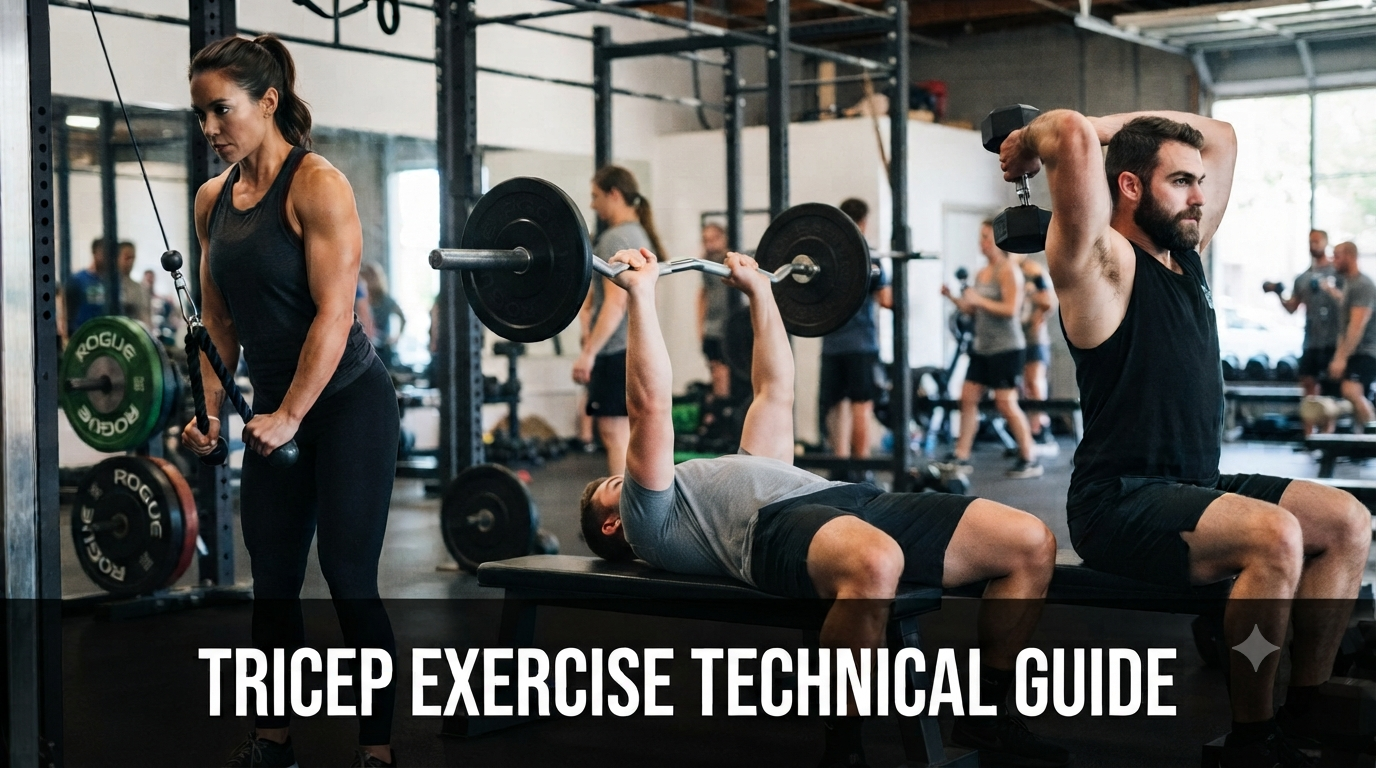
Master Your Tricep Development: The Complete Guide to Upper-Arm Strength
Building impressive, functional arms is only half the battle until you master the triceps, which make up roughly two-thirds of your upper arm's mass. This comprehensive guide breaks down the technical execution of the most effective tricep movements, ranging from heavy, compound pressing motions that build foundational thickness to precision isolation exercises that target each of the three distinct heads. By mastering the precise biomechanics of elbow extension and optimizing your shoulder positioning, you can maximize motor unit recruitment, enhance your mind-muscle connection, and ensure consistent, injury-free growth for a balanced, powerful physique.
Ready to start with a Personal Trainer in Port Melbourne? Book an introductory two-session free trial with Nick Hall Body Transformations today to start your personalized training program tailored to your goals.
Cable Tricep Pushdown
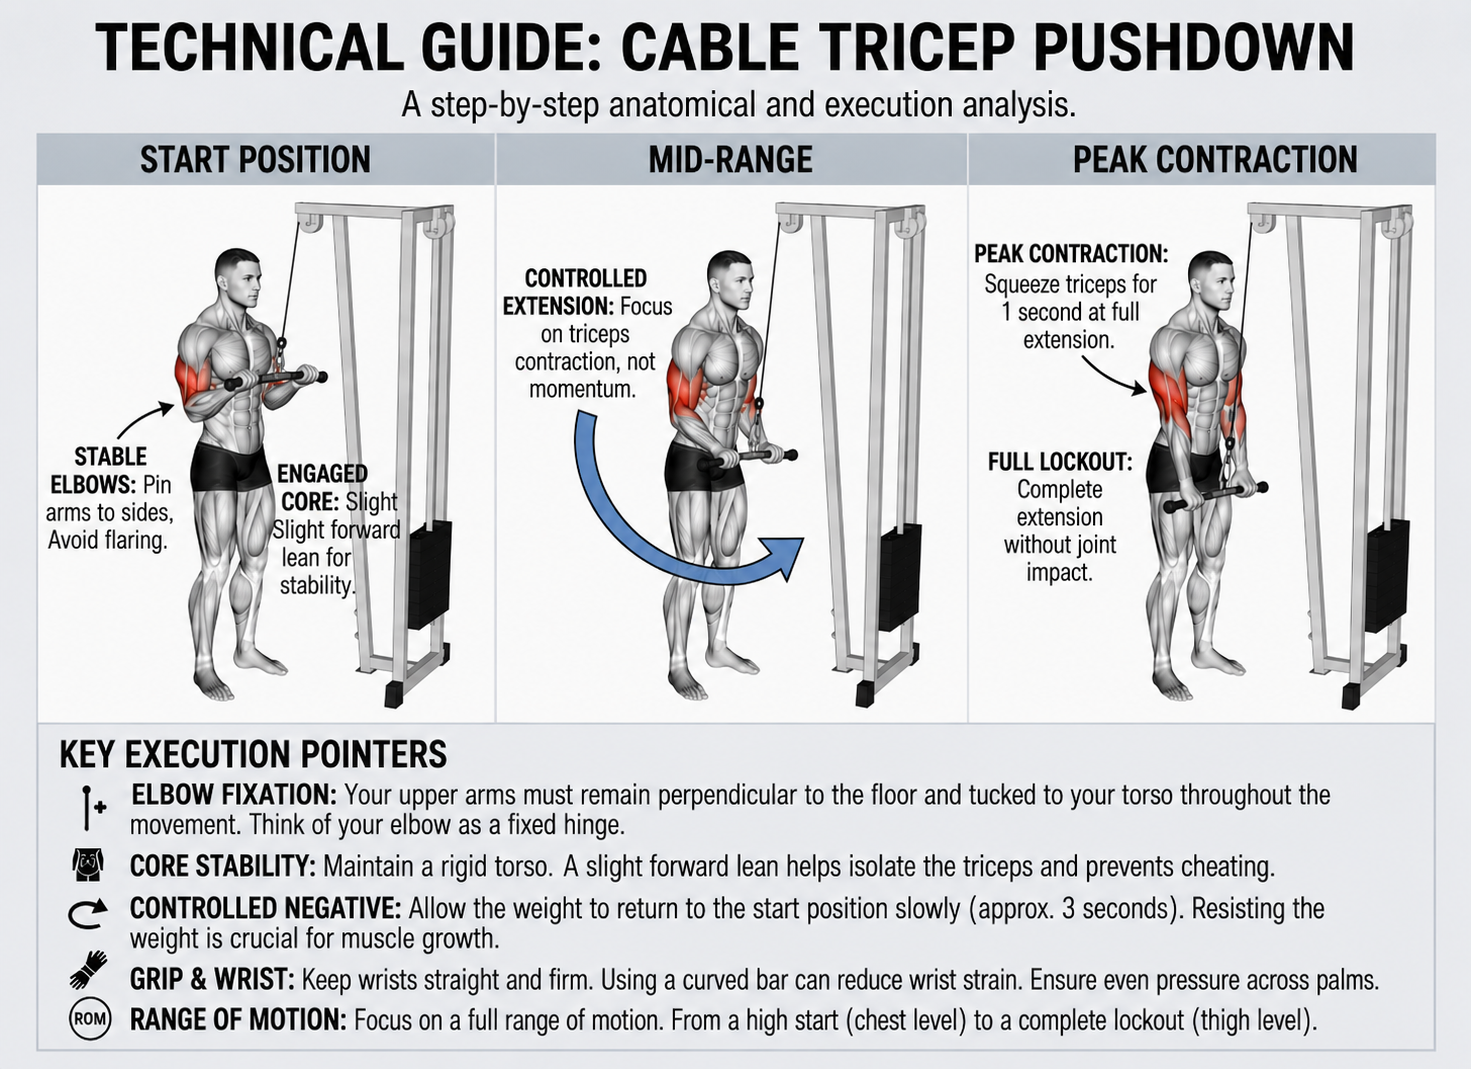
The cable tricep pushdown is a foundational isolation exercise. Its primary benefit is providing constant tension throughout the entire range of motion, which is difficult to achieve with free weights. When performed with a straight or cambered bar, it is highly effective at targeting the lateral head of the triceps.
Setup and Positioning
Attachment: Secure a straight or angled bar to a high-pulley cable machine.
Stance: Stand facing the machine with your feet shoulder-width apart. Maintain a slight, stable bend in your knees.
Torso Angle: Lean forward slightly at the hips. This stable, slightly inclined position allows you to handle more weight without being pulled off balance by the cable.
Elbow Placement: This is the most critical technical detail. Lock your elbows into your sides. They should act as a hinge joint and remain pinned to your rib cage throughout the entire movement. Imagine a bolt passing through your elbows and into your torso; they should not migrate forward or backward.
Execution
The Starting Position: Begin with your hands at approximately upper-chest height. Your forearms should be at an angle slightly greater than 90 degrees relative to your upper arms.
The Descending Phase: Push the bar downward by extending your elbows. Focus on moving only your forearms. Keep your wrists straight and firm; do not allow them to cock backward.
The Contraction: At the bottom of the movement, fully extend your arms until they are locked out. Squeeze your triceps hard for a one-second pause.
The Return (Eccentric): Control the weight on the way up. Allow the bar to return to the starting position in a slow, controlled manner (aim for 2 seconds up). Stop the upward movement before your forearms hit your biceps—maintaining tension at the top is key.
Common Technical Errors to Avoid
Elbow Migration: If your elbows drift forward as you push down, you are incorporating your shoulders and lats, taking the tension off the triceps.
Momentum/Swinging: Using your body weight to "heave" the bar down indicates the weight is too heavy. The movement should be strictly controlled.
Wrist Involvement: Allowing the wrists to curl or flex can strain the joint and reduce the focus on the tricep muscles.
Incomplete Range of Motion: Failing to fully lock out at the bottom or letting the weight stack "rest" at the top loses the benefits of constant tension.
Cable Tricep Pushdown (Rope)
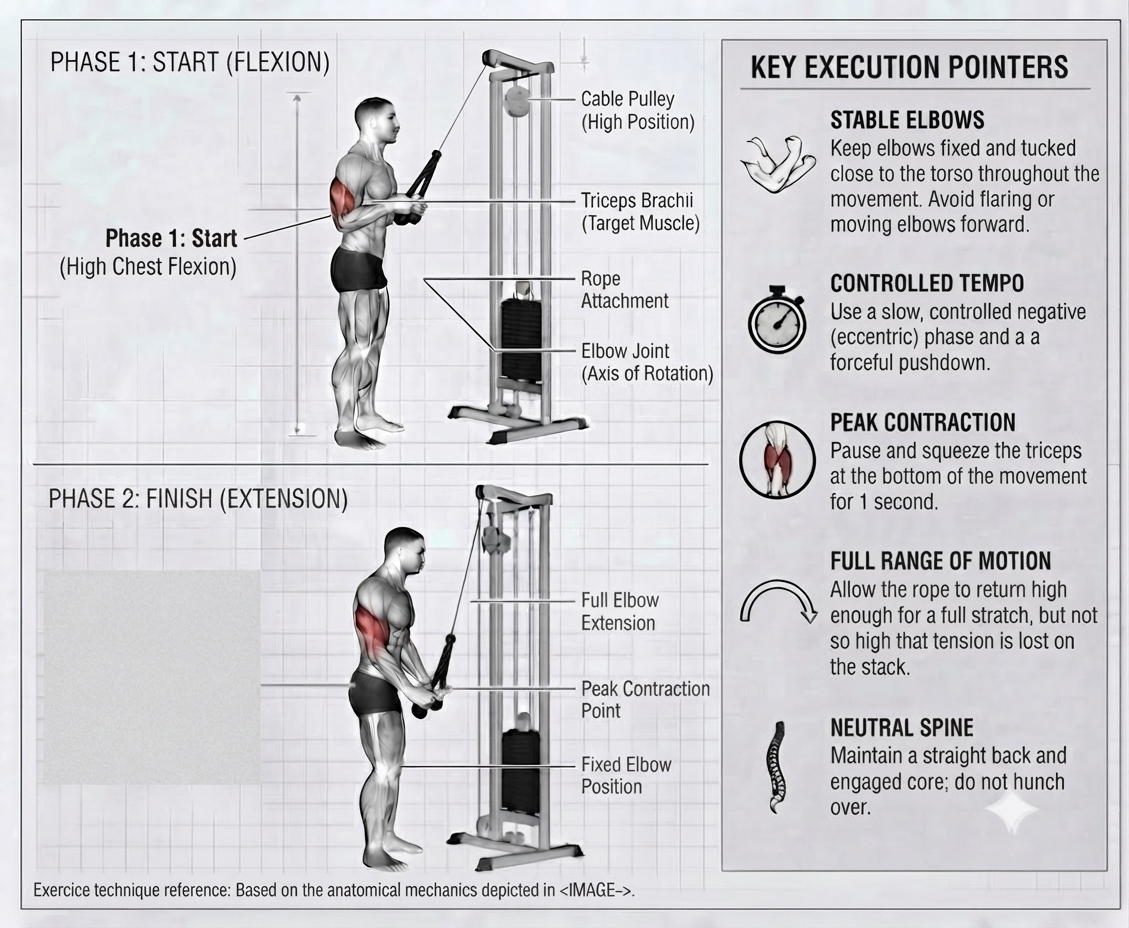
The rope attachment changes the mechanics of the standard pushdown by allowing for a greater range of motion and an enhanced contraction. While the straight bar limits your hands to a fixed path, the rope allows you to "split" or "flare" the handles at the bottom of the movement, which encourages a deeper contraction and often feels more natural for the wrists.
Setup and Positioning
Attachment: Secure a long tricep rope to a high-pulley cable machine.
Stance: Adopt a stable, hip-width stance. You can choose to stand square to the machine or take a slight staggered stance for added stability if using heavier loads.
Torso Angle: Lean slightly forward from the hips to provide a clear path for the rope to travel.
Elbow Placement: Similar to the straight bar variation, your elbows should remain tucked at your sides. Avoid the tendency to let the elbows drift forward as you fatigue.
Execution
The Starting Position: Grip the rope ends with your palms facing each other (neutral grip). Start with your hands near your upper chest, elbows pinned to your ribcage.
The Descending Phase: Push your hands down toward your thighs. Keep your elbows strictly locked in place.
The "Split" (The Key Difference): As your arms approach full extension, actively pull the ends of the rope apart. This outward pull forces a maximum contraction of the triceps, particularly emphasizing the lateral head.
The Contraction: Once the arms are fully extended and the rope ends are pulled apart, hold the squeeze for one full second.
The Return (Eccentric): Resist the cable on the way up. Allow your forearms to travel back to the starting position in a controlled motion (2 seconds up), ensuring the rope does not pull your elbows forward.
Common Technical Errors to Avoid
"Rowing" the Weight: A common mistake is pulling the elbows backward as if performing a row, rather than isolating the triceps through elbow extension.
Wrist Rotation: Avoid twisting your wrists excessively during the movement. Keep your hands neutral, and only focus on the outward flare of the rope ends at the very bottom.
Limited Range: Many trainees stop before the arms are fully locked out, missing out on the peak contraction that the rope attachment specifically allows.
Overhead Rope Tricep Extensions
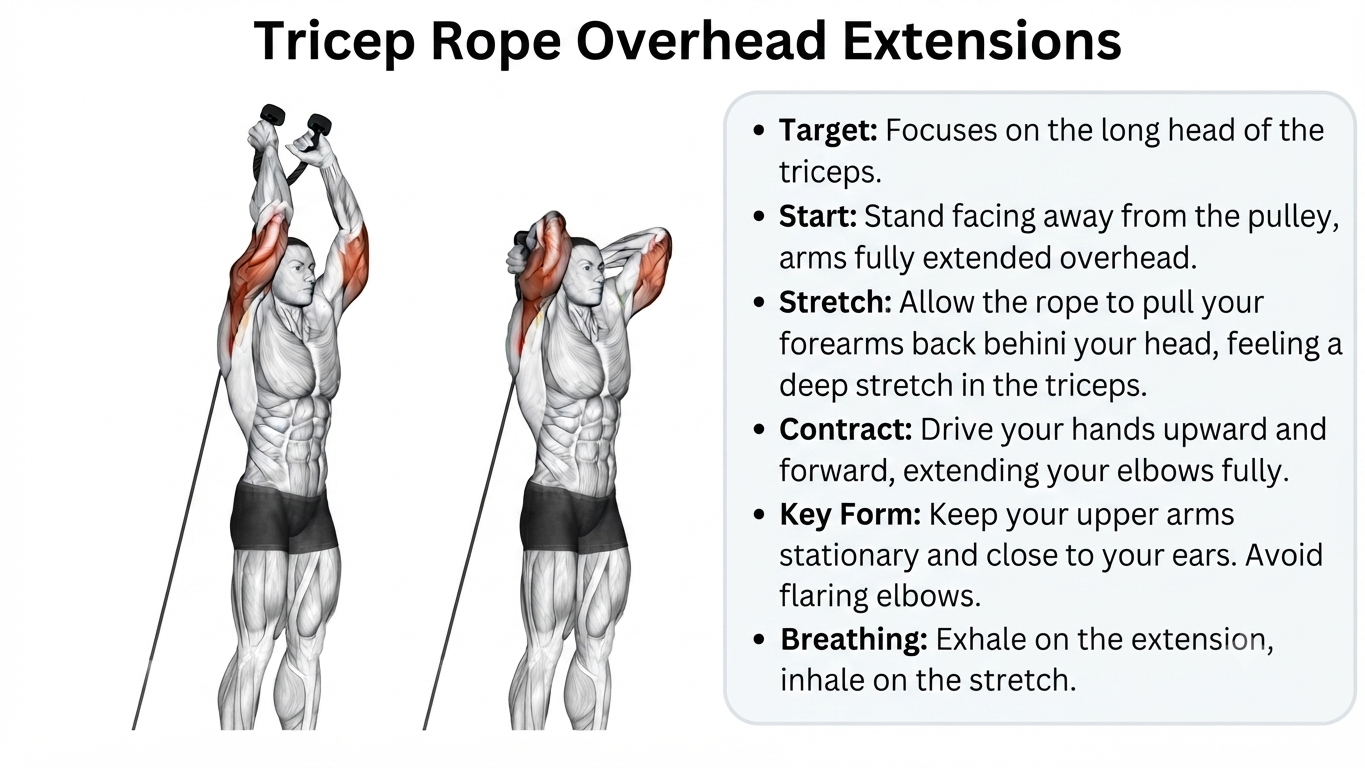
The overhead rope extension is a premier movement for targeting the long head of the triceps. By positioning the arm overhead, you place the long head in a stretched (lengthened) position, which is biomechanically superior for hypertrophy. This movement requires strict control to ensure the tension remains on the triceps rather than the shoulders or lower back.
Setup and Positioning
Attachment: Secure a long rope to a low-pulley cable machine.
Stance: Stand facing away from the cable machine. Take a staggered stance (one foot in front of the other) for balance.
The Start: Reach back and grab the rope ends, bringing your hands overhead. Your upper arms should be positioned alongside your ears, pointing straight up toward the ceiling.
Torso Angle: Keep your spine neutral and your core braced. Avoid excessive arching of the lower back; if you find yourself arching to get the rope overhead, you may need to step slightly further away from the machine.
Execution
The Descending Phase (The Stretch): Allow your forearms to fold back behind your head. Focus on keeping your upper arms stationary—they should not move forward or backward. You should feel a deep, intense stretch in the back of your arms.
The Pressing Phase: Drive your hands upward by extending your elbows. Focus on "reaching" toward the ceiling rather than just pushing the weight.
The Contraction: Extend your arms fully until your elbows are locked out. Keep your palms facing each other (neutral grip) throughout the movement.
The Return (Eccentric): Slowly return to the starting position, taking 2–3 seconds to feel the stretch again. Do not rush the eccentric phase, as this is where the long head does its most productive work.
Common Technical Errors to Avoid
Moving Elbows: The most common mistake is allowing the elbows to flare outward or swing forward during the movement. If your elbows move, you are recruiting the shoulders.
Arching the Back: If your lower back is rounding or excessively arching, your core is not engaged. Tighten your abdominals to lock your ribcage in place.
Cutting the Range: Stopping the movement halfway to avoid the deep stretch misses the specific benefit of this exercise.
Reverse Single-Arm Tricep Pulldown
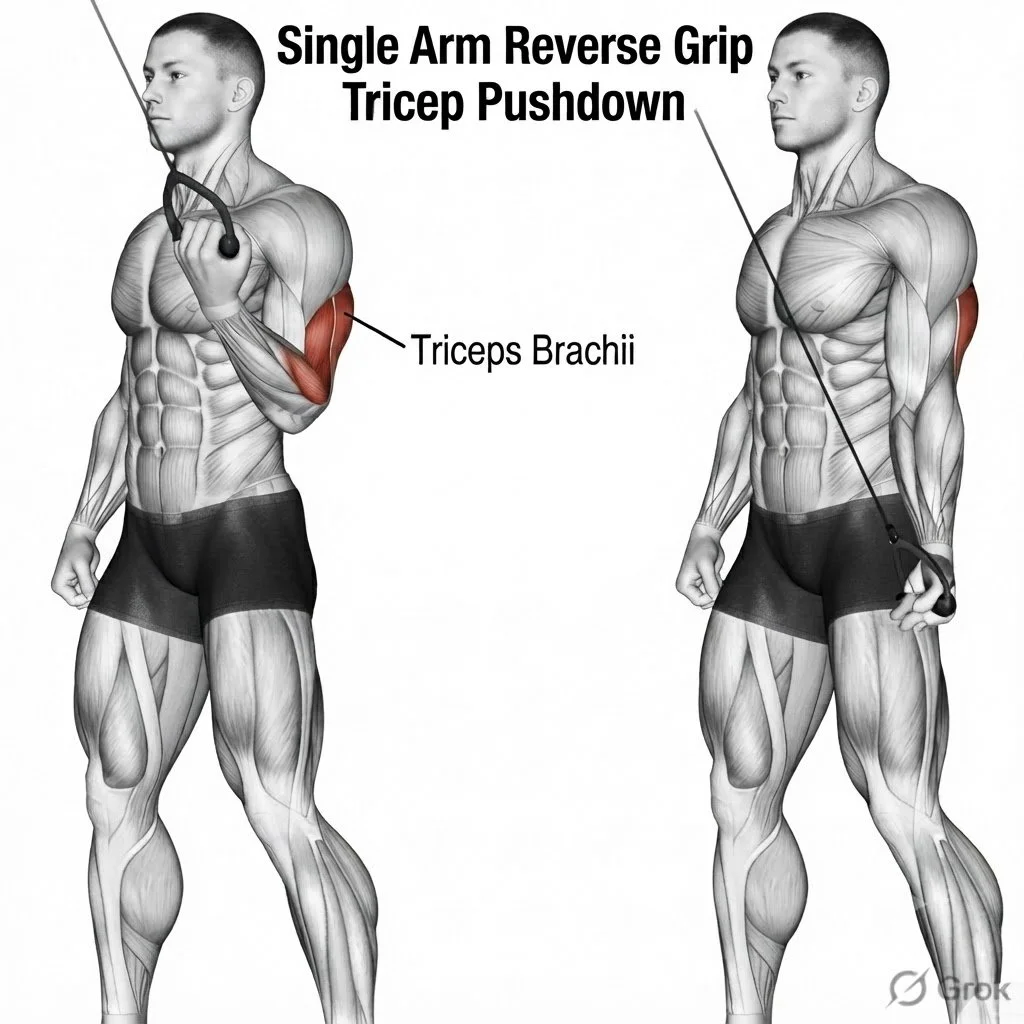
The reverse (supinated) grip pulldown is a specialized variation that provides a unique stimulus to the triceps. By rotating the palm to face upward (supination), you alter the mechanics of the joint and potentially place a greater emphasis on the medial and lateral heads. This exercise is excellent for addressing muscle imbalances since you are working one arm at a time.
Setup and Positioning
Attachment: Use a single-handle D-grip attachment on a high-pulley cable machine.
Stance: Stand facing the machine. Take a shoulder-width stance and maintain a slight, athletic lean forward at the hips to keep your center of gravity stable.
The Grip: Reach up and grasp the handle with an underhand (supinated) grip. Your palm should be facing the ceiling throughout the entire movement.
Elbow Placement: Anchor your elbow firmly against the side of your ribcage. Like the standard pushdown, the elbow must act as a fixed hinge.
Execution
The Starting Position: Begin with your hand at roughly shoulder height. Your forearm should be angled toward the opposite side of your body or straight down depending on your shoulder comfort.
The Descending Phase: Drive your hand downward by extending your elbow. As you descend, maintain that underhand palm-up orientation.
The Contraction: Extend your arm fully until your elbow is locked. Because of the supinated grip, you may notice a more intense "squeeze" in the lower portion of the tricep. Hold this for a one-second pause.
The Return (Eccentric): Under full control, allow the cable to pull your hand back to the starting position. Ensure your palm remains facing up the entire time.
Common Technical Errors to Avoid
Rotating the Wrist: Do not allow your palm to rotate toward the floor (pronation) as you push down. The benefit of this exercise is the specific supinated position.
Shoulder Involvement: If you find your shoulder shrugging or your entire torso moving with the weight, the load is too heavy. Keep the shoulder blade packed down and back.
Bicep Assistance: By keeping the wrist supinated, you naturally reduce the involvement of the elbow flexors. If you feel your bicep engaging, check that your wrist isn't "curling" the weight.
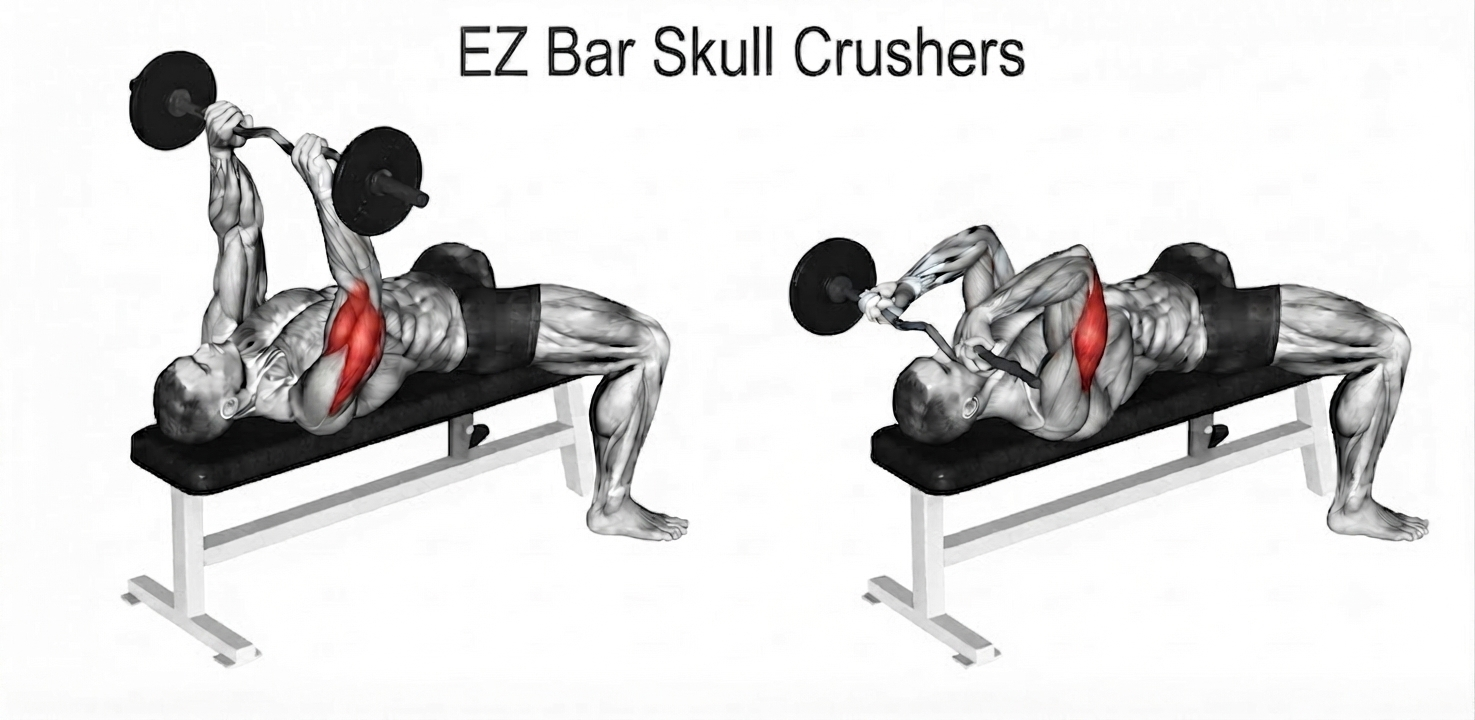
Skull Crushers (Lying Tricep Extensions)
The skull crusher is arguably the most effective "mass-builder" for the triceps. By moving the weight in an arc over the head, it places the triceps under significant load in the stretched position. While commonly performed with an EZ-curl bar or straight bar, it can also be performed with dumbbells to allow for a more natural path of motion and reduced wrist strain.
Setup and Positioning
Equipment: Use an EZ-curl bar (or dumbbells) and a flat or slightly decline bench.
Lying Position: Lie flat on the bench with your head near the edge. Plant your feet firmly on the floor to create a stable base.
The Start: Press the bar (or dumbbells) up toward the ceiling so they are directly above your shoulders.
Elbow Position: This is critical: Align your elbows so they are pointing toward the ceiling and remain fixed in that spot. Do not let them drift outward (flare) or move back toward your head as you lower the weight.
Execution
The Descending Phase (The Stretch): With your upper arms perfectly vertical, bend your elbows to lower the weight in a controlled arc toward your forehead (or slightly behind your head for a deeper stretch). Stop when your forearms are roughly parallel to the floor or slightly below.
The Pressing Phase: Drive the weight back up by extending your elbows. Focus entirely on the triceps; do not use your shoulders to help "swing" the weight up.
The Contraction: Stop just short of full lockout to keep constant tension on the triceps, or lock out if your goal is maximal peak contraction.
Common Technical Errors to Avoid
Moving the Upper Arms: The most common mistake is allowing the elbows to travel backward or forward during the movement. If your upper arms move, the tension shifts from the triceps to the lats and shoulders.
Wrist Extension: Keeping the wrists straight is essential. If you allow your wrists to bend backward under the weight, you risk significant joint pain and reduced muscle recruitment.
Too Much Weight: Because this is an isolation movement, ego-lifting is a major cause of injury. Use a weight that allows for a strict, 2-second eccentric (lowering) phase.
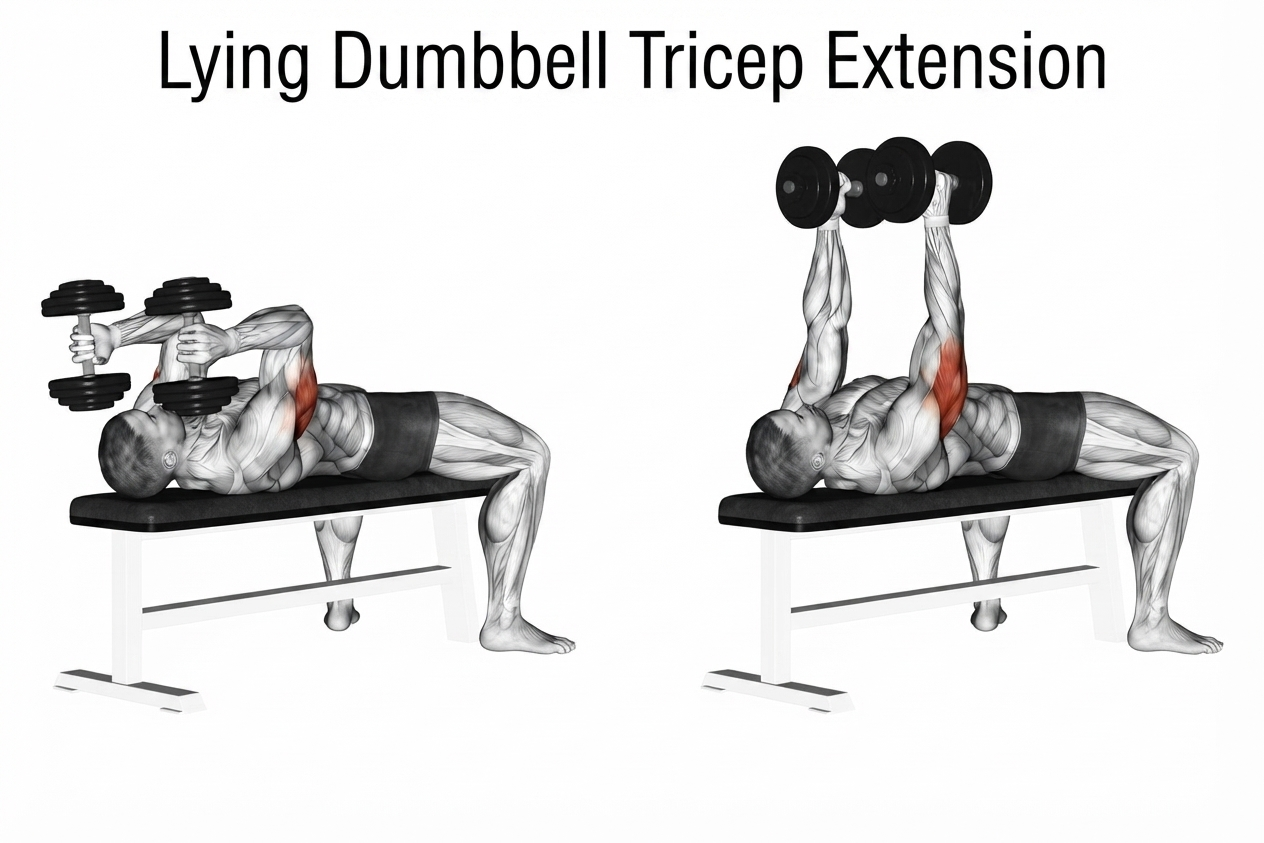
Lying Tricep Dumbbell Extensions
Lying tricep dumbbell extensions (often called "Dumbbell Skull Crushers") are a fantastic variation for two main reasons: they allow for individual arm path freedom, which is much friendlier on the elbows and shoulders than a fixed barbell, and they enable a neutral grip position, which is often more comfortable for many lifters.
Setup and Positioning
Equipment: A pair of dumbbells and a flat bench.
Lying Position: Lie flat on the bench, ensuring your upper back and head are supported. Plant your feet firmly on the ground to provide a stable foundation.
The Start: Press the dumbbells toward the ceiling, directly over your shoulder joints.
Grip and Elbows: Keep your palms facing each other (neutral grip). Position your elbows so they are pointing straight toward the ceiling. Crucial: Keep your elbows tucked in—do not let them flare outward as you lower the weights.
Execution
The Descending Phase: Keeping your upper arms perfectly vertical (stationary), hinge only at the elbows to lower the dumbbells toward the sides of your head. Aim to stop just beside your ears.
The Stretch: At the bottom, you should feel a deep stretch in the long head of the tricep. Do not rush this transition; control the weight on the way down.
The Pressing Phase: Drive the dumbbells back up to the starting position by extending your elbows. Focus on pushing with the meaty part of your palms.
The Top Position: Stop the movement just before your arms lock out completely to maintain constant muscular tension, or fully lock out if you prefer to emphasize the peak contraction.
Common Technical Errors to Avoid
"Ghost" Elbows: The most common error is letting the elbows drift backward or forward. If they move, the load is transferred from your triceps to your shoulders and chest.
Allowing the Dumbbells to Touch: Do not bang the dumbbells together at the top. Keep them parallel throughout the movement.
Wrist Fatigue: Because you are holding dumbbells, you need to actively stabilize your wrists. Do not let the weights "flop" backward; keep your knuckles facing the ceiling.
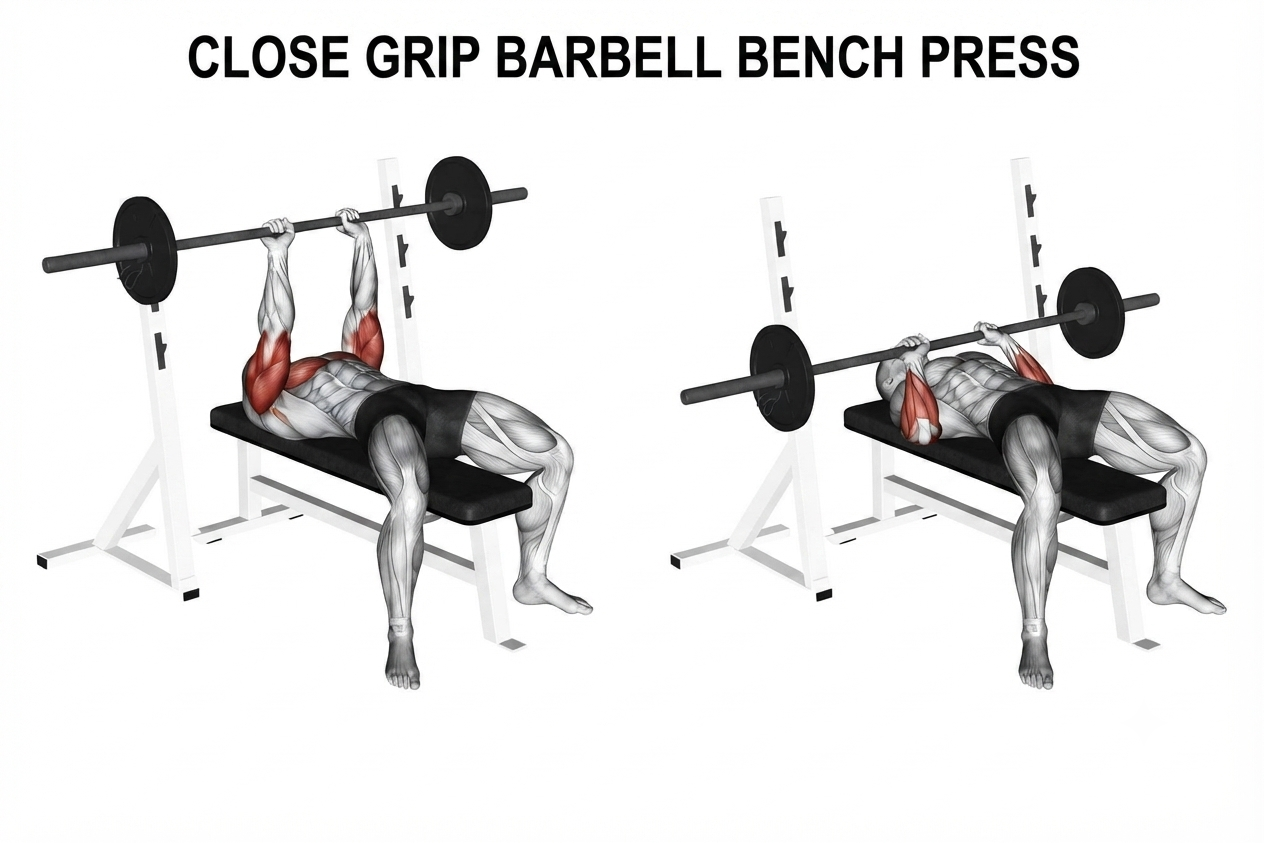
Barbell Close-Grip Bench Press
The Barbell Close-Grip Bench Press is the king of tricep compound movements. By bringing your hands closer together than in a standard bench press, you significantly increase the range of motion at the elbow and decrease the involvement of the pectorals, making the triceps the primary movers. This exercise allows for the heaviest loading of all tricep movements, making it essential for overall mass and strength.
Setup and Positioning
Grip Width: Lie on a flat bench and grasp the barbell with your hands spaced roughly shoulder-width apart. A common mistake is going too narrow (e.g., touching index fingers), which can place unnecessary strain on the wrists and shoulders. Shoulder-width is the "sweet spot" for tricep recruitment without compromising stability.
Arch and Foundation: Maintain a slight natural arch in your lower back, keep your glutes on the bench, and plant your feet firmly on the floor.
Shoulder Blades: Retract and depress your scapulae (pull your shoulder blades back and down) to create a stable platform.
Execution
The Descent: Lower the bar toward the lower part of your chest or your upper abdominals.
Elbow Path: As you lower the bar, keep your elbows tucked in toward your body. They should track alongside your torso, not flare out to the sides. This elbow-tuck is what differentiates this move from a standard chest press and shifts the mechanical burden onto the triceps.
The Bottom Position: Pause for a brief second when the bar touches your chest. Do not bounce the bar off your torso.
The Drive: Press the bar upward by extending your elbows. Focus on pushing the bar in a straight vertical line.
Lockout: Squeeze your triceps hard at the top of the movement.
Common Technical Errors to Avoid
Elbow Flare: Allowing your elbows to flare out at a 45-degree angle or wider turns the movement back into a chest-dominant press.
Grip Too Narrow: A grip that is too narrow increases the risk of wrist injury and limits your ability to stabilize the barbell.
Shoulder Compensation: If you feel the movement in your front delts rather than your triceps, ensure your shoulder blades remain retracted throughout the set.
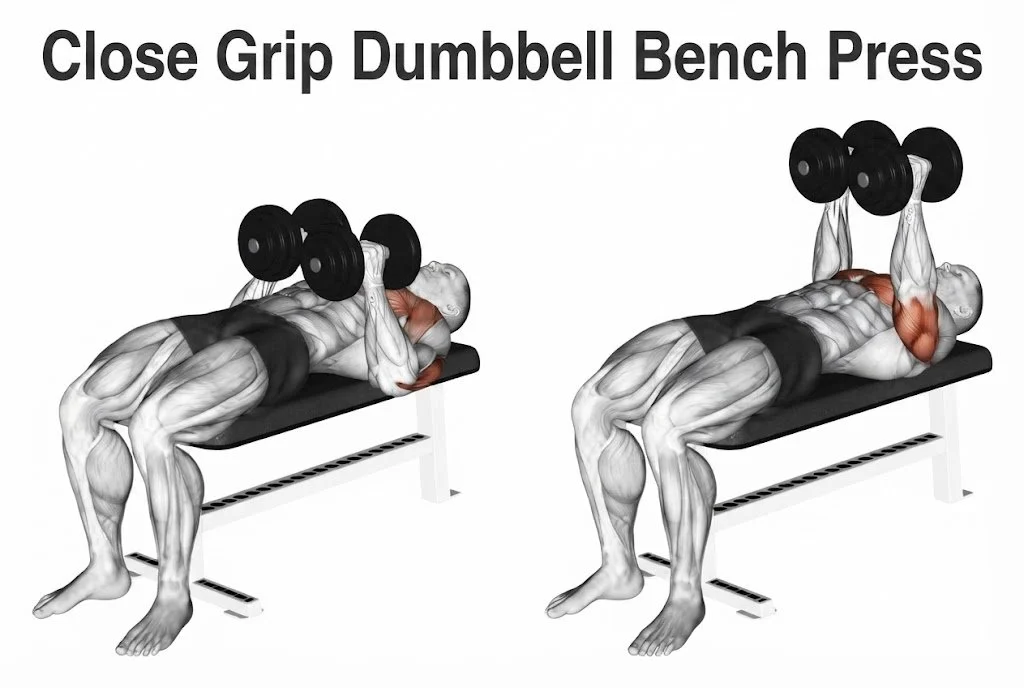
Technical Guide: Dumbbell Close-Grip Bench Press
The dumbbell version of the close-grip press offers two distinct advantages over the barbell version: it increases the range of motion (as the dumbbells can travel lower than a bar) and, as we discussed previously, it allows you to maintain a neutral grip, which is often more ergonomic for the wrists and shoulders.
Setup and Positioning
Equipment: A pair of dumbbells and a flat bench.
The Start: Lie flat on the bench. Press the dumbbells up so they are directly over your shoulder joints.
Grip Alignment: Turn your hands so your palms are facing each other (neutral grip).
Proximity: Bring the dumbbells together so they are touching (or nearly touching) throughout the entire movement. Keeping them pressed together creates an isometric contraction in your chest, but the primary focus remains on the triceps.
Execution
The Descent: Lower the dumbbells toward your lower chest or upper abdomen. Keep your elbows tucked in close to your torso—do not let them flare out.
The Stretch: Continue lowering the weights until you feel a solid stretch in the triceps. Because there is no bar to stop the weights against your chest, you can achieve a deeper stretch than with the barbell.
The Drive: Press the dumbbells back to the starting position by extending your elbows. Focus on using your triceps to "push" the weights up.
The Lockout: Fully extend your arms at the top and give your triceps a hard squeeze.
Common Technical Errors to Avoid
Losing the "Squeeze": Many people allow the dumbbells to drift apart during the ascent. You must keep the weights pressed firmly together; this constant pressure helps maintain the focus on the triceps.
Flaring the Elbows: Even with dumbbells, the urge to flare the elbows to use the chest is high. Remind yourself to "lead with the elbows" tucked toward your ribcage.
Fast Eccentric: Don't let the weights drop. Control the lowering phase to maximize time under tension.
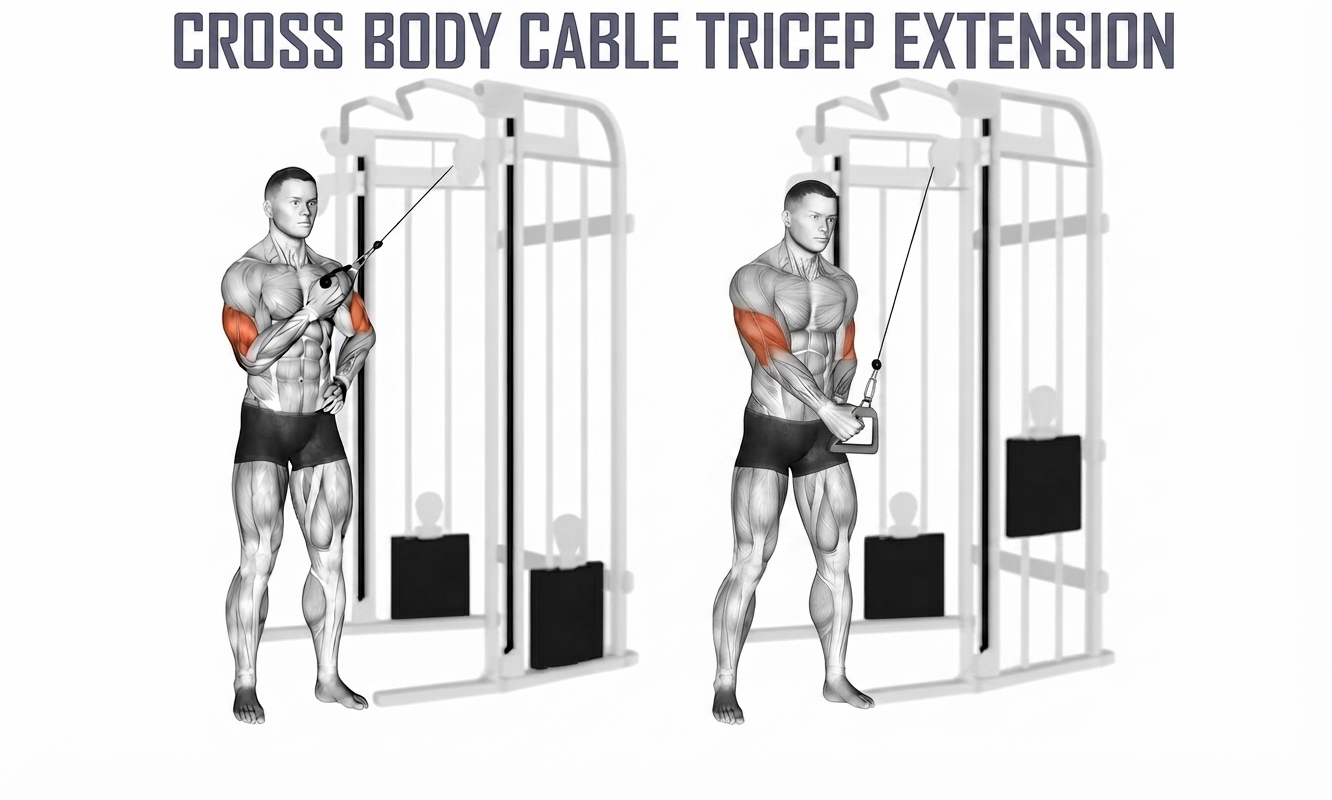
Cross-Body Cable Tricep Extension (Single Arm)
The cross-body cable extension is an excellent isolation movement because it aligns the cable's line of pull with the path of the tricep fibers, particularly the long head. By reaching across your body, you can achieve a unique angle of tension that is difficult to replicate with standard pushdowns.
Setup and Positioning
Attachment: Use a single-handle D-grip attachment on a high-pulley cable machine.
Stance: Stand side-on to the cable machine. For example, if working your right arm, your left side should be closest to the pulley.
The Starting Position: Reach across your body and grab the handle with your right hand. Your right elbow should be tucked toward your torso, and your hand should start near your left shoulder/upper chest.
Body Angle: Stand tall with a slight hinge at the hips. Keep your core braced to prevent your torso from rotating with the weight.
Execution
The Descending Phase: Push the handle down and across your body by extending your right elbow. Imagine drawing a diagonal line from your left shoulder toward your right hip.
The Contraction: As your arm reaches full extension, ensure your elbow is completely locked. Squeeze the tricep hard—you should feel a deep contraction specifically along the outer side of the back of your arm.
The Return (Eccentric): Resist the cable on the way up, allowing the weight to pull your hand back toward your opposite shoulder. Control this phase, maintaining constant tension in the tricep.
Common Technical Errors to Avoid
Torso Rotation: The most common mistake is rotating your chest to "follow" the handle as you push down. Your torso should remain fixed; only your forearm should move.
Arm Path: If you push the handle straight down rather than across your body, you lose the specific benefits of this angle. Keep that diagonal trajectory.
Using Momentum: Using your body weight or shoulder to jerk the weight down negates the isolation. Keep the movement slow and deliberate.
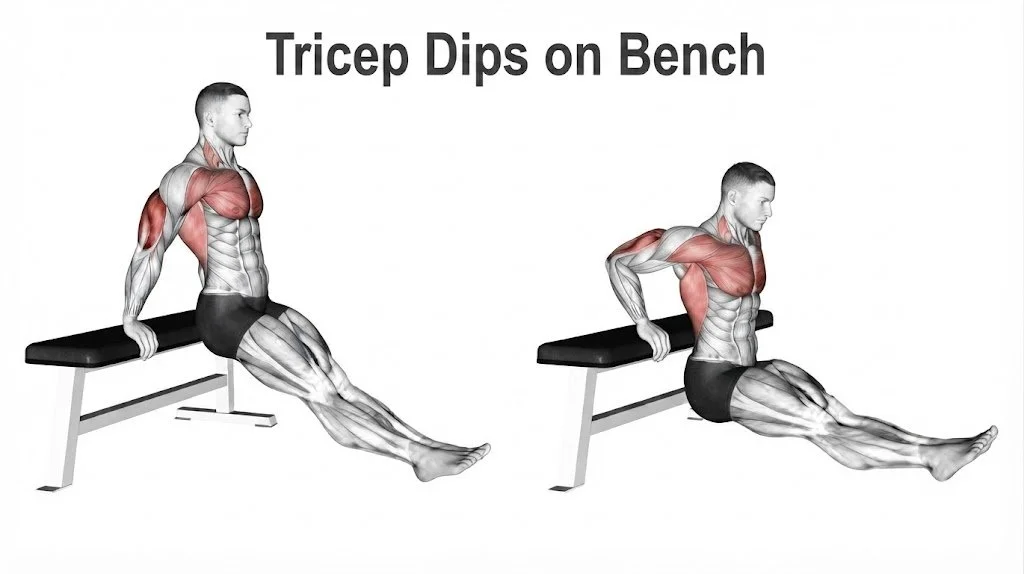
Tricep Dips on Bench
The bench dip is a highly accessible compound movement that allows you to use your own body weight to target the triceps. While it is often performed with feet on the floor, it effectively recruits the medial and lateral heads and is a great finisher to exhaust the triceps after heavy pressing work.
Setup and Positioning
Equipment: A sturdy bench or a box of similar height.
Starting Position: Sit on the edge of the bench and place your hands just outside your hips, palms flat on the edge, fingers pointing forward.
Body Placement: Shift your weight forward until your glutes are off the bench, supporting your body with your arms. Walk your feet out until your legs are extended (or keep knees bent for an easier version).
Posturing: Keep your back close to the bench. Avoid leaning too far forward; your torso should remain relatively upright to ensure the triceps, rather than the shoulders or chest, do the work.
Execution
The Descending Phase: Slowly lower your hips toward the floor by bending your elbows. Keep your elbows pointed backward—do not let them flare out to the sides.
The Depth: Continue lowering until your shoulders are just below your elbows. You should feel a stretch in the triceps and a slight tension in the front of your shoulders.
The Drive: Push back up to the starting position by extending your elbows. Focus on using your triceps to drive your body upward.
The Lockout: Fully extend your arms at the top, squeezing your triceps, but avoid "locking" the joint with an aggressive snap.
Common Technical Errors to Avoid
Distance from Bench: If your hips drift too far away from the bench, you place unnecessary and potentially harmful stress on the shoulder joint. Keep your back as close to the bench as possible.
Elbow Flare: Letting your elbows point outward turns this into a wider-angle press, which is less effective for the triceps and harder on the shoulders.
Shoulder Shrugging: Keep your shoulder blades depressed (down away from your ears). Do not allow your shoulders to "rise" up toward your ears during the descent.
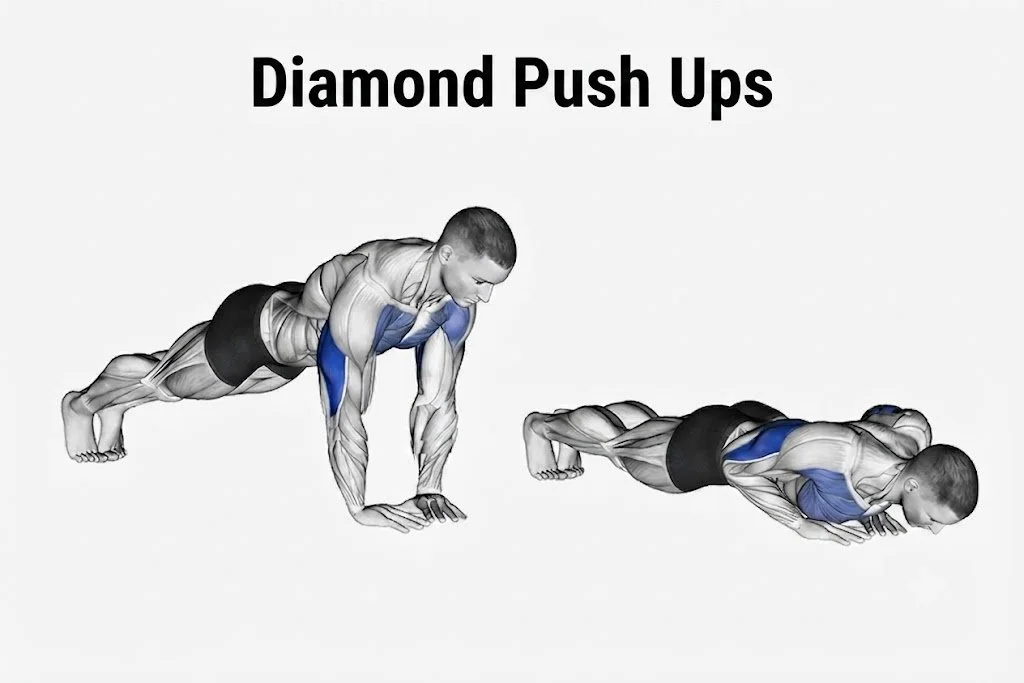
Diamond (Triangle) Push-Ups
The Diamond Push-Up is a classic bodyweight movement that forces a shift in mechanical load away from the chest and onto the triceps. By narrowing the hand placement, you force your elbows to stay tucked, creating a massive amount of internal tension in the tricep complex.
Setup and Positioning
Hand Placement: Start in a standard high-plank position. Place your hands together under the center of your chest so that your index fingers and thumbs form a diamond or triangle shape.
Body Alignment: Maintain a rigid "plank" line from your head to your heels. Engage your glutes and core to ensure your lower back doesn't sag.
Head Position: Keep your head in a neutral position, looking slightly ahead of your hands.
Execution
The Descending Phase: Lower your body toward your hands in a slow, controlled manner. Keep your elbows tucked in close to your ribcage as they bend—do not let them flare out to the sides.
The Depth: Continue until your chest is just an inch or two above your hands. You will feel a significant amount of tension building in your triceps.
The Drive: Press your body back up to the starting position by forcefully extending your elbows.
The Top Position: Fully lock out your arms at the top, squeezing your triceps for a brief second before beginning the next repetition.
Common Technical Errors to Avoid
Excessive Elbow Flare: If your elbows point outward like "chicken wings," the stress moves from your triceps to your shoulders. Keep them tracking alongside your torso.
Sagging Hips: Letting your lower back arch is a sign of core fatigue. If you cannot maintain a straight line, elevate your hands on a bench or sturdy box to make the movement slightly easier while maintaining strict form.
Incomplete Range of Motion: Many people perform "half-reps" because this exercise is difficult. It is better to do 5 perfect, full-range reps than 15 shallow, poor-quality reps.
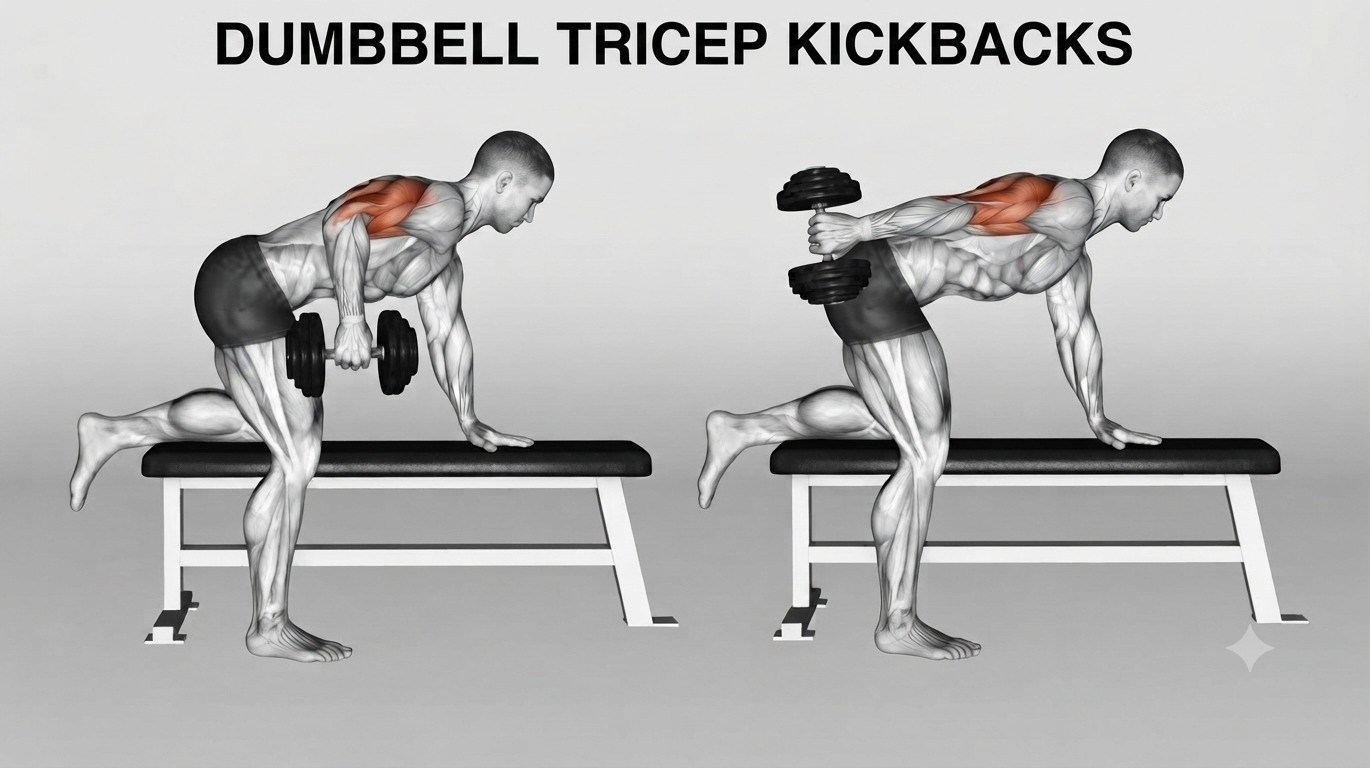
Dumbbell Tricep Kickback
The dumbbell tricep kickback is a unique isolation exercise because it places the tricep under its greatest load when the muscle is in a fully shortened (contracted) position. Unlike pushdowns, where the tension is consistent, the kickback provides a distinct peak contraction for the long head, provided the arm remains fixed throughout the movement.
Setup and Positioning
Equipment: A single light-to-moderate dumbbell and a flat bench (or any stable surface for support).
Stance: Stand beside the bench, placing your opposite knee and hand on the surface for support. Keep your back flat and parallel to the floor.
Arm Position: Hold the dumbbell with a neutral grip. Bring your working arm up so that your upper arm is parallel to the floor. Your elbow should be pinned against your side. This is your "anchor" point.
Execution
The Starting Position: With your elbow tucked, your forearm should hang toward the floor at roughly a 90-degree angle to your upper arm.
The Extending Phase: Keeping your upper arm completely stationary, kick the dumbbell backward by extending your elbow. Imagine you are trying to push your hand toward the wall behind you.
The Contraction: At the top of the movement, your arm should be fully straightened and parallel to the floor. Squeeze your tricep hard at this peak position for a full second.
The Return (Eccentric): Slowly return the weight to the starting position, controlling the descent to roughly 2 seconds. Keep the elbow "locked" in that high position the entire time.
Common Technical Errors to Avoid
"Swinging" the Elbow: This is the most common mistake. If your elbow drops or swings forward as you move the weight, you lose the isolation. The upper arm must be a fixed lever.
Using Momentum: Using your shoulder to "swing" the weight up renders the exercise ineffective. If you need to swing, the weight is too heavy—kickbacks are an isolation movement meant for lighter loads and strict control.
Rounding the Back: Keep your core engaged and your spine neutral to protect your lower back while in the bent-over position.
Mastering Your Physique: A Commitment to Technical Excellence
Building a powerful, balanced physique is a journey of precision, requiring not just hard work, but a deep understanding of the biomechanics behind every movement. By integrating these technical insights—from the heavy compound lifts that build foundational mass to the strategic isolation work that sculpts specific muscle heads—you are well on your way to maximizing your physical potential.
This tricep guide is the perfect complement to your existing technical repertoire. Be sure to revisit the detailed protocols in your Back Exercises Guide, Leg Exercises Guide, Chest Exercises Guide, Shoulder Exercise Guide and Bicep Exercises Guide to ensure every training session is optimized for performance and growth. Consistent application of these techniques is the ultimate key to injury-free, sustainable progress.
Take the Next Step with Expert Coaching
Ready to turn this theory into tangible results? Whether you prefer hands-on training or a structured digital approach, I have the tools to help you succeed:
Book your two-session free trial in Port Melbourne: Experience personalized, one-on-one coaching with Nick Hall Body Transformations, where we tailor every set and rep to your unique physiology and goals.
Join my Online Training Program: Get elite-level guidance, customized programming, and technical support delivered directly to you, no matter where you are in the world.
Let’s refine your training, sharpen your technique, and build the strongest version of yourself.