Master Your Leg Day: The Complete Guide to Lower-Body Strength
Building powerful, resilient legs is the foundation of any elite strength program, whether you are training for sports performance, injury prevention, or general fitness. This comprehensive guide breaks down the technical execution of the most effective lower-body movements, from foundational squats to advanced posterior chain variations. By mastering the precise mechanics of these exercises, you can maximize muscle activation, improve your movement efficiency, and ensure long-term progress safely and effectively.
Ready to start with a Personal Trainer in Port Melbourne? Book in an introductory two session free trial with Nick Hall Body Transformations today to start your personalized training program tailored to your goals.
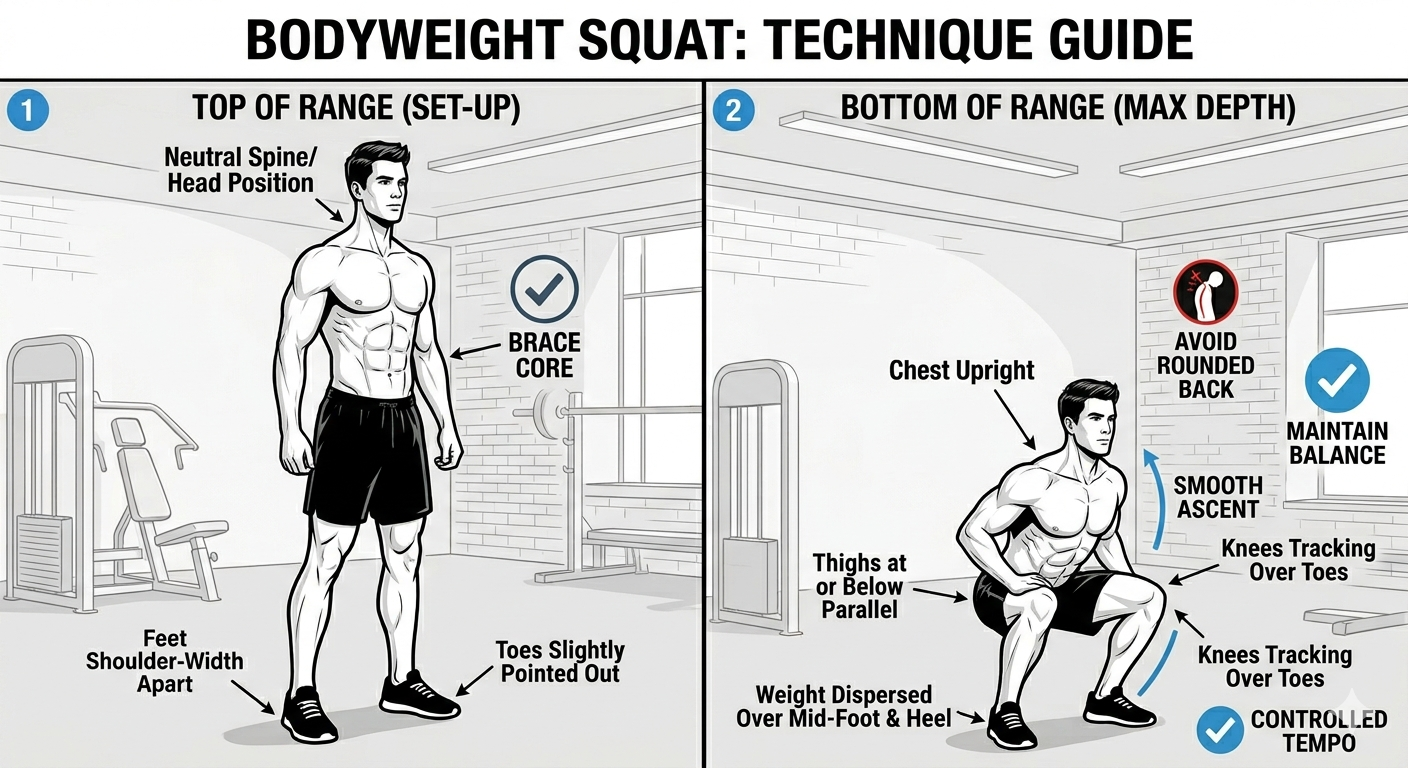
Bodyweight Squat: Technique Guide
The bodyweight squat is the foundational movement for all lower-body training. It is the perfect exercise to master your mechanics before adding external weight.
How to Execute
Stance: Stand with your feet slightly wider than shoulder-width apart, with your toes pointed slightly outward.
The Descent: Initiate the movement by pushing your hips back and down as if sitting into an invisible chair. Keep your chest upright and your gaze fixed forward.
The Depth: Lower yourself until your thighs are at least parallel to the floor, ensuring your knees track in line with your toes.
The Ascent: Drive through your mid-foot and heels to return to the starting position, squeezing your glutes at the top.
Pro Tips for Success
Maintain Balance: Keep your weight distributed evenly across your entire foot; avoid lifting your heels off the ground.
Core Engagement: Keep your core braced throughout the movement to maintain a neutral spine.
Controlled Motion: Focus on a smooth, controlled descent rather than dropping quickly into the bottom position.
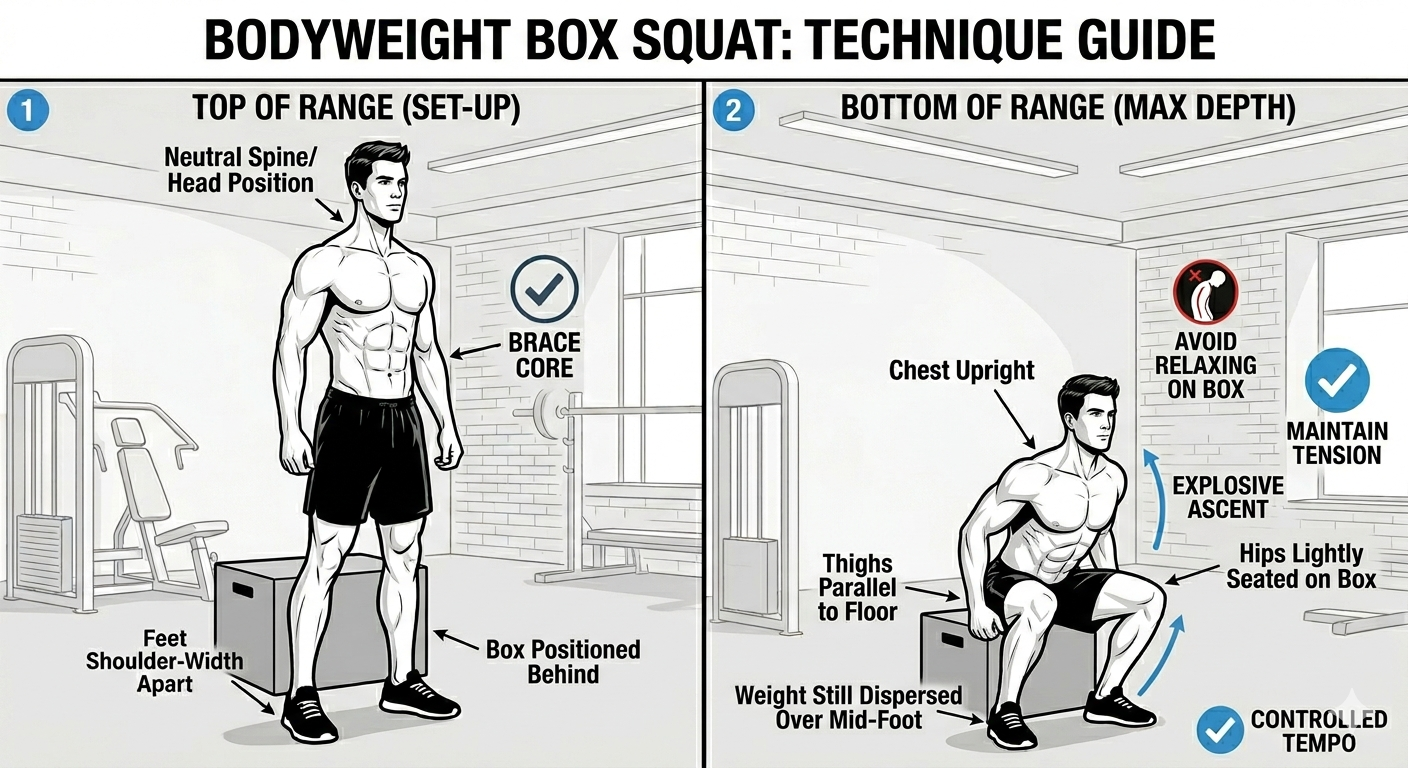
Bodyweight Box Squat: Technique Guide
The box squat is an excellent tool for learning to reach consistent depth and developing better hip mechanics.
How to Execute
Set-up: Stand with a box or bench positioned directly behind you.
The Descent: Initiate the squat by sitting your hips back until your glutes lightly touch the box. Do not "collapse" onto the box; maintain tension in your legs.
The Pause: Briefly pause (1 second) while your glutes are in contact with the box, keeping your chest upright.
The Ascent: Drive upward through your heels to return to a full standing position.
Pro Tips for Success
Maintain Tension: Keep your core and leg muscles engaged even while sitting on the box; do not fully relax.
Hip Drive: Focus on using your hips to initiate the ascent rather than leaning your torso forward.
Consistent Depth: Use the box as a reference point to ensure every repetition reaches the same depth.
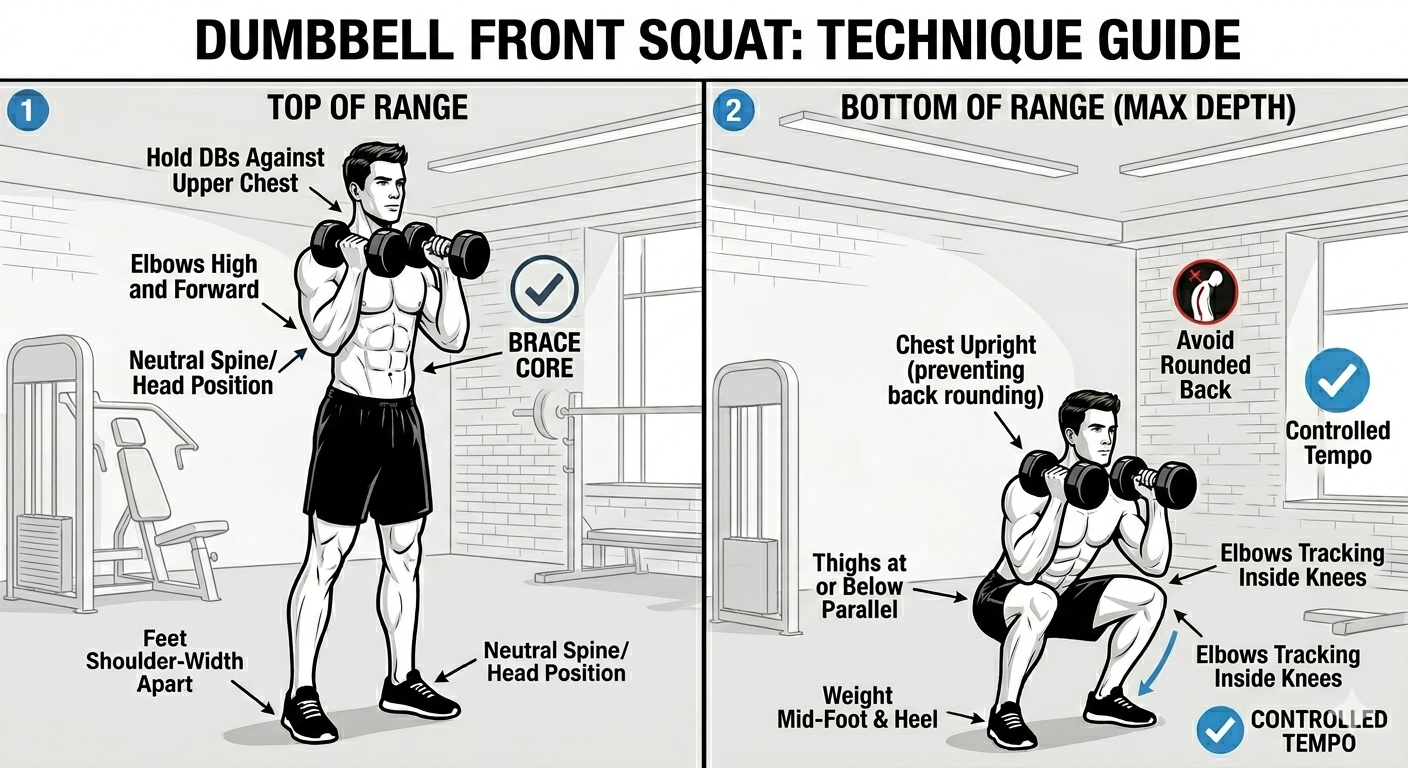
Dumbbell Front Squat: Technique Guide
Dumbbell front squats are excellent for building anterior chain strength and improving posture, as the forward weight placement prevents you from leaning too far forward.
How to Execute
Set-up: Hold a dumbbell in each hand at shoulder height, with elbows pointed forward and palms facing inward.
The Descent: Keep your chest upright and core braced as you sit your hips down between your heels.
The Depth: Lower until your thighs are parallel to the floor, or slightly lower, while keeping your elbows high.
The Ascent: Drive through your mid-foot to stand back up, keeping the dumbbells stable at shoulder level.
Pro Tips for Success
Elbow Position: Focus on keeping your elbows high throughout the entire movement to prevent the dumbbells from pulling you forward.
Vertical Torso: This movement requires a more upright torso than a back squat; let your knees track forward naturally to maintain this.
Core Bracing: A strong core is vital for stabilizing the weight in front of you; keep it tight for every rep.
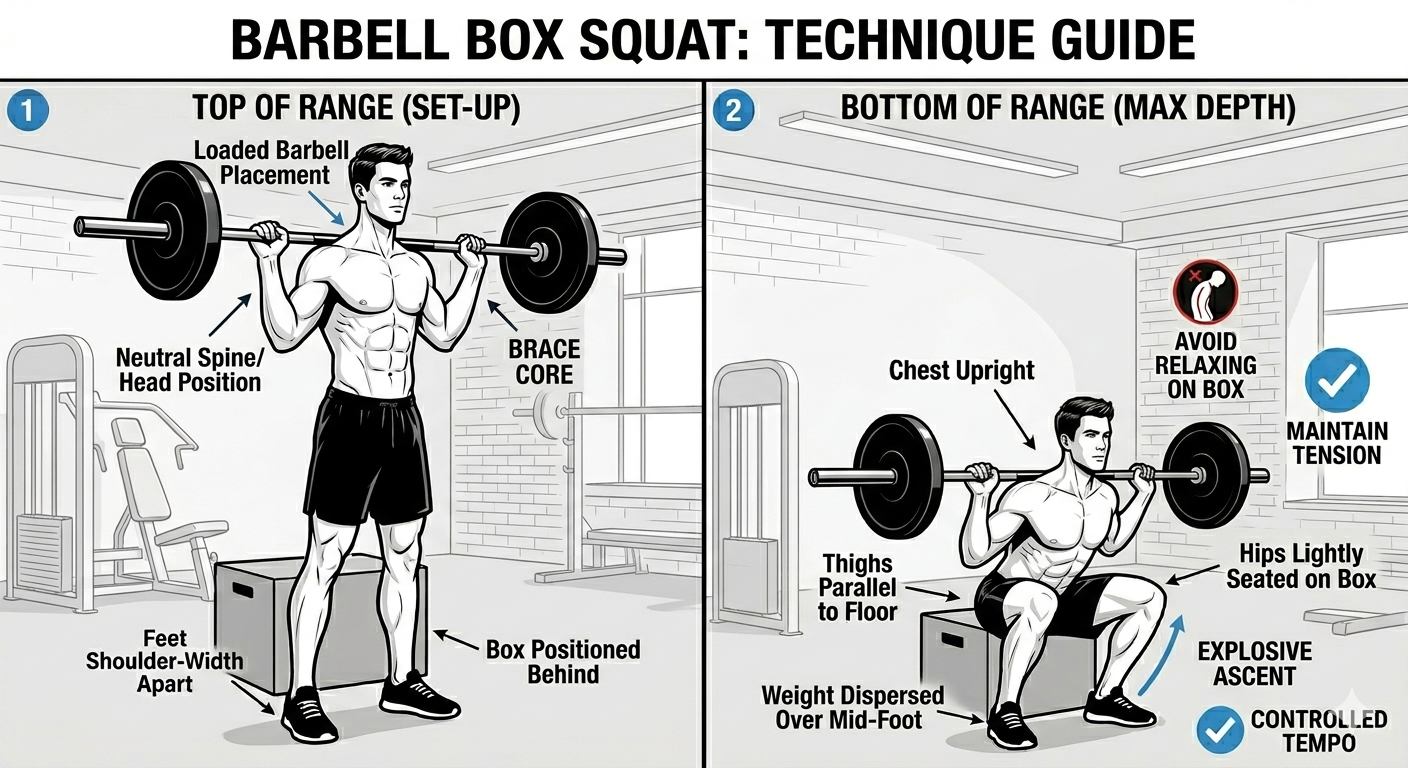
Barbell Box Squat: Technique Guide
The barbell box squat is an essential tool for developing explosive power and perfecting your squat mechanics. By using a box, you learn to sit back into the squat, engaging the posterior chain more effectively.
How to Execute
Set-up: Place a box at the appropriate height behind you. Rack the barbell across your upper traps, step back, and set your feet wider than shoulder-width.
The Descent: Initiate the movement by pushing your hips back and down to reach the box. Maintain an upright torso and keep your shins as vertical as possible.
The Pause: Lightly sit on the box for a brief, controlled second. Do not rock back or lose tension in your core.
The Ascent: Drive your feet into the floor and explode upward, ensuring your hips and chest rise at the same rate.
Pro Tips for Success
Maintain Tension: Never relax your core or leg muscles while on the box; stay ready to drive upward.
Hip Focus: Think about "spreading the floor" with your feet as you stand up to maintain knee stability.
Controlled Descent: Do not rush to the box; maintain a steady, controlled tempo throughout the downward phase.
Barbell Back Squat: Technique Guide
The barbell back squat is the cornerstone of lower-body strength and development. Proper execution is essential for building leg power while maintaining spinal health.
How to Execute
Set-up: Place the barbell on the rack at mid-chest height. Step under the bar, placing it across your upper trapezius (not your neck).
Stance: Set your feet slightly wider than shoulder-width with toes pointed slightly outward.
The Descent: Take a deep breath, brace your core, and push your hips back and down as if sitting into a chair. Keep your chest up and your weight balanced across the middle of your foot.
The Depth: Lower until your thighs are at least parallel to the floor, maintaining a neutral spine.
The Ascent: Drive through your heels, pushing the floor away to return to the standing position. Exhale as you complete the rep.
Pro Tips for Success
Neutral Spine: Avoid rounding your back at the bottom of the movement.
Controlled Tempo: Focus on a slow 2-3 second descent to maximize time under tension and control.
Core Bracing: Think about someone about to poke you in the stomach—tighten your core throughout the entire lift to protect your lower back.
Advanced Variation: Accommodating Resistance
Chains/Bands: Attach chains or resistance bands to the ends of the barbell. This increases the load as you reach the top of the lift, requiring you to accelerate through the finish to overcome the added resistance.
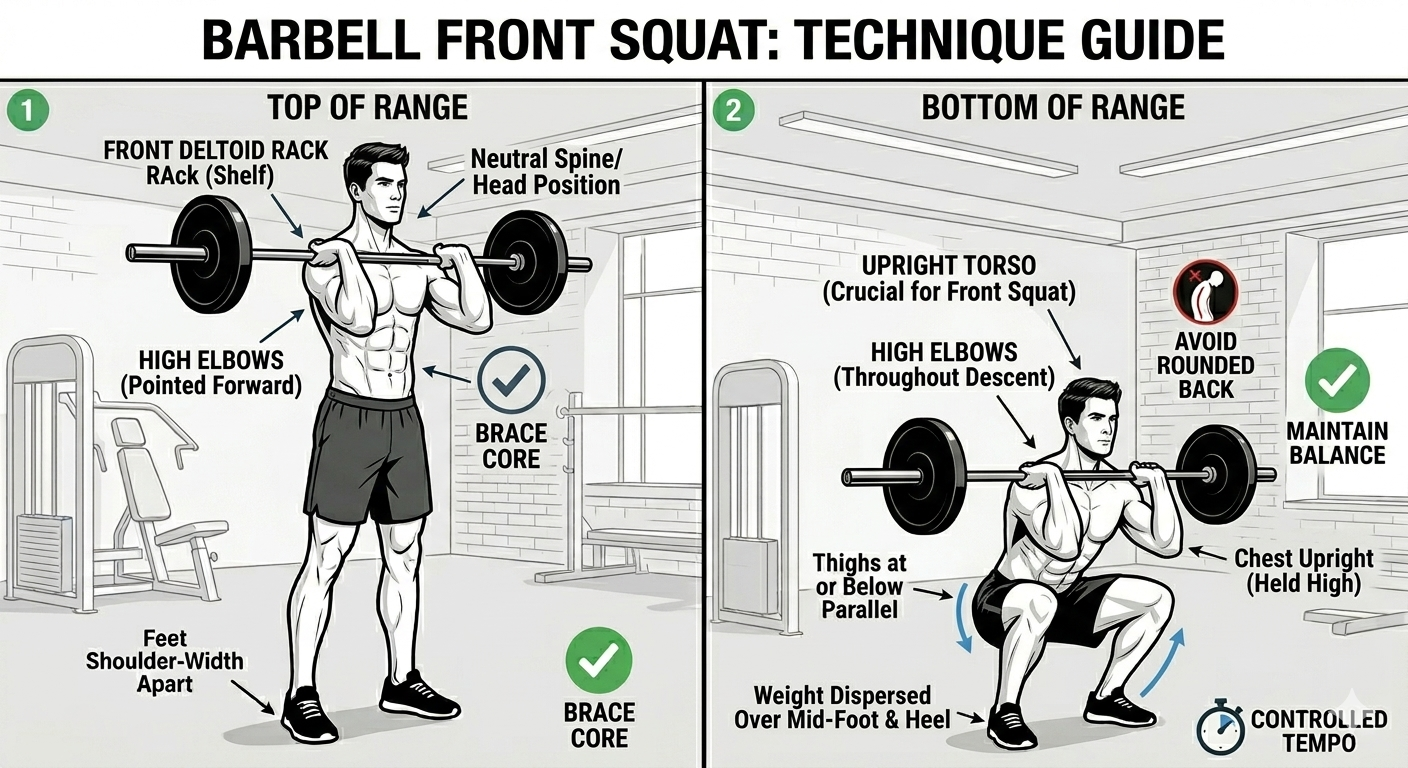
Barbell Front Squat: Technique Guide
The barbell front squat places the load on the anterior (front) side of the body, demanding exceptional core strength and an upright torso position.
How to Execute
Set-up: Rack the barbell at mid-chest height. Place the bar across the front deltoids and clavicle, keeping your elbows high and pointing forward.
The Descent: Maintain a vertical torso, sitting your hips straight down between your heels.
The Depth: Lower until your thighs are parallel to the floor, ensuring your elbows do not drop.
The Ascent: Drive through your heels, maintaining the upright posture to stand back up.
Pro Tips for Success
Elbow Position: Keeping elbows high is the secret to this lift; if they drop, the bar will roll forward.
Core Bracing: Deeply brace your core to support the front-loaded weight.
Advanced Variation: Accommodating Resistance
Chains/Bands: Adding chains or bands helps emphasize the lockout phase of the front squat, forcing you to remain upright and stable as the resistance increases at the top of the movement.
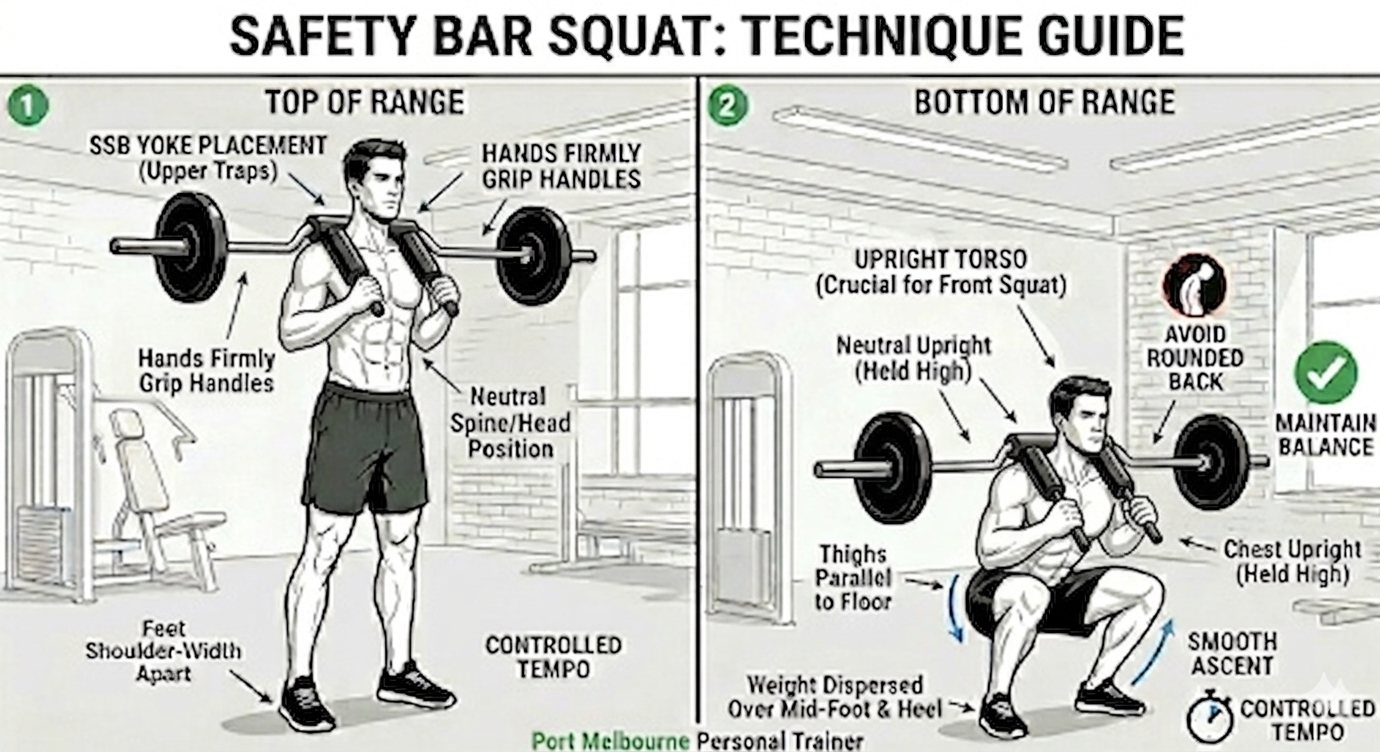
Safety Bar Squat: Technique Guide
The safety bar squat (SSB) is a fantastic tool that allows for heavy lower-body loading while minimizing stress on the shoulders and wrists.
How to Execute
Set-up: Step under the safety bar, resting the pads on your upper traps. Grip the handles firmly.
The Descent: Sit your hips back and down. You will notice the bar naturally encourages a slightly more upright posture.
The Depth: Squat until your thighs are parallel to the floor.
The Ascent: Drive upward through your heels, keeping your chest tall throughout.
Pro Tips for Success
Handle Grip: Use the handles to guide the bar, but do not pull down on them; let the weight rest on your traps.
Stability: This bar is less stable than a standard barbell; focus on controlling the path of the bar throughout the entire repetition.
Advanced Variation: Accommodating Resistance
Chains/Bands: Because the safety bar puts you in a more upright position, adding chains or bands is an excellent way to safely overload the quads and glutes at the top of the movement.
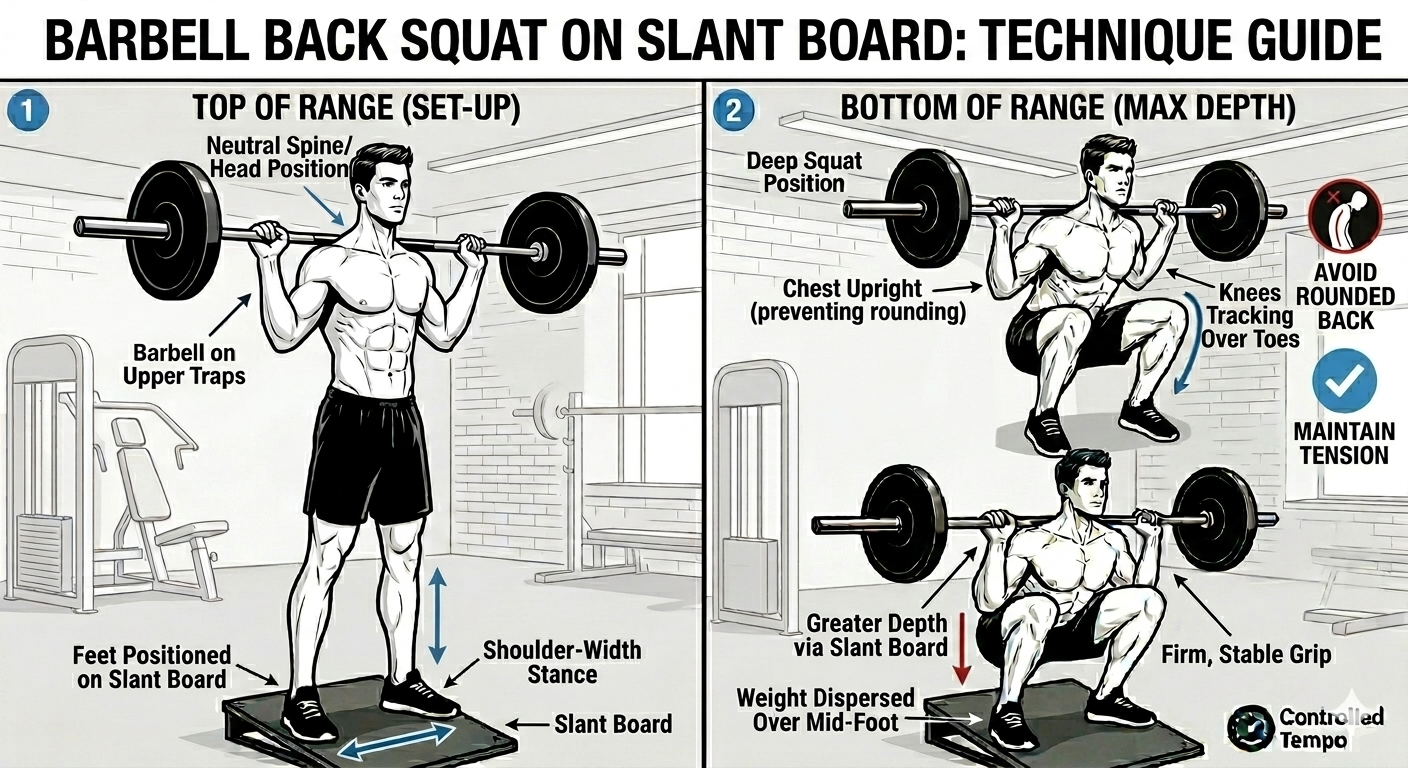
Barbell Back Squat on Slant Board: Technique Guide
Elevating your heels on a slant board increases knee flexion, allowing for a deeper squat and greater quadriceps activation while keeping your torso upright.
How to Execute
Set-up: Place your heels on the slant board at a comfortable width. Rack the barbell on your upper traps.
The Descent: Initiate the movement by sitting straight down, allowing your knees to travel forward over your toes.
The Depth: Squat as deeply as possible while maintaining a vertical torso and neutral spine.
The Ascent: Drive through your mid-foot and toes to return to the standing position.
Pro Tips for Success
Quad Focus: This is a specialized movement for isolating the quads; avoid leaning forward to keep the tension on the legs.
Mobility: This is excellent for those with limited ankle mobility.
Advanced Variation: Accommodating Resistance
Chains/Bands: Adding chains or bands helps increase the challenge during the final extension phase, providing a greater overload for the quads as you lock out.
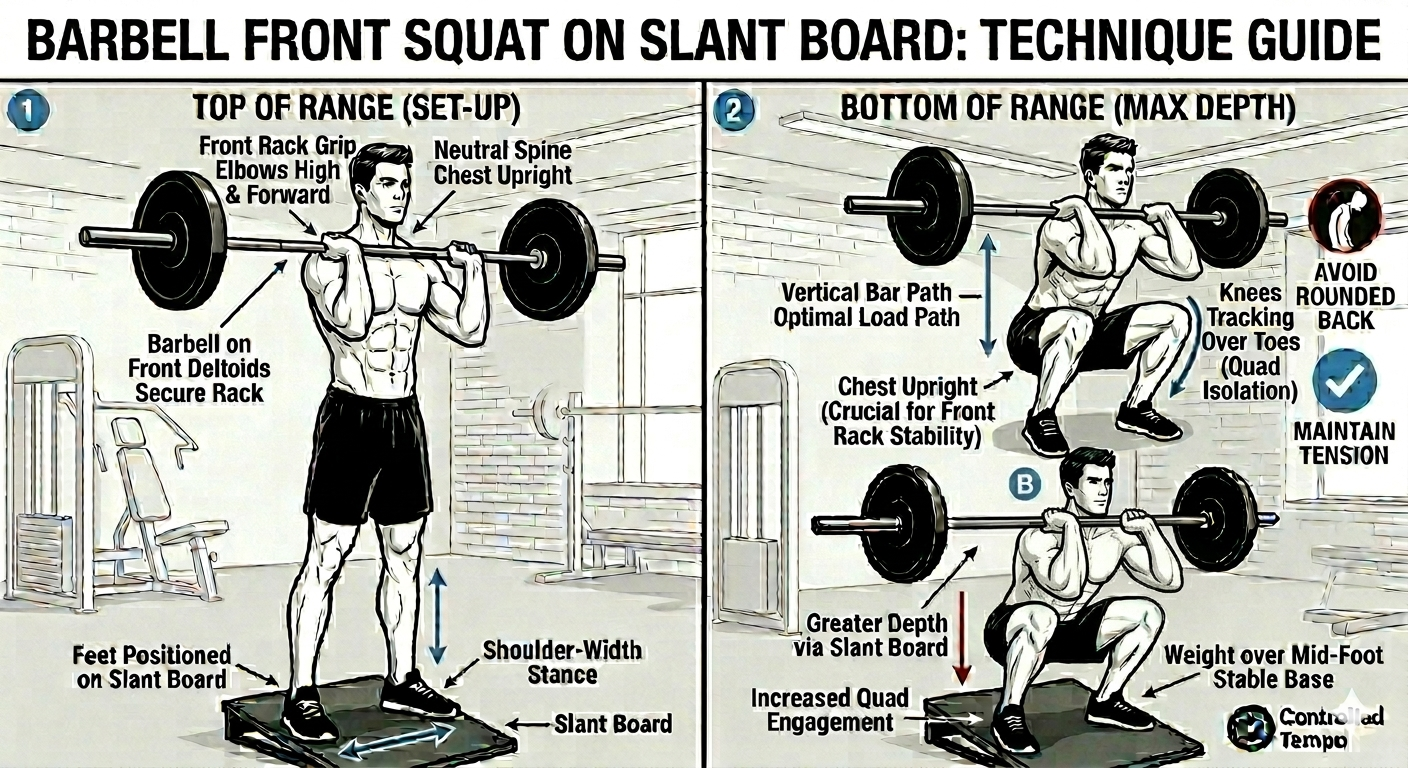
Barbell Front Squat on Slant Board: Technique Guide
This variation combines the core-demanding posture of the front squat with the quad-isolating benefits of the slant board.
How to Execute
Set-up: Place your heels on the slant board. Clean the bar to your front deltoids with elbows high and forward.
The Descent: Keep your chest upright as you sit your hips straight down.
The Depth: Lower until your thighs are at least parallel to the floor, ensuring your elbows remain high.
The Ascent: Drive upward, keeping the bar stable across your front deltoids.
Pro Tips for Success
Verticality: Focus on keeping the bar path perfectly vertical over your mid-foot.
Stability: If you feel the bar rolling, adjust your elbow height immediately.
Advanced Variation: Accommodating Resistance
Chains/Bands: By adding chains or bands, you force yourself to maintain perfect stability and posture under an increasing load at the top of the lift.
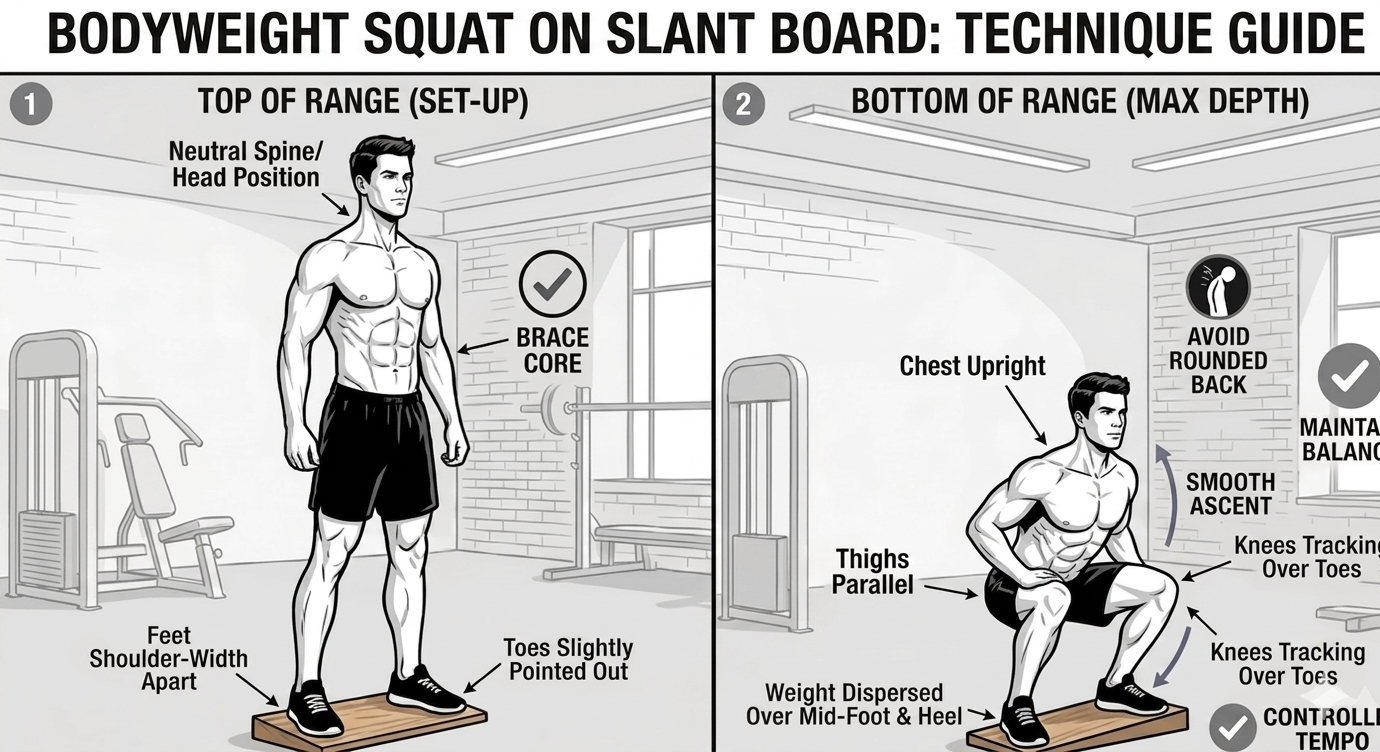
Bodyweight Squat on Slant Board: Technique Guide
This variation uses the slant board to allow for a deeper, more quad-focused bodyweight squat, ideal for those focusing on form or working with limited ankle mobility.
How to Execute
Set-up: Place your feet on the slant board at shoulder-width.
The Descent: Initiate by sitting your hips straight down, allowing your knees to travel forward over your toes.
The Depth: Squat as deep as comfortable while keeping your torso upright.
The Ascent: Drive through your mid-foot and toes to return to the starting position.
Pro Tips for Success
Posture: Keep your chest high to ensure the focus remains on your quadriceps.
Balance: Use the slant board to keep your heels planted throughout the entire movement.
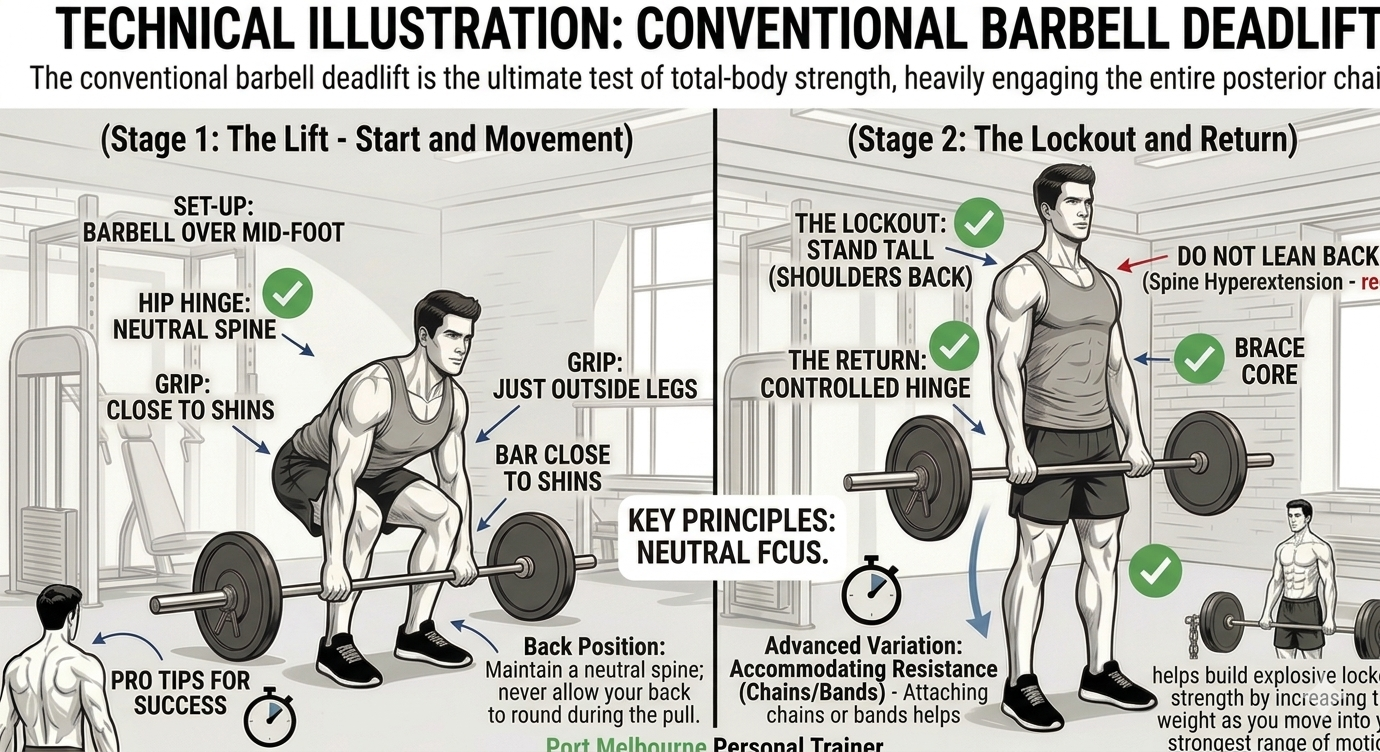
Barbell Deadlift: Technique Guide
The conventional barbell deadlift is the ultimate test of total-body strength, heavily engaging the entire posterior chain.
How to Execute
Set-up: Position the barbell over your mid-foot. Hinge at your hips and grip the bar just outside your legs.
The Lift: Brace your core and drive through your heels, keeping the bar close to your shins as you stand tall.
The Lockout: Stand fully upright with your shoulders back. Do not lean backward or hyperextend your spine.
The Return: Hinge at the hips, keeping your back neutral, and lower the bar back to the floor with control.
Pro Tips for Success
Back Position: Maintain a neutral spine; never allow your back to round during the pull.
Bar Path: Keep the barbell in contact with your legs throughout the entire movement.
Advanced Variation: Accommodating Resistance
Chains/Bands: Attaching chains or bands to the barbell helps build explosive lockout strength by increasing the weight as you move into your strongest range of motion.
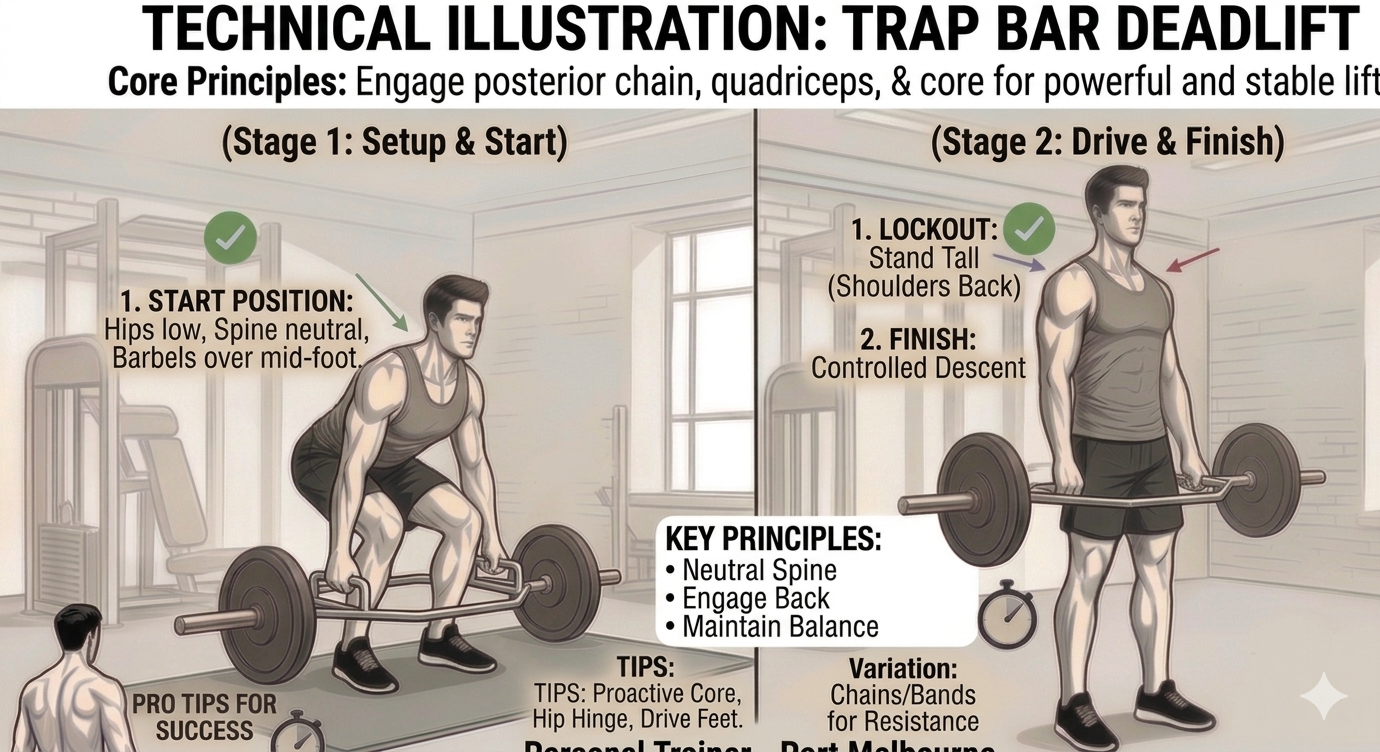
Trap-Bar Deadlift: Technique Guide
The trap-bar deadlift is often more accessible than the conventional deadlift, as it places the weight in line with your center of gravity.
How to Execute
Set-up: Step into the center of the trap bar. Hinge at the hips and grip the handles with a neutral palm position.
The Lift: Maintain a tall chest and drive through your heels to stand up, ensuring your hips and shoulders rise simultaneously.
The Lockout: Stand tall, squeezing your glutes at the top.
The Return: Lower the weight with control, keeping your core engaged.
Pro Tips for Success
Neutral Grip: The neutral grip reduces stress on the shoulders compared to the conventional barbell grip.
Leg Drive: Focus on pushing the floor away with your legs rather than pulling with your arms.
Advanced Variation: Accommodating Resistance
Chains/Bands: Adding chains or bands forces you to remain stable and powerful through the entire ascent, particularly as the resistance increases at the top.
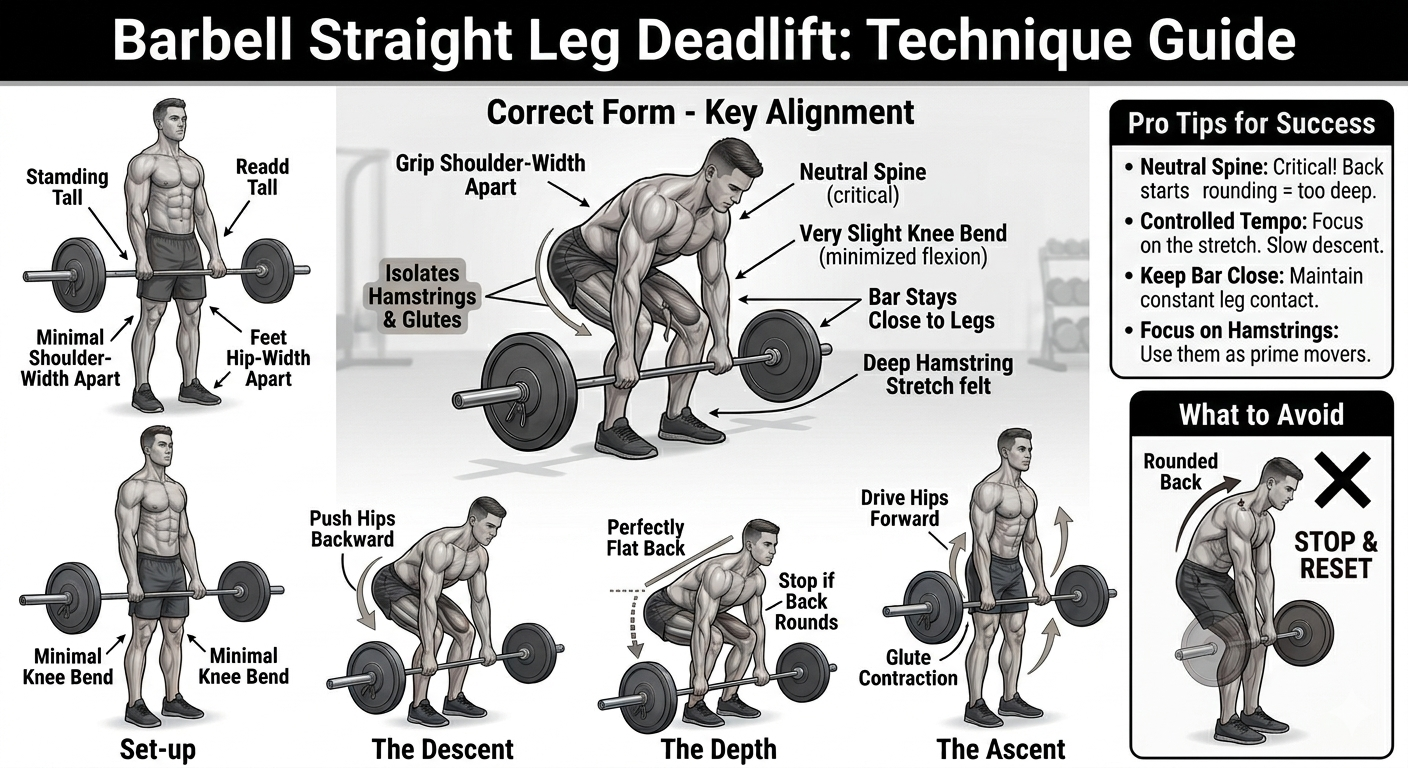
Barbell Straight Leg Deadlift: Technique Guide
This exercise specifically isolates the hamstrings and glutes by minimizing knee flexion.
How to Execute
Set-up: Grip the bar with hands shoulder-width apart. Keep your feet hip-width apart with a very slight bend in the knees.
The Descent: Hinge at the hips, pushing them backward while keeping the bar close to your legs.
The Depth: Lower until you feel a deep stretch in your hamstrings, keeping your back perfectly flat.
The Ascent: Drive your hips forward to return to the standing position, focusing on a glute contraction.
Pro Tips for Success
Neutral Spine: This is the most critical aspect; if your back starts to round, you have gone too deep.
Controlled Tempo: Focus on the stretch—slow down the descent to maximize hamstring engagement.
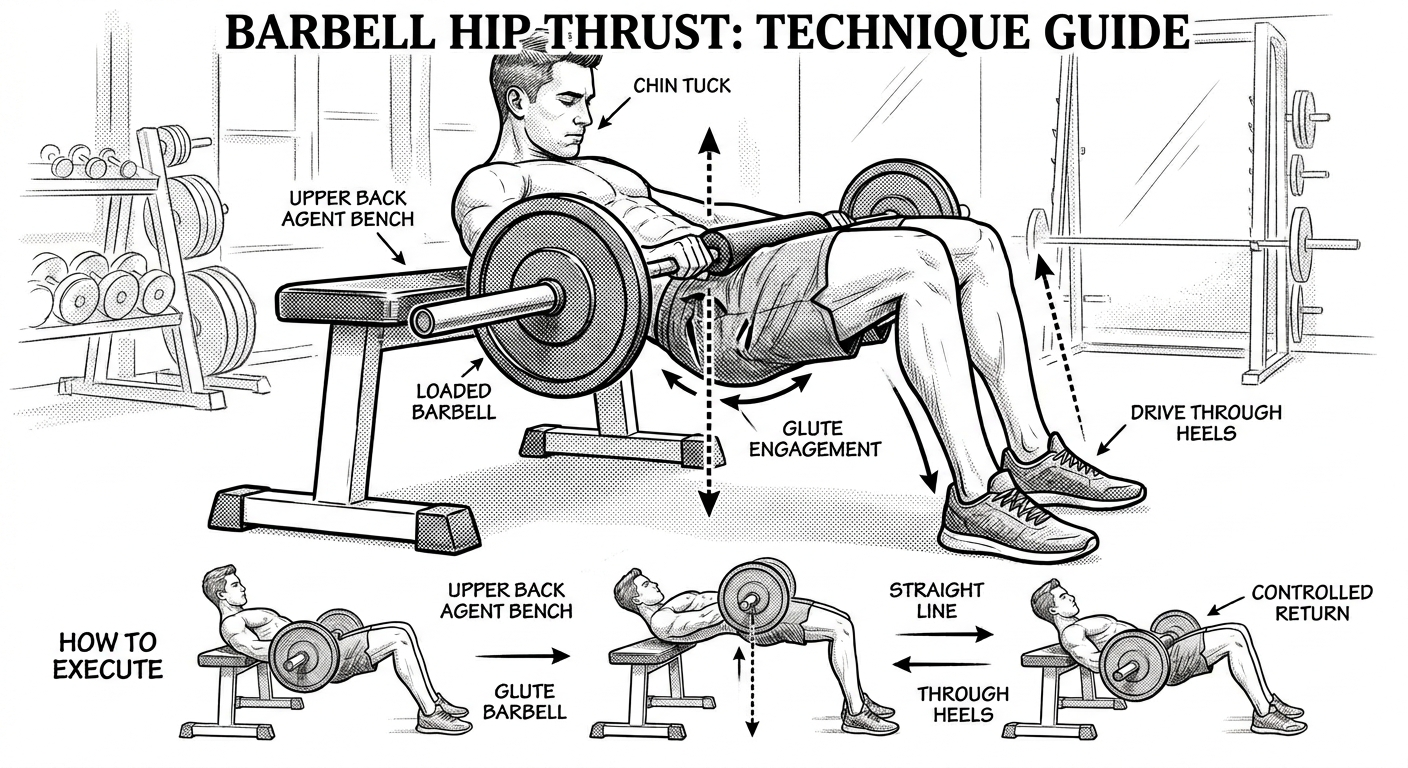
Barbell Hip Thrusters: Technique Guide
The barbell hip thruster is arguably the most effective movement for isolating and building the gluteal muscles.
How to Execute
Set-up: Sit on the floor with your upper back resting against a bench. Place a loaded barbell across your hips, using a pad for comfort.
The Lift: Drive through your heels to lift your hips toward the ceiling.
The Lockout: At the top of the movement, your body should form a straight line from your shoulders to your knees. Squeeze your glutes hard at this peak position.
The Return: Lower your hips back toward the floor with a controlled motion, maintaining core tension.
Pro Tips for Success
Chin Tuck: Keep your chin tucked toward your chest throughout the movement to prevent arching your lower back.
Glute Engagement: Focus on initiating the movement from the glutes, not the lower back.
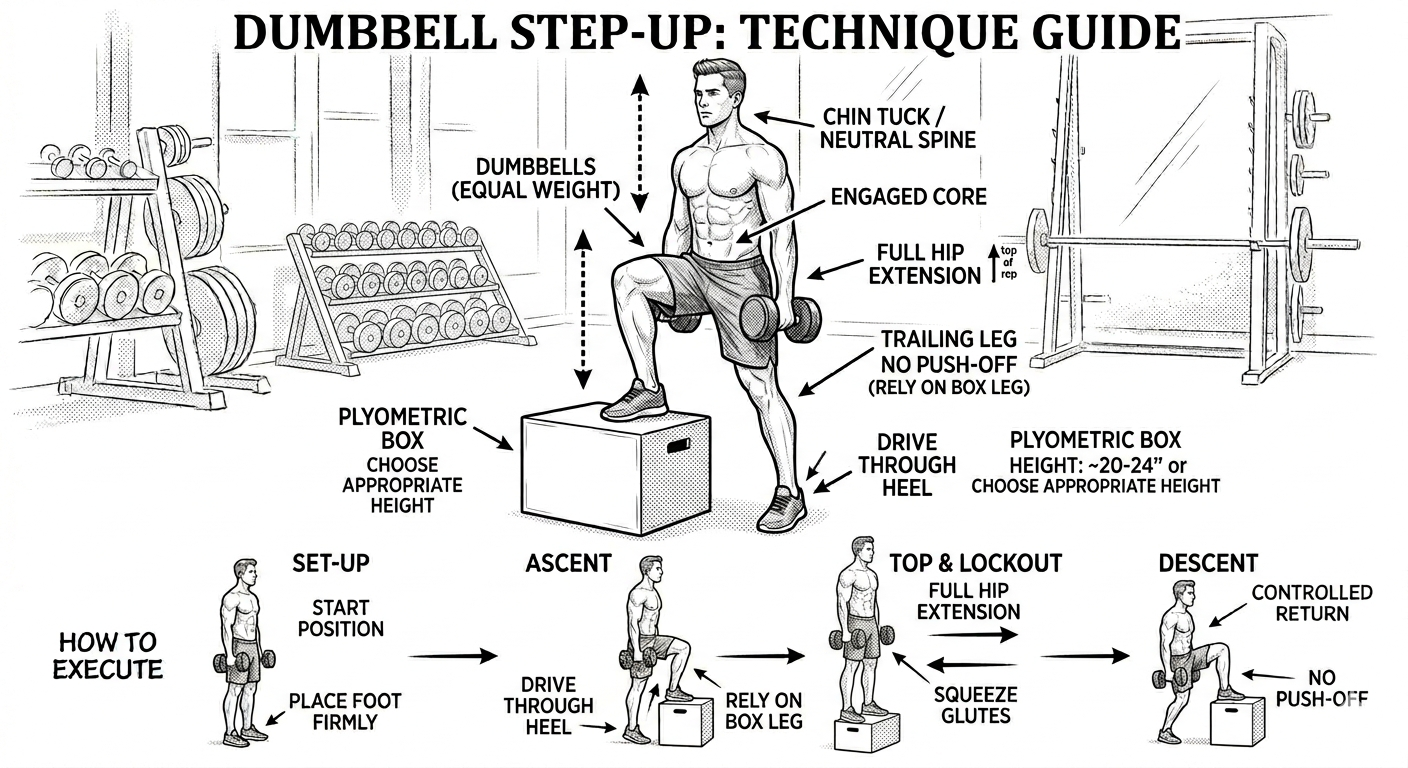
Dumbbell Step-Up: Technique Guide
Step-ups are excellent for addressing unilateral strength imbalances and improving balance.
How to Execute
Set-up: Stand in front of a box or bench while holding dumbbells in each hand.
The Ascent: Place one foot firmly on the box. Drive through that heel to stand fully upright on the box.
The Descent: Step down slowly with the same leg, maintaining control until your other foot touches the floor.
Repetition: Complete all reps on one side before switching to the other.
Pro Tips for Success
Full Extension: Ensure you reach full hip extension at the top of the box.
Control: Do not "push off" the floor with your bottom foot; rely entirely on the leg on the box.
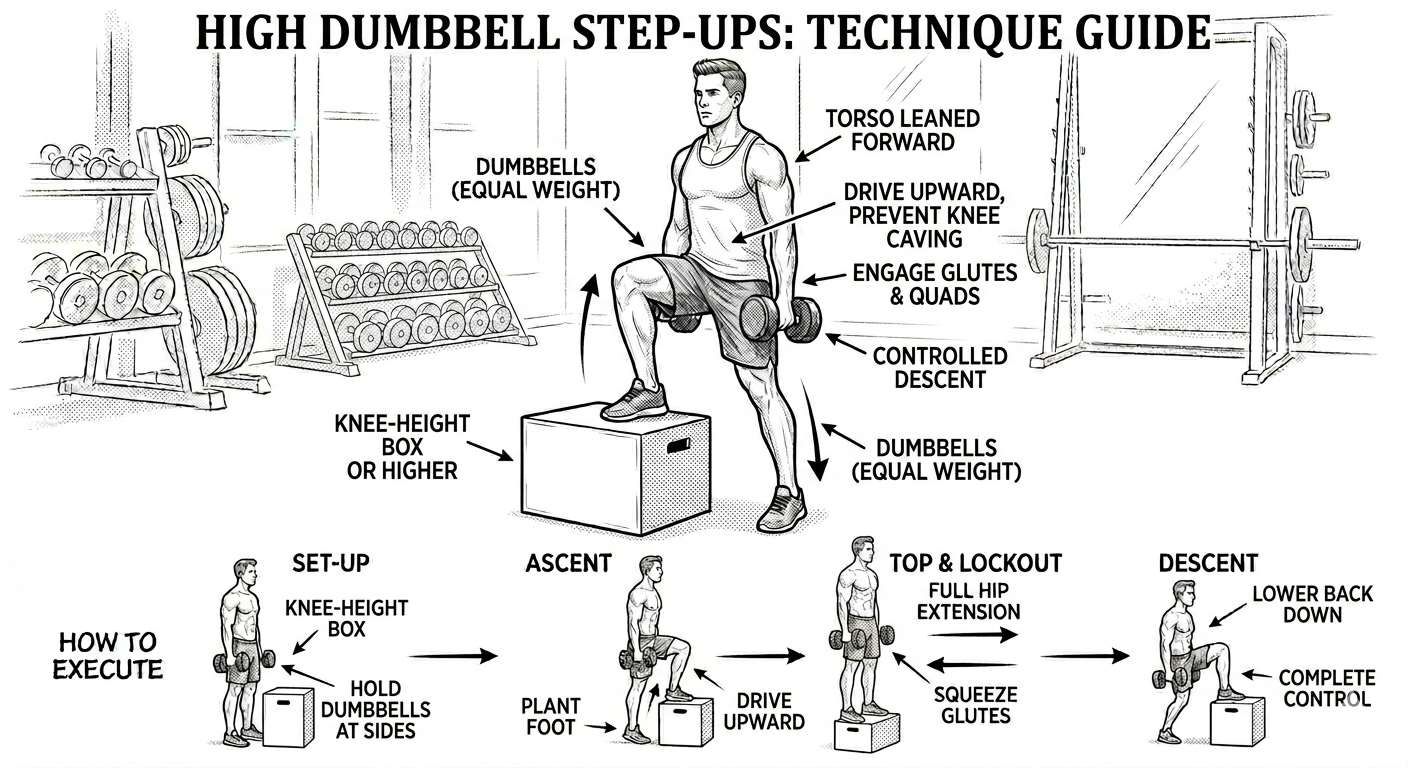
High Dumbbell Step-Ups: Technique Guide
Using a higher box increases the range of motion, requiring more glute and quad engagement.
How to Execute
Set-up: Use a box that is at least knee-height or slightly higher. Hold dumbbells at your sides.
The Ascent: Plant your foot on the box and drive upward, ensuring your knee does not cave inward.
The Descent: Lower yourself back down under complete control.
Pro Tips for Success
Torso Angle: Lean your torso slightly forward to help engage the glutes of the working leg.
Stability: If you lose balance, reduce the height of the box until your stability improves.
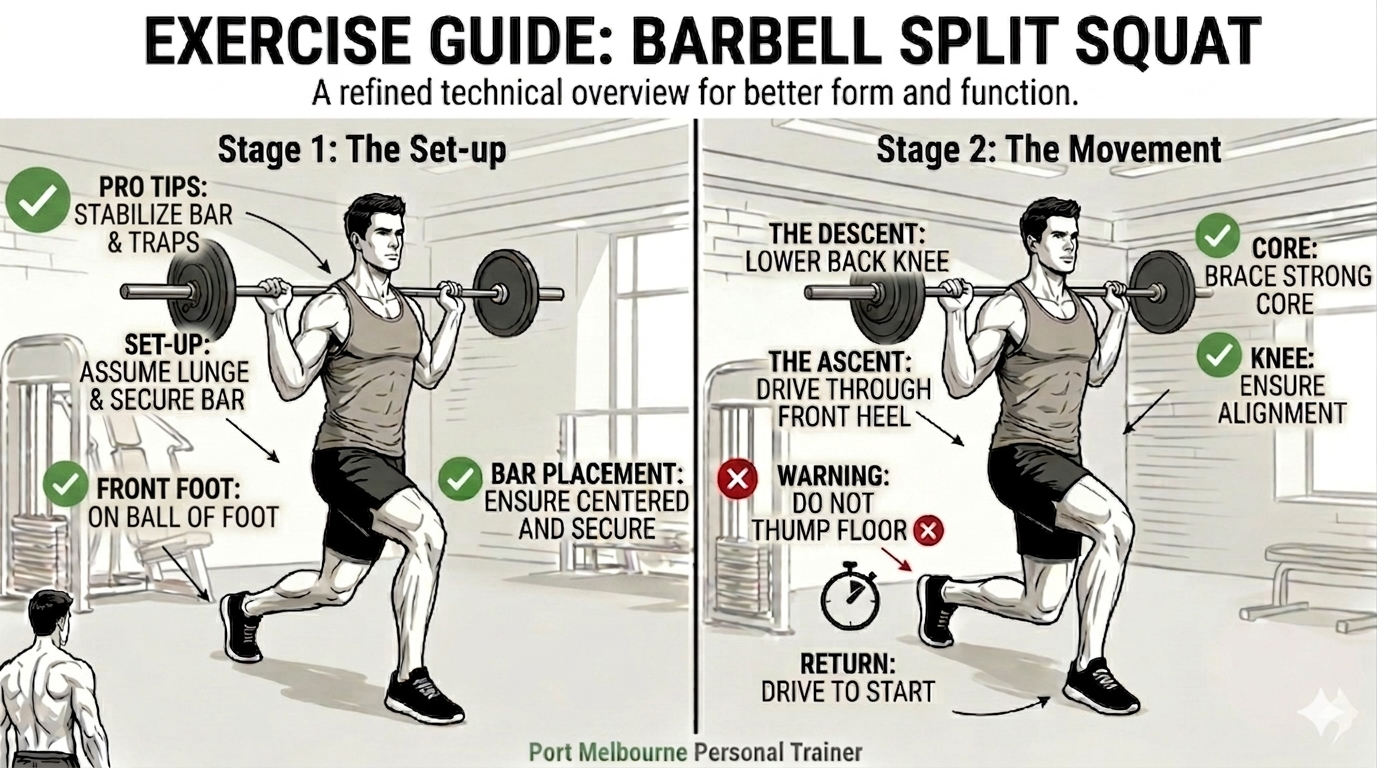
Barbell Split Squat: Technique Guide
This unilateral movement builds leg strength, stability, and core control.
How to Execute
Set-up: Place a barbell on your upper traps. Assume a lunge position with one foot forward and the back foot placed on the floor (or a small plate).
The Descent: Lower your back knee toward the floor, keeping your front shin vertical.
The Ascent: Drive through your front heel to return to the starting position.
Pro Tips for Success
Upright Posture: Keep your torso vertical to shift more emphasis onto the legs.
Balance: Focus on keeping your weight centered over the front foot.
Advanced Variation: Accommodating Resistance
Chains/Bands: Hanging chains from the bar increases the challenge throughout the ascent, demanding high levels of stabilization.
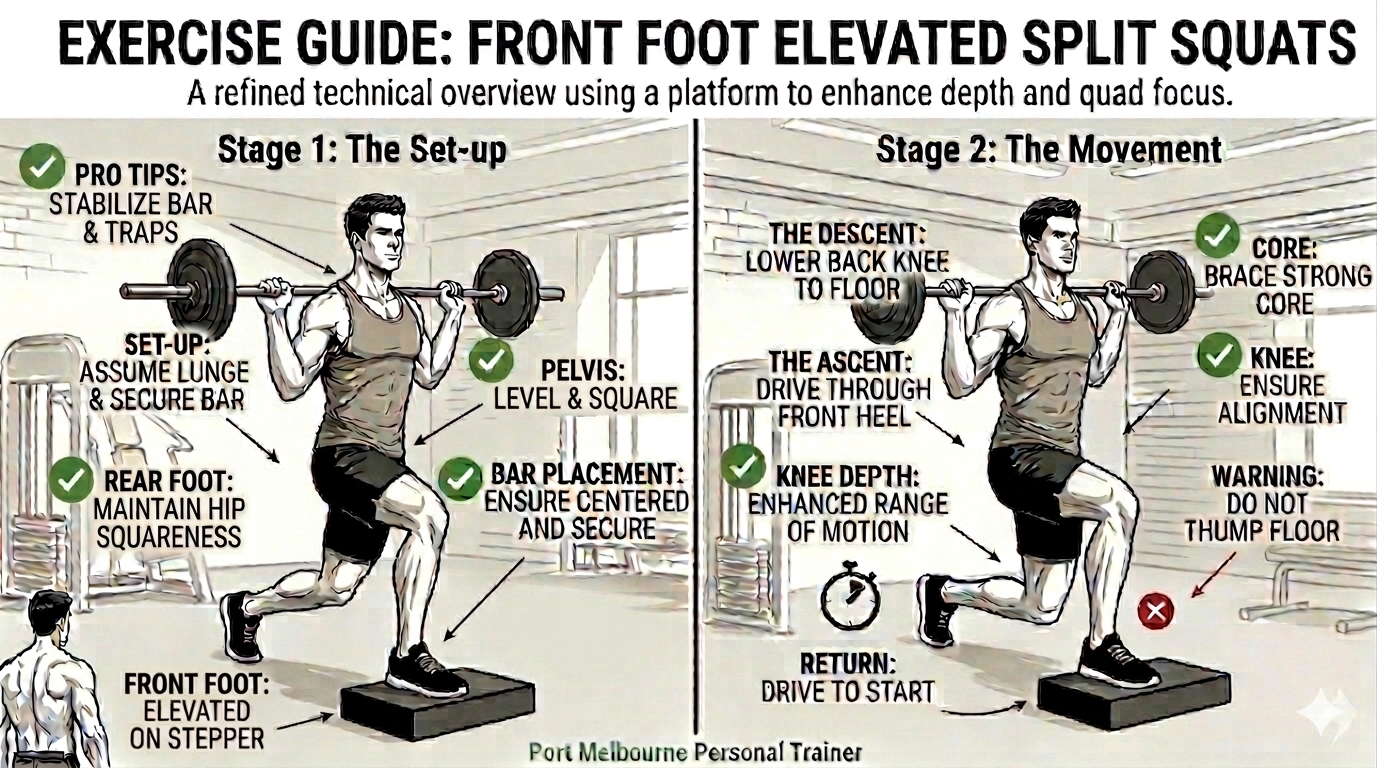
Barbell Split Squat (Front Foot Elevated): Technique Guide
Elevating the front foot increases the range of motion for the front leg, emphasizing deep hip and quad activation.
How to Execute
Set-up: Place your front foot on a small platform or plate. Assume a lunge position with a barbell on your upper traps.
The Descent: Lower your back knee toward the floor while keeping your torso upright.
The Ascent: Drive through your front heel to return to the starting position.
Pro Tips for Success
Depth: The elevated front foot allows for a deeper stretch in the glute of the working leg.
Alignment: Ensure your front knee tracks directly over your toes throughout the movement.
Barbell Split Squat (Rear Foot Elevated): Technique Guide
This variation shifts the focus heavily onto the lead leg, improving stability and unilateral leg strength.
How to Execute
Set-up: Place your rear foot on a bench behind you. Support a barbell on your upper traps.
The Descent: Lower your hips until your lead thigh is at least parallel to the floor.
The Ascent: Drive through the heel of your lead foot to return to the standing position.
Pro Tips for Success
Balance: Keep your weight centered over your front foot to avoid losing your balance.
Control: A slower descent will improve your stability and muscle recruitment.
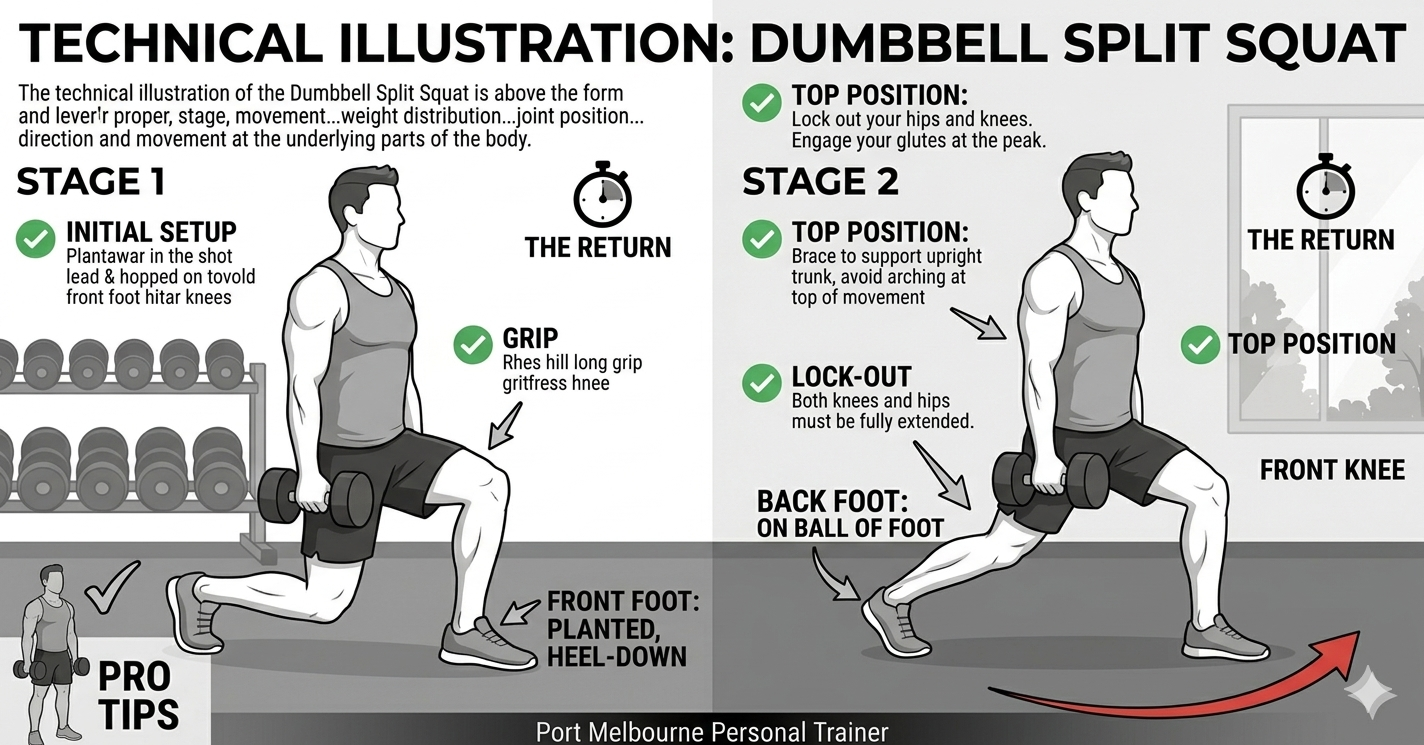
Dumbbell Split Squat: Technique Guide
Similar to the barbell version, this allows for a more natural arm path and can be easier on the shoulders.
How to Execute
Set-up: Hold a dumbbell in each hand at your sides. Assume a lunge position.
The Descent: Lower your back knee toward the floor while keeping your torso stable.
The Ascent: Push through your front heel to return to the starting position.
Pro Tips for Success
Grip: Maintain a firm grip on the dumbbells to keep them stable by your sides.
Core: A strong, braced core is essential to prevent leaning during the descent.
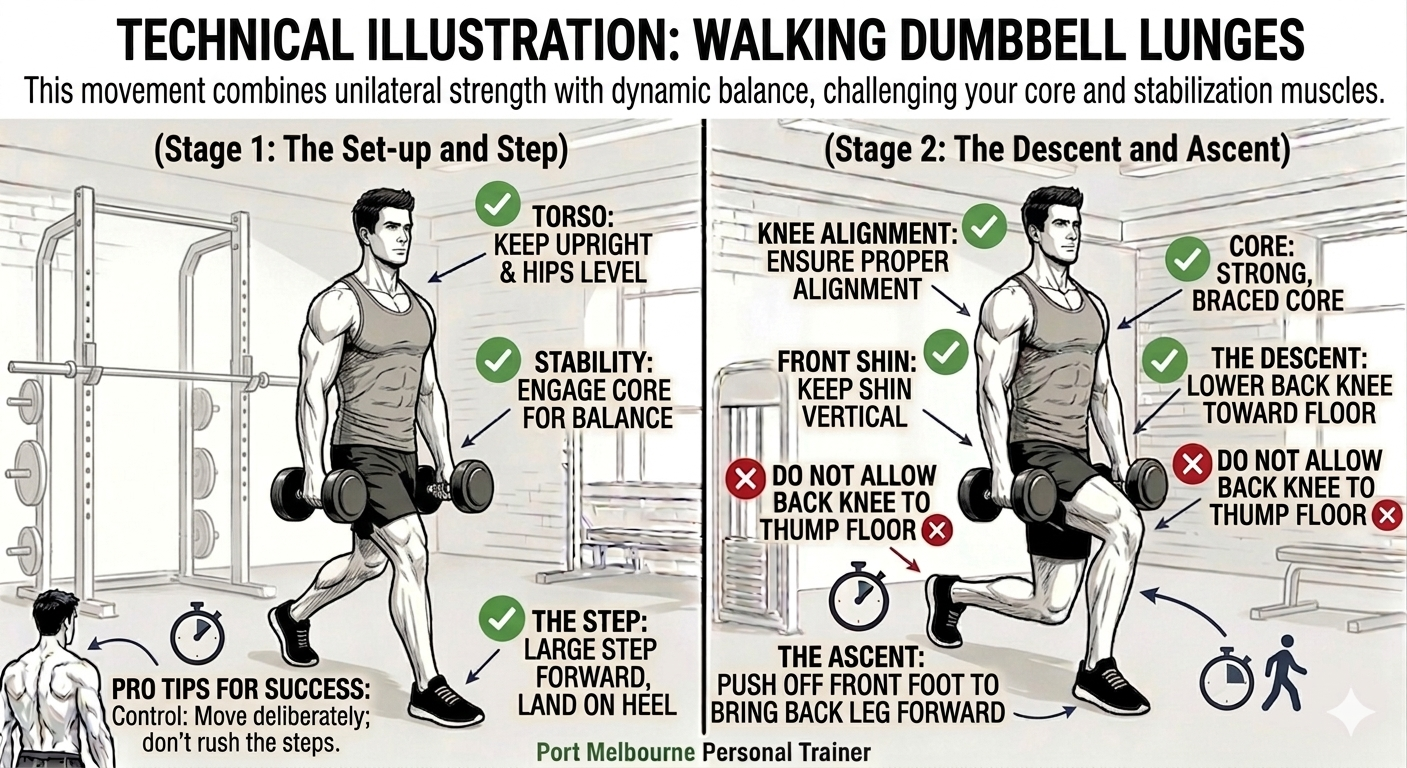
Walking Dumbbell Lunges: Technique Guide
This movement combines unilateral strength with dynamic balance, challenging your core and stabilization muscles.
How to Execute
Set-up: Hold a dumbbell in each hand. Stand tall with your feet together.
The Step: Take a large step forward, landing on your heel.
The Descent: Lower your back knee toward the ground while keeping your front shin vertical.
The Ascent: Push off your front foot to bring your back leg forward into the next lunge step.
Pro Tips for Success
Stability: Focus on keeping your torso upright and your hips level as you move.
Control: Move deliberately; don't rush the steps.
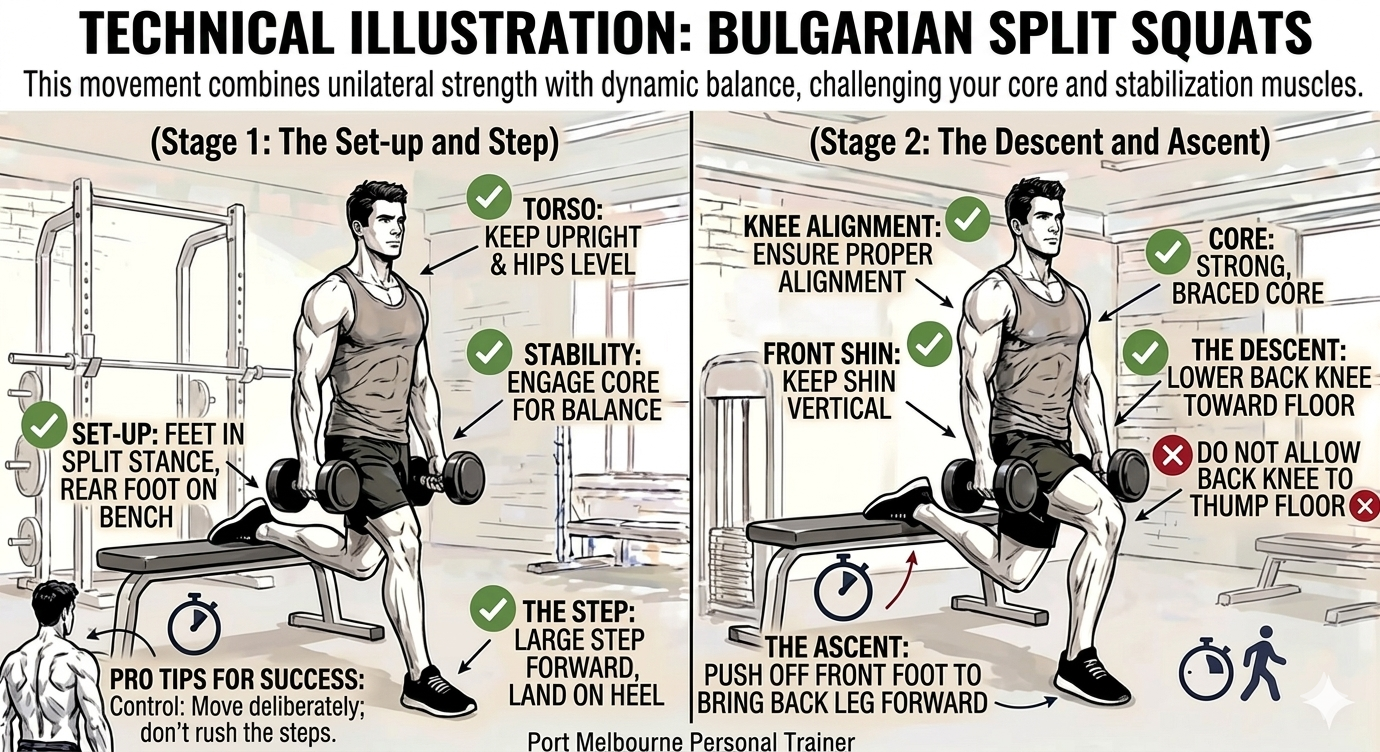
Bulgarian Split Squats: Technique Guide
Considered a premier unilateral exercise, this movement forces intense engagement of the quads and glutes of the front leg.
How to Execute
Set-up: Place your rear foot on a bench. Stand far enough forward that your front leg can achieve a deep squat.
The Descent: Keep your torso upright as you lower your back knee toward the floor.
The Ascent: Drive through your front heel to return to the starting position.
Pro Tips for Success
Hip Hinge: Lean your torso slightly forward to increase glute engagement.
Knee Health: Keep your front knee in line with your toes.
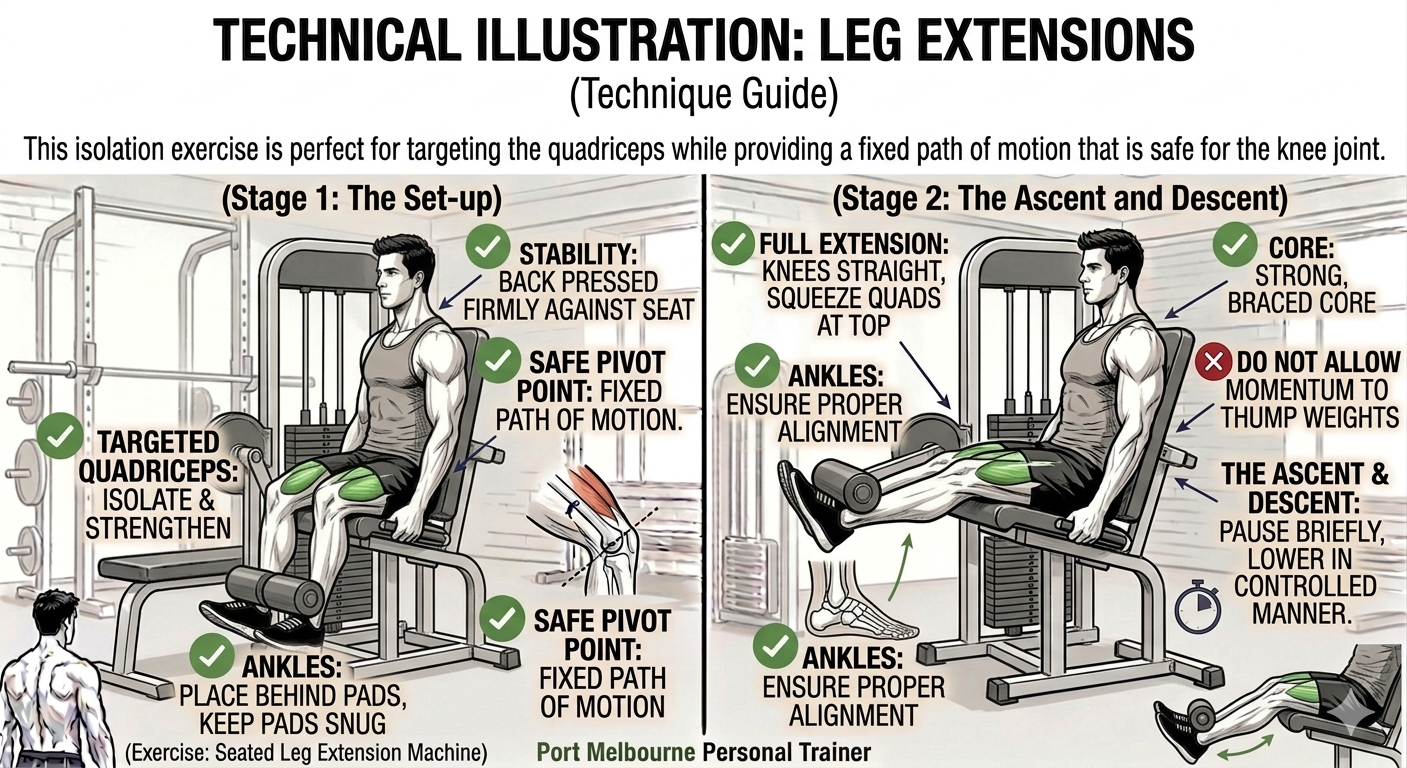
Leg Extensions: Technique Guide
This isolation exercise is perfect for targeting the quadriceps while providing a fixed path of motion that is safe for the knee joint.
How to Execute
Set-up: Adjust the machine so your knees align with the pivot point. Place your ankles behind the pad.
The Ascent: Extend your legs fully until your knees are straight, focusing on squeezing your quads at the top.
The Descent: Lower the weight in a controlled manner, resisting the pull of the machine, until you return to the start.
Pro Tips for Success
Pause: Briefly pause at the top of the movement to maximize muscle contraction.
Stability: Keep your back pressed firmly against the seat to prevent any swinging or momentum.
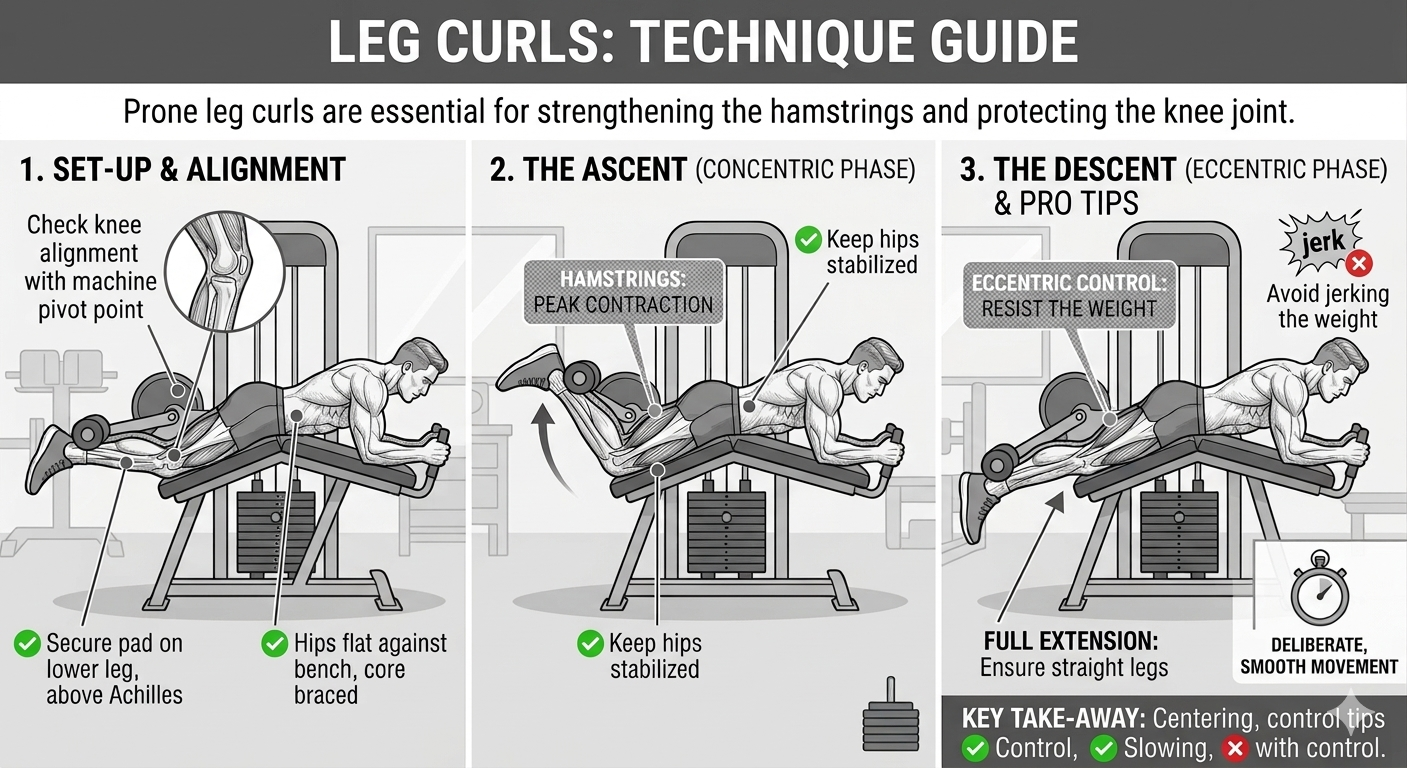
Leg Curls: Technique Guide
Leg curls are essential for strengthening the hamstrings and protecting the knee joint.
How to Execute
Set-up: Adjust the machine so your knees align with the pivot point. Secure the pad against the back of your lower legs.
The Ascent: Curl your legs toward your glutes, keeping your hips flat against the bench.
The Descent: Slowly return to the starting position, maintaining tension throughout the entire range of motion.
Pro Tips for Success
Control: Avoid jerking the weight; the movement should be smooth and deliberate.
Full Extension: Ensure you fully straighten your legs at the bottom of the movement.
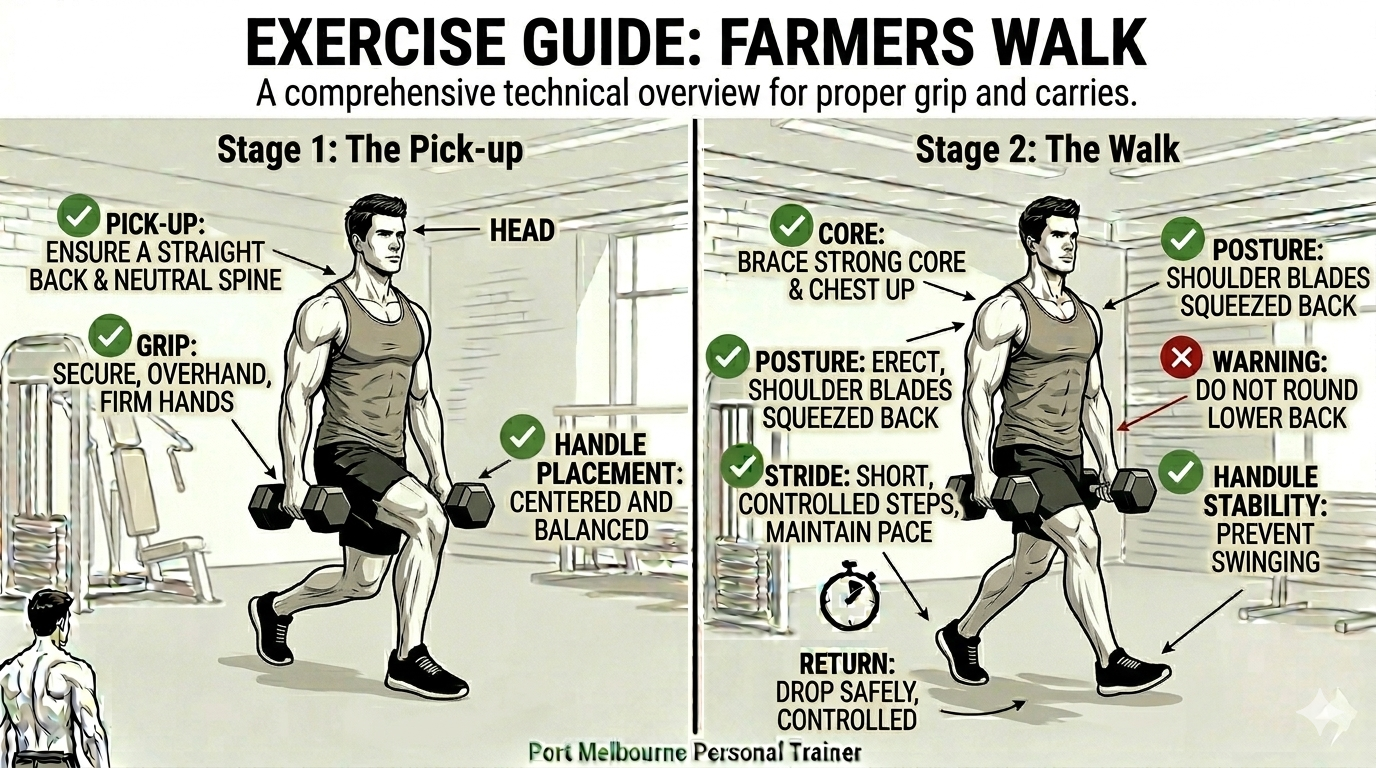
Farmers Walk: Technique Guide
The farmers walk builds incredible grip strength, core stability, and total-body conditioning.
How to Execute
Set-up: Stand between two heavy dumbbells or kettlebells.
The Movement: Grip the handles firmly, stand tall with your shoulders back, and walk with a steady, controlled stride.
The Goal: Maintain a neutral posture while walking for a set distance or time.
Pro Tips for Success
Core Bracing: Treat this like a moving plank; keep your core tight to stabilize the weight.
Grip: Ensure your grip remains firm and your shoulders don't slump forward.
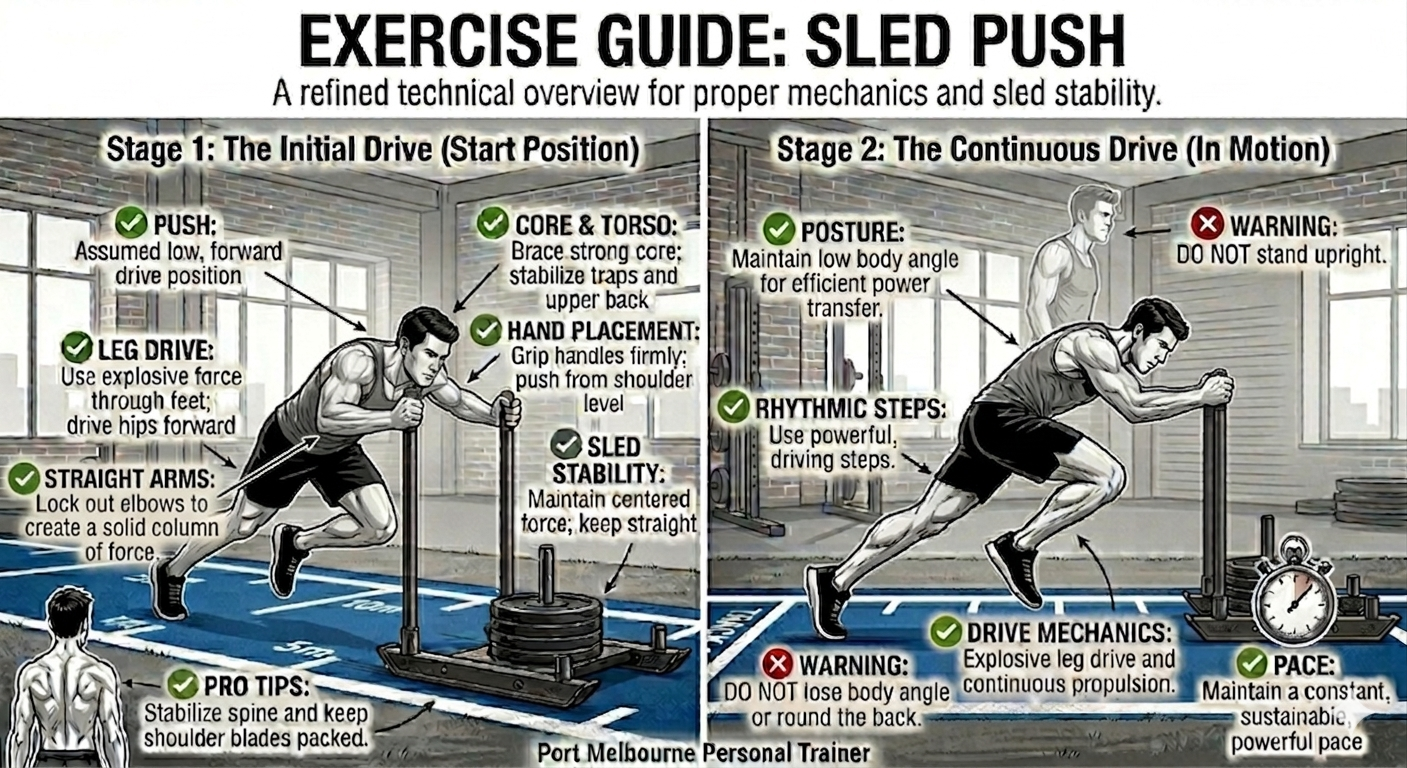
Sled Push: Technique Guide
The sled push is a powerful, low-impact conditioning tool that builds leg drive and stamina.
How to Execute
Set-up: Grip the sled handles with your arms extended. Lean your body into the sled.
The Drive: Push through your legs, taking short, powerful steps. Keep your spine neutral.
The Goal: Maintain a steady pace to keep the sled moving without stopping.
Pro Tips for Success
Posture: Avoid hunching your shoulders; keep your chest up to maintain power.
Drive: Focus on pushing the ground away with every step.
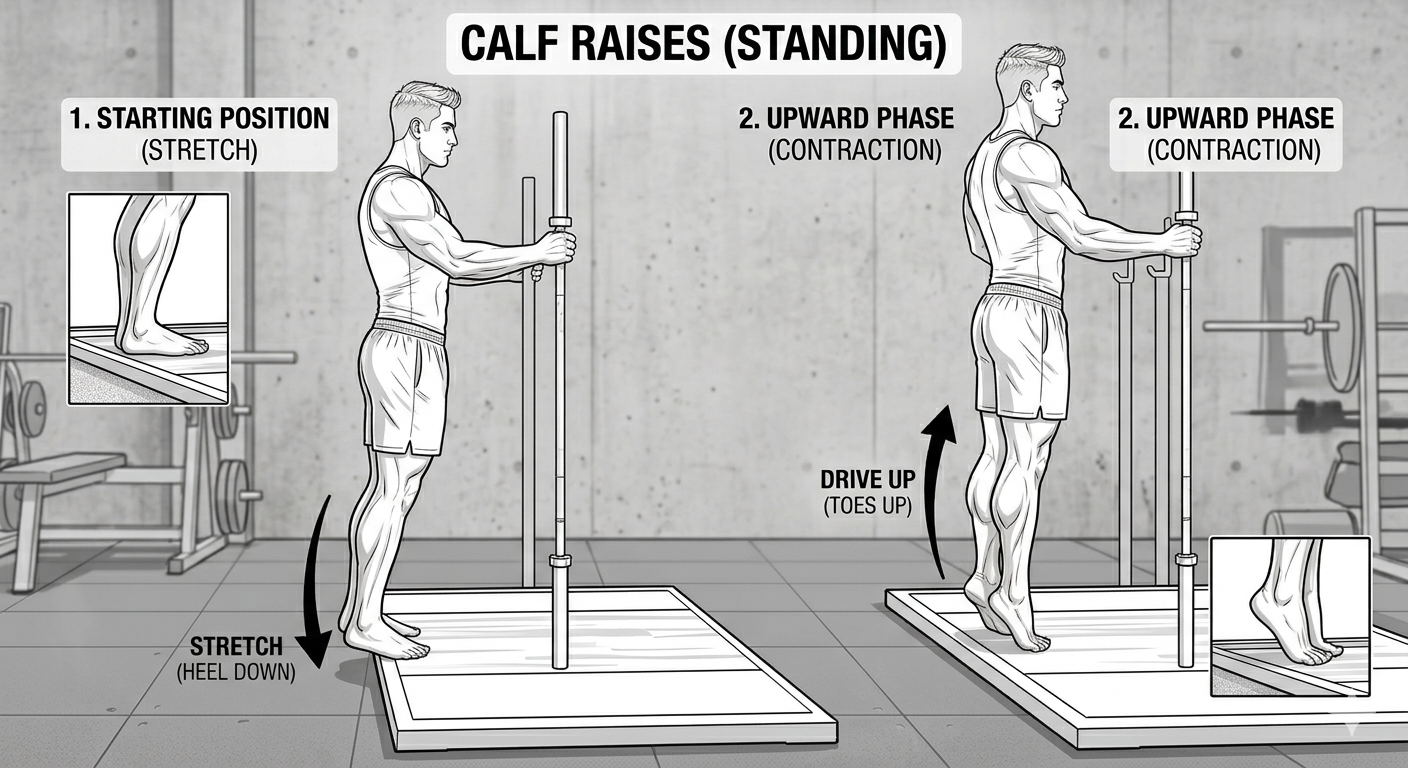
Calf Raises: Technique Guide
This exercise builds the strength and definition of the gastrocnemius and soleus muscles.
How to Execute
Set-up: Place the balls of your feet on a raised platform, with your heels hanging off the edge.
The Ascent: Press through the balls of your feet to raise your heels as high as possible.
The Descent: Lower your heels slowly until you feel a deep stretch in your calf muscles.
Pro Tips for Success
Range of Motion: Don't cut the movement short; ensure a full stretch at the bottom and a high peak at the top.
Tempo: A slow, controlled tempo is more effective than rapid, bouncing reps.


Mastering Your Physique: A Commitment to Technical Excellence
Building a powerful, balanced physique is a journey of precision, requiring not just hard work, but a deep understanding of the biomechanics behind every movement. By integrating these technical insights—from the heavy compound lifts that build foundational mass to the strategic isolation work that sculpts specific muscle heads—you are well on your way to maximizing your physical potential.
This leg exercise guide is the perfect complement to your existing technical repertoire. Be sure to revisit the detailed protocols in your Back Exercises Guide, Chest Exercise Guide, Shoulder Exercise Guide, Bicep Exercise Guide and Tricep Exercises Guide to ensure every training session is optimized for performance and growth. Consistent application of these techniques is the ultimate key to injury-free, sustainable progress.
Take the Next Step with Expert Coaching
Ready to turn this theory into tangible results? Whether you prefer hands-on training or a structured digital approach, I have the tools to help you succeed:
Book your two-session free trial in Port Melbourne: Experience personalized, one-on-one coaching with Nick Hall Body Transformations, where we tailor every set and rep to your unique physiology and goals.
Join my Online Training Program: Get elite-level guidance, customized programming, and technical support delivered directly to you, no matter where you are in the world.
Let’s refine your training, sharpen your technique, and build the strongest version of yourself.