Build a Stronger Back: Complete Exercise Library & Technique Guide
Welcome to your ultimate resource for developing a powerful, defined, and injury-resistant back. Whether you are aiming to increase your pulling strength, improve your posture, or maximize muscle hypertrophy, proper form is the foundation of every successful workout. This comprehensive exercise library provides step-by-step instructions, expert technical cues, and essential diagrams for the most effective back-building movements—from foundational pull-ups and rows to targeted cable isolation exercises. Master your technique, eliminate common training mistakes, and take the guesswork out of your back day with our science-backed guide designed for athletes of all levels.
Ready to take your training to the next level? If you’re in the Port Melbourne area, click here to book an introductory two session free trial with Nick Hall Body Transformations today to start your personalized training program tailored to your goals.
Alternatively, if you want to follow my programming from anywhere in the world, join the waiting list for my upcoming online program here to be the first to know when spots open up.
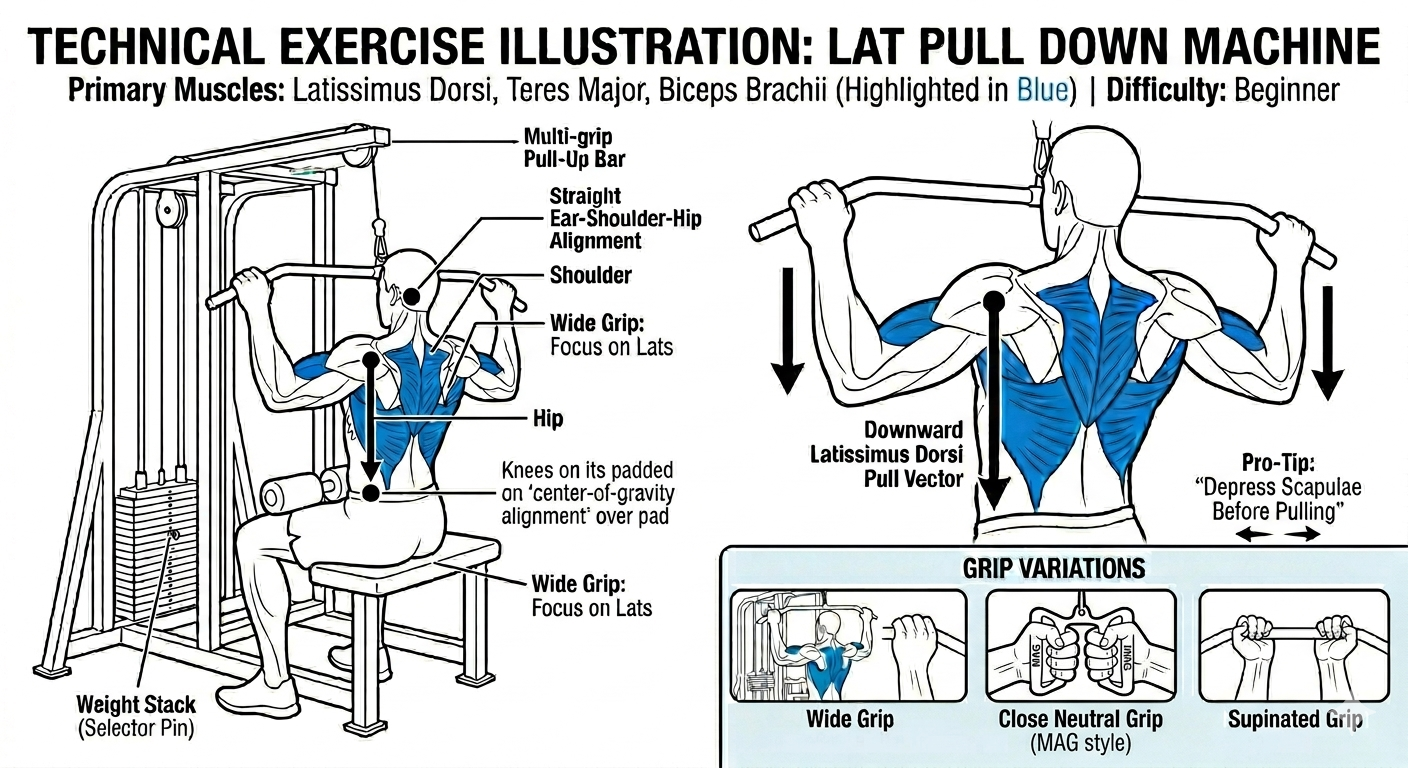
Lat Pulldown
Primary Muscles: Latissimus Dorsi, Teres Major, Biceps Brachii
Difficulty: Beginner
Step-by-Step Execution
Setup: Adjust the thigh pad so it is snug against your legs to prevent your body from lifting. Grab the bar with your desired grip width. Sit down and place your feet flat on the floor.
The Movement: Initiate the pull by depressing your shoulder blades (scapular depression). Drive your elbows down toward your hips. Keep your torso nearly vertical with only a slight lean back to allow the bar to clear your face.
The Finish: Pull the bar until it reaches your upper chest/clavicle. Squeeze your back muscles for a one-second hold, then return the bar under control to the starting position without letting your shoulders shrug toward your ears.
Pro-Tips & Common Mistakes
Common Fault: Avoid "swinging" or using momentum to pull the weight. If you have to rock your body significantly, the weight is too heavy.
The Cue: Think about pulling your elbows into your back pockets, rather than just pulling the bar down with your hands. This shifts the focus from your biceps to your lats.
Grip Variation:
Wide Grip: Increases focus on the outer lats (width).
Narrow/Reverse Grip: Increases range of motion and recruits more bicep and lower lat involvement.
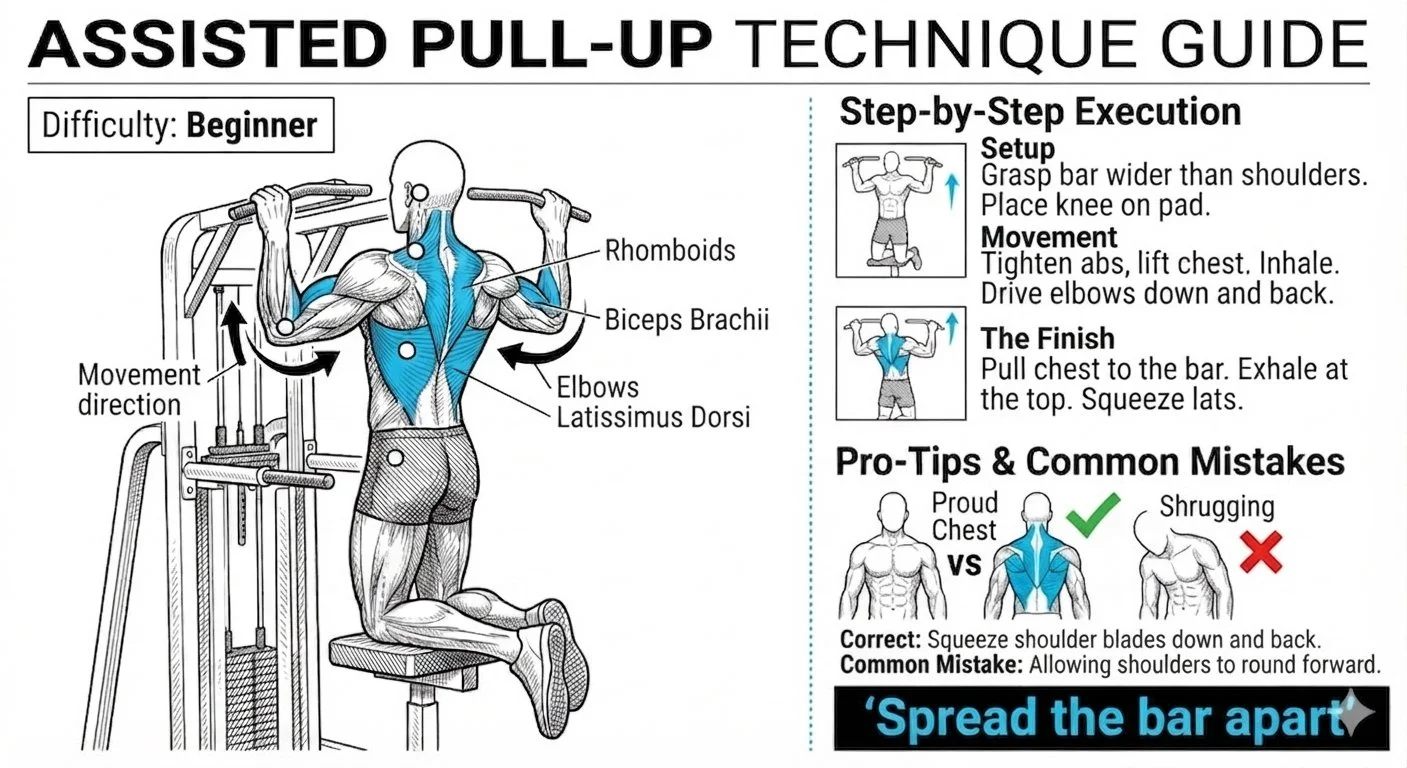
Assisted Pull-up Machine
Primary Muscles: Latissimus Dorsi, Rhomboids, Biceps Brachii
Difficulty: Beginner
Step-by-Step Execution
Setup: Select your weight (the counterweight helps you). Place your knees or feet on the pad. Take your desired grip (wide for back width, reverse for more bicep/lat engagement).
The Movement: With arms fully extended, depress your scapula (shoulders down away from ears). Pull your chest toward the bar by driving your elbows down.
The Finish: Aim to get your chin over the bar. Pause momentarily at the top, then lower yourself under control until your arms are fully extended.
Pro-Tips & Common Mistakes
Common Fault: Allowing the shoulders to "hunch" or shrug at the bottom of the movement. Keep the chest proud throughout.
The Cue: "Spread the bar apart" (if using a wide bar) to engage the lats more effectively.
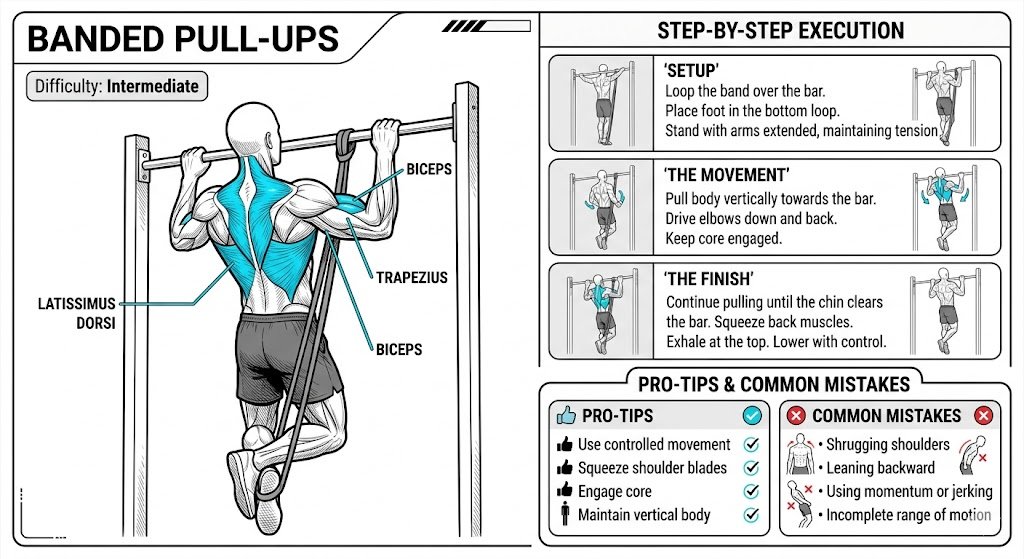
Banded Pull-ups
Primary Muscles: Latissimus Dorsi, Trapezius, Biceps
Difficulty: Intermediate
Step-by-Step Execution
Setup: Loop a resistance band securely over the pull-up bar. Step one foot or knee into the bottom loop.
The Movement: Hang with arms fully extended. Engage your lats to begin the pull. Drive your elbows down toward your ribs.
The Finish: Pull until your chin clears the bar. Lower yourself slowly—the band will provide the most assistance at the bottom.
Pro-Tips & Common Mistakes
Common Fault: Using the band as a "spring." Control the descent rather than letting the band snap you back up.
The Cue: Imagine you are trying to bend the pull-up bar in half.
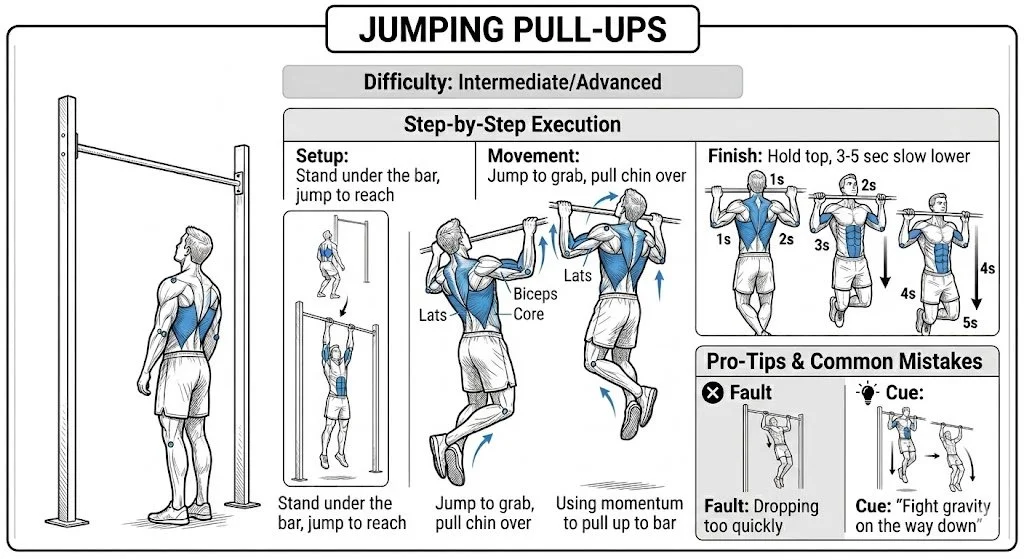
Jumping Pull-ups
Primary Muscles: Latissimus Dorsi, Biceps, Core
Difficulty: Intermediate/Advanced.
Step-by-Step Execution
Setup: Stand underneath the bar. Ensure the bar height allows you to jump and reach it comfortably.
The Movement: Jump to grab the bar, using the momentum to pull your chin above it.
The Finish: Hold for a split second at the top, then lower yourself as slowly as possible (3–5 seconds) to maximize eccentric strength.
Pro-Tips & Common Mistakes
Common Fault: Dropping too quickly. The goal of this exercise is the negative (lowering) portion.
The Cue: "Fight gravity on the way down." The slower the descent, the more muscle fiber recruitment you will achieve.
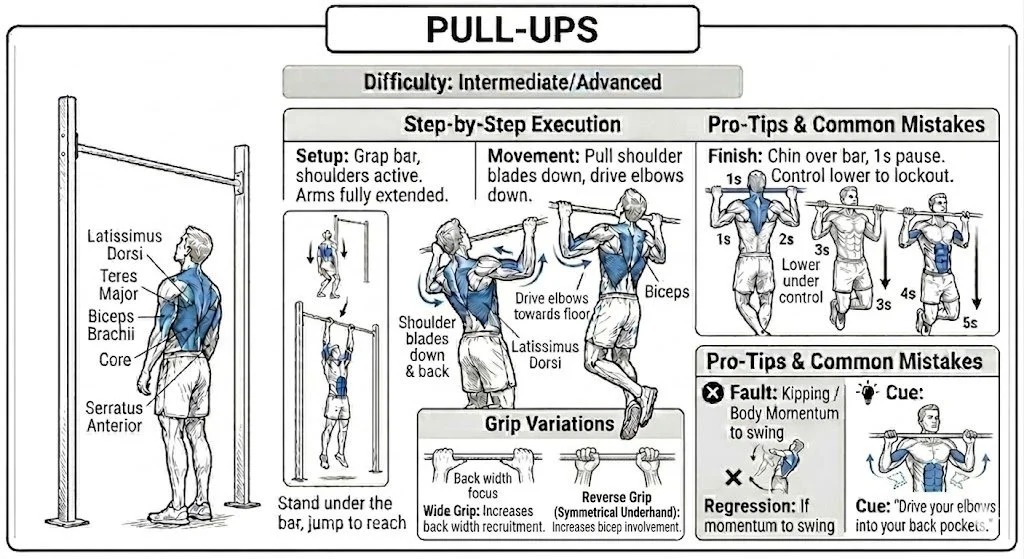
Pull-ups
Primary Muscles: Latissimus Dorsi, Teres Major, Biceps Brachii, Core
Difficulty: Intermediate/Advanced
Step-by-Step Execution
Setup: Grasp the bar with your desired grip (wide/narrow/reverse). Hang with arms fully extended and shoulders "active" (depressed, not shrugged).
The Movement: Initiate by pulling your shoulder blades down and back. Drive your elbows toward the floor.
The Finish: Continue until your chin is over the bar. Pause for one second, then lower under control until arms are locked out.
Pro-Tips & Common Mistakes
Common Fault: "Kipping" or using momentum to swing your body. If you cannot do a strict rep, regress to banded or assisted versions.
The Cue: "Drive your elbows into your back pockets."
Grip Variation:
Wide Grip: Increases back width recruitment.
Reverse (Chin-up) Grip: Maximizes bicep involvement.
Narrow Grip: Focuses on inner lats and serratus anterior.
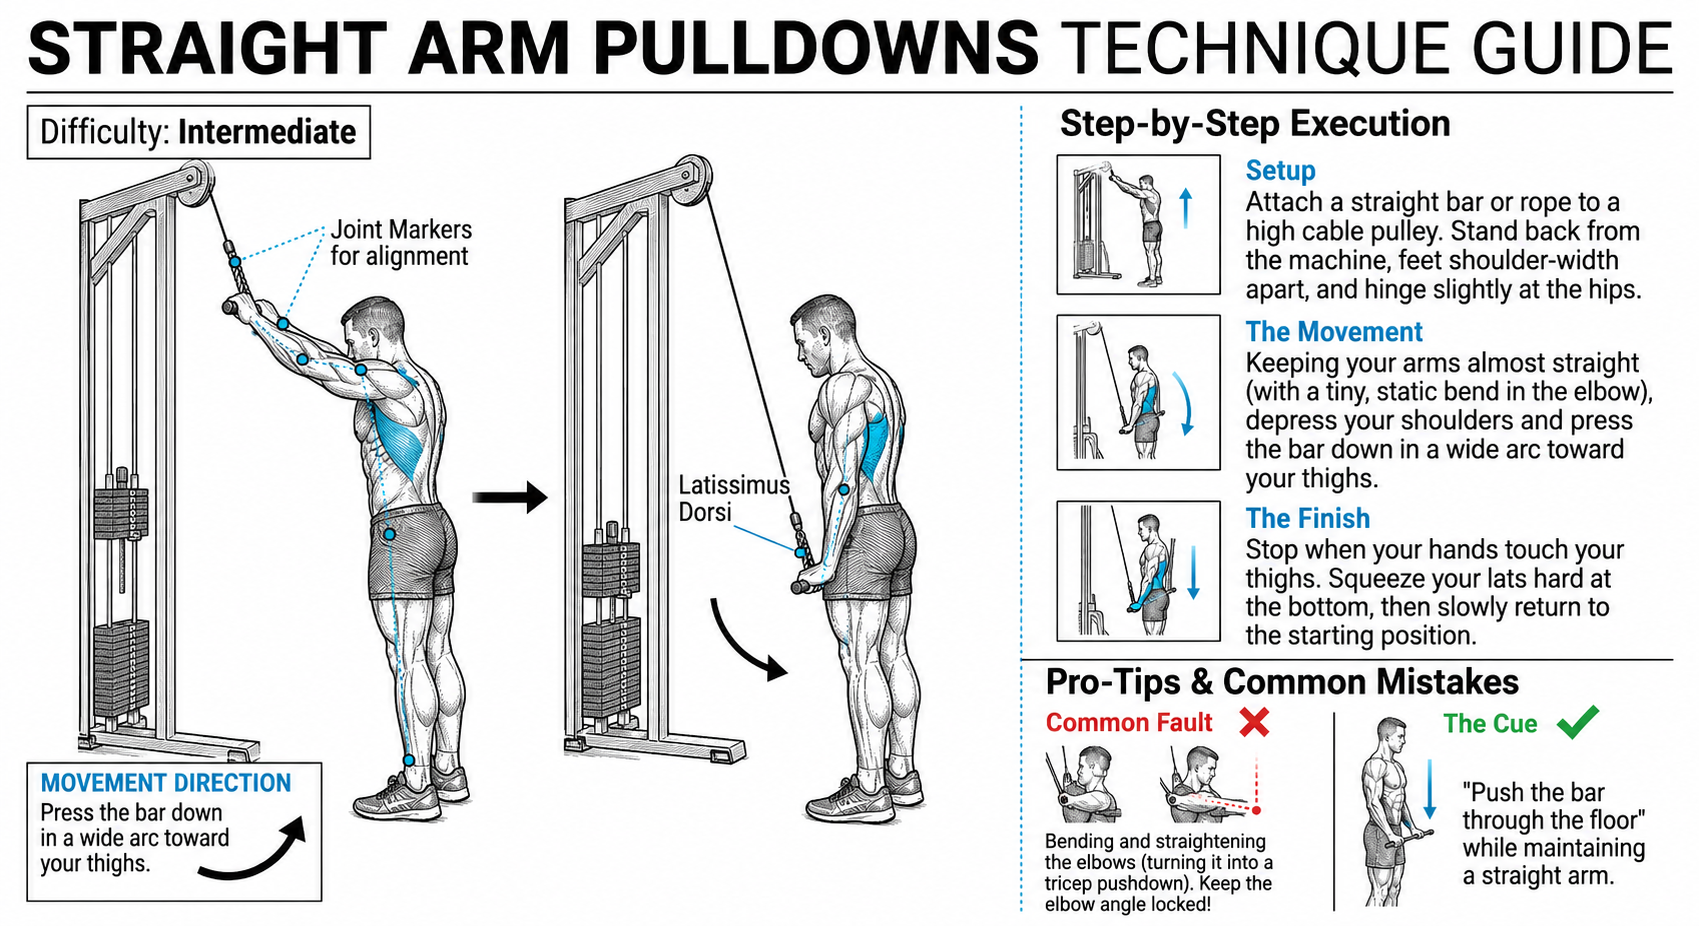
Straight Arm Pulldowns
Primary Muscles: Latissimus Dorsi (Isolated)
Difficulty: Intermediate
Step-by-Step Execution
Setup: Attach a straight bar or rope to a high cable pulley. Stand back from the machine, feet shoulder-width apart, and hinge slightly at the hips.
The Movement: Keeping your arms almost straight (with a tiny, static bend in the elbow), depress your shoulders and press the bar down in a wide arc toward your thighs.
The Finish: Stop when your hands touch your thighs. Squeeze your lats hard at the bottom, then slowly return to the starting position.
Pro-Tips & Common Mistakes
Common Fault: Bending and straightening the elbows (turning it into a tricep pushdown). Keep the elbow angle locked!
The Cue: "Push the bar through the floor" while maintaining a straight arm.
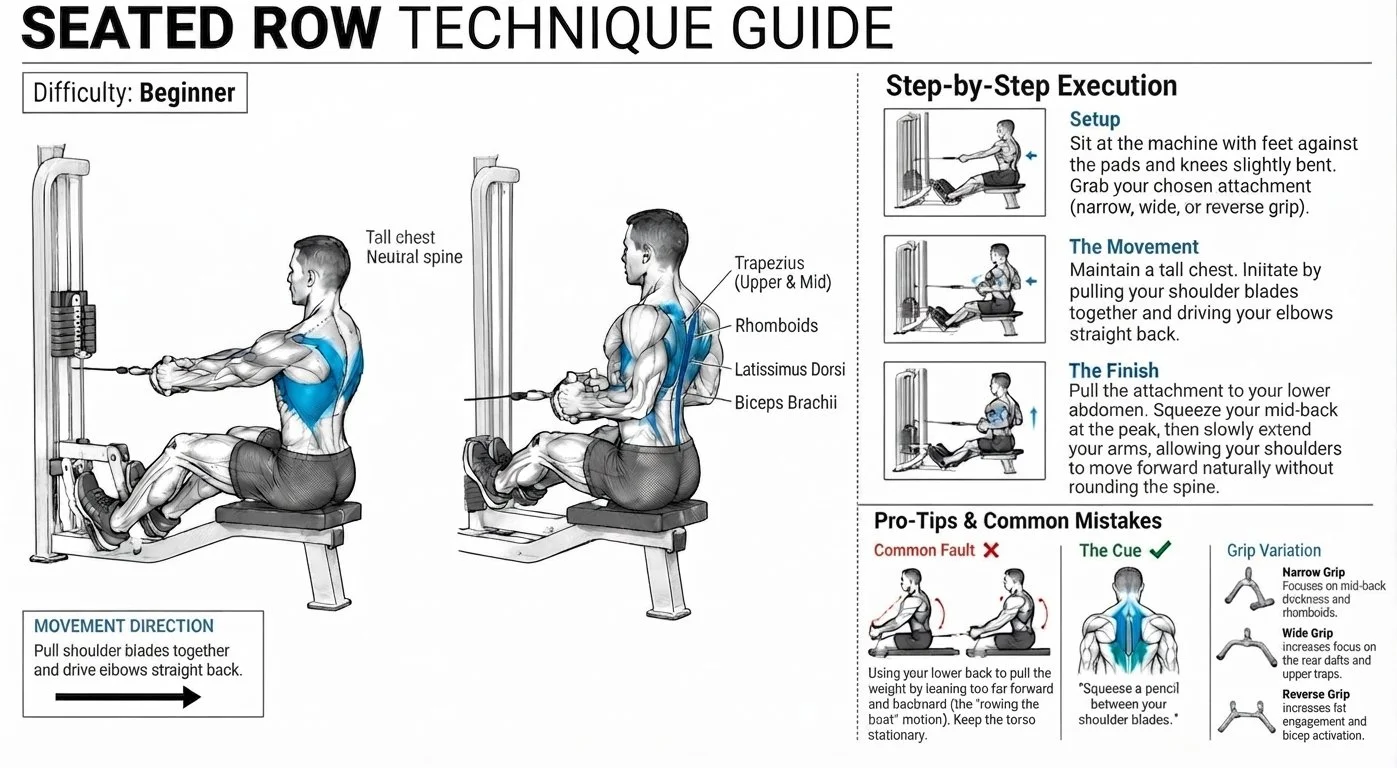
Seated Row
Primary Muscles: Latissimus Dorsi, Rhomboids, Trapezius, Biceps
Difficulty: Beginner
Step-by-Step Execution
Setup: Sit at the machine with feet against the pads and knees slightly bent. Grab your chosen attachment (narrow, wide, or reverse grip).
The Movement: Maintain a tall chest. Initiate by pulling your shoulder blades together and driving your elbows straight back.
The Finish: Pull the attachment to your lower abdomen. Squeeze your mid-back at the peak, then slowly extend your arms, allowing your shoulders to move forward naturally without rounding the spine.
Pro-Tips & Common Mistakes
Common Fault: Using your lower back to pull the weight by leaning too far forward and backward (the "rowing the boat" motion). Keep the torso stationary.
The Cue: "Squeeze a pencil between your shoulder blades."
Grip Variation:
Narrow Grip: Focuses on mid-back thickness and rhomboids.
Wide Grip: Increases focus on the rear delts and upper traps.
Reverse Grip: Increases lat engagement and bicep activation.
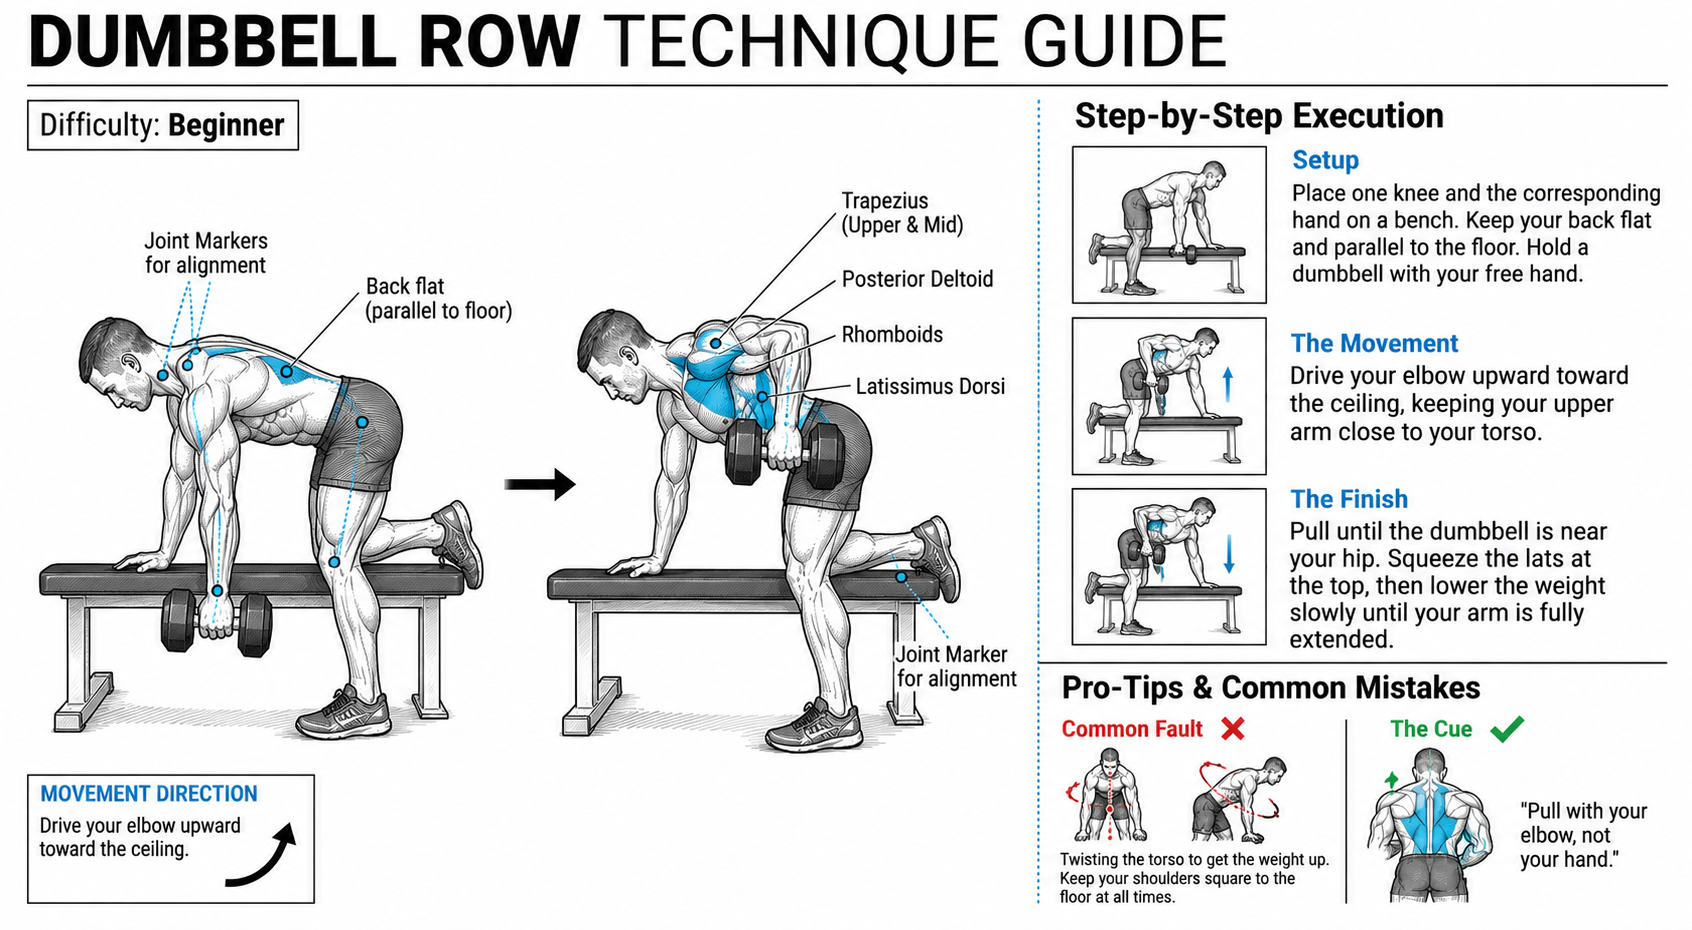
Dumbbell Row
Primary Muscles: Latissimus Dorsi, Rhomboids, Trapezius, Posterior Deltoids
Difficulty: Beginner
Step-by-Step Execution
Setup: Place one knee and the corresponding hand on a bench. Keep your back flat and parallel to the floor. Hold a dumbbell with your free hand.
The Movement: Drive your elbow upward toward the ceiling, keeping your upper arm close to your torso.
The Finish: Pull until the dumbbell is near your hip. Squeeze the lats at the top, then lower the weight slowly until your arm is fully extended.
Pro-Tips & Common Mistakes
Common Fault: Twisting the torso to get the weight up. Keep your shoulders square to the floor at all times.
The Cue: "Pull with your elbow, not your hand."
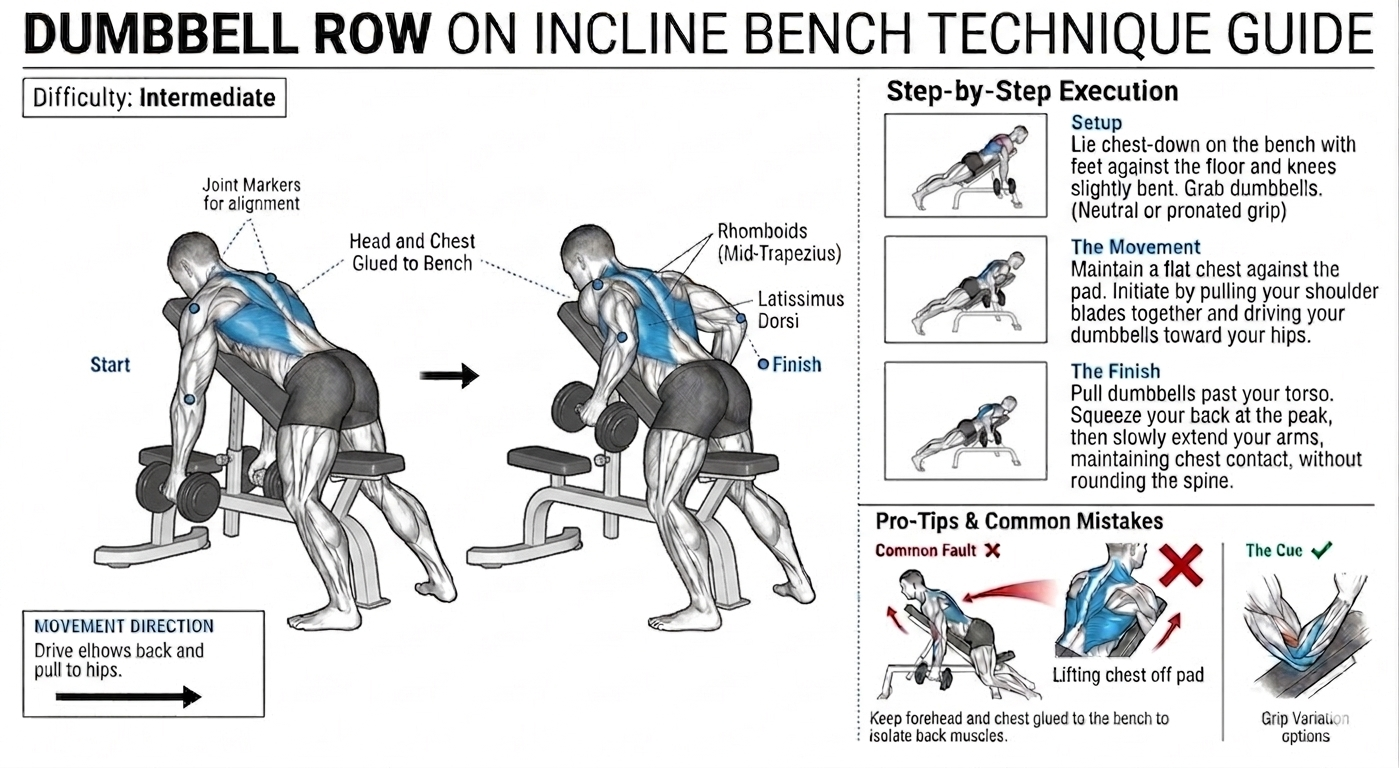
Dumbbell Row on Incline Bench
Primary Muscles: Latissimus Dorsi, Rhomboids, Mid-Trapezius
Difficulty: Intermediate
Step-by-Step Execution
Setup: Set an incline bench to roughly 30–45 degrees. Lie chest-down on the bench with a dumbbell in each hand.
The Movement: With arms hanging down, pull both dumbbells toward your hips by driving your elbows back.
The Finish: Pull until your elbows are just past your torso. Squeeze your back, then return to the start.
Pro-Tips & Common Mistakes
Common Fault: Lifting the chest off the pad. Keep your forehead and chest glued to the bench to isolate the back muscles.
The Cue: "Lead with your elbows" to ensure you don't over-rely on your biceps.
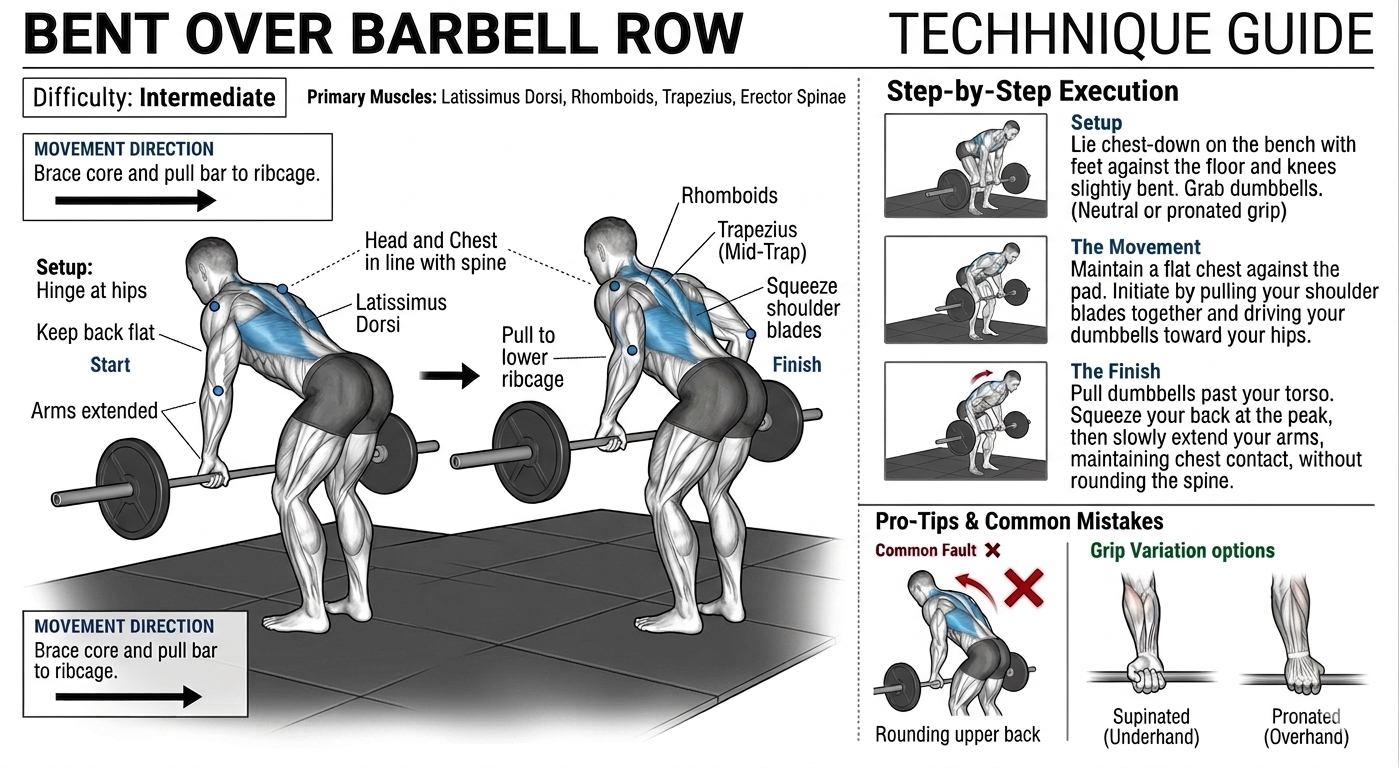
Bent Over Barbell Row
Primary Muscles: Latissimus Dorsi, Rhomboids, Trapezius, Erector Spinae
Difficulty: Intermediate
Step-by-Step Execution
Setup: Stand with feet hip-width apart. Grip the barbell with hands slightly wider than shoulders. Hinge at the hips until your torso is nearly parallel to the floor, keeping your back flat.
The Movement: Brace your core and pull the barbell toward your lower ribcage. Drive your elbows back and up.
The Finish: Squeeze your shoulder blades together at the top, then lower the bar under control until your arms are fully extended.
Pro-Tips & Common Mistakes
Common Fault: Rounding the upper back to pull more weight. If you cannot maintain a flat back, reduce the weight.
Grip Variation:
Supinated (Underhand): Increases lat and bicep activation.
Pronated (Overhand): Increases emphasis on the mid-back and rhomboids.
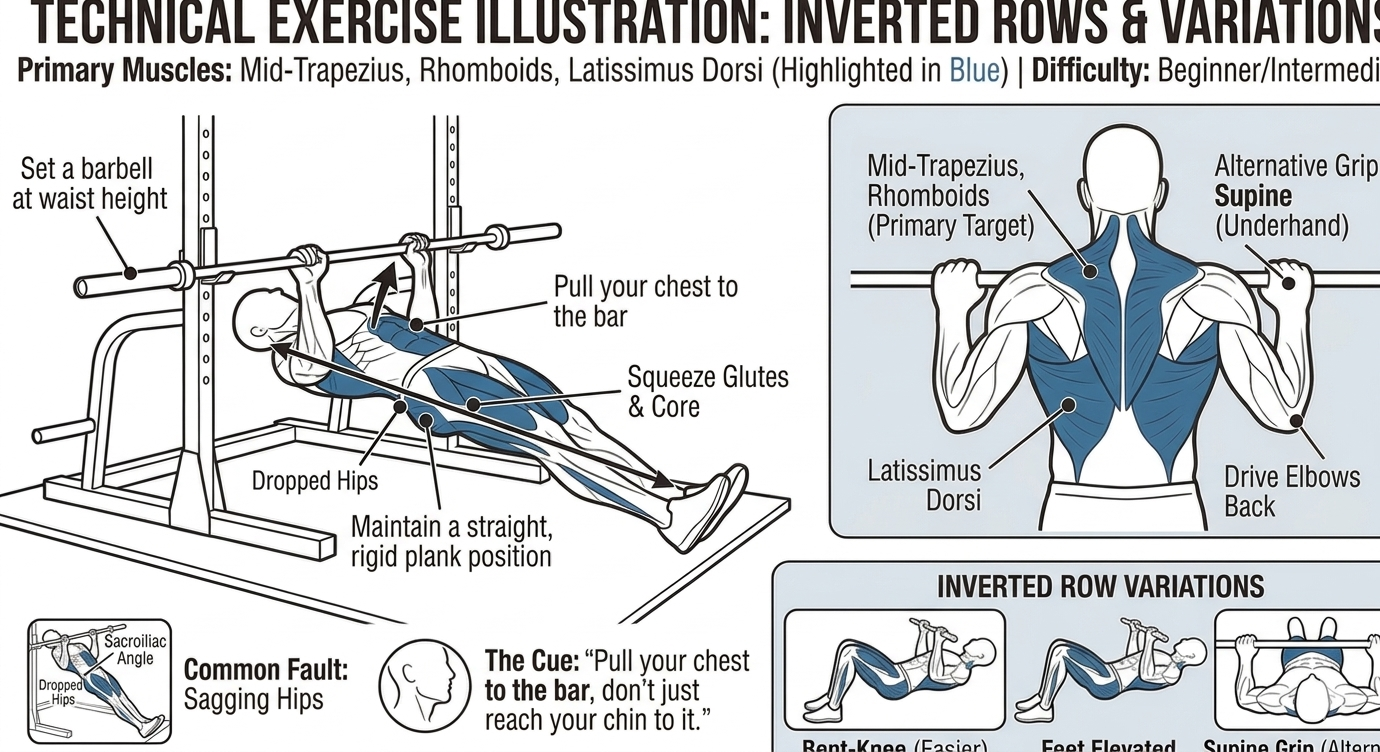
Inverted Rows
Primary Muscles: Mid-Trapezius, Rhomboids, Latissimus Dorsi
Difficulty: Beginner/Intermediate
Step-by-Step Execution
Setup: Set a barbell in a rack at waist height. Lie underneath, grip the bar, and extend your body straight (or keep knees bent for an easier version).
The Movement: Keeping your body in a rigid plank position, pull your chest toward the bar by driving your elbows back.
The Finish: Touch your chest to the bar, pause for a second, then lower yourself under control until arms are locked out.
Pro-Tips & Common Mistakes
Common Fault: Sagging hips. Keep your glutes squeezed and your core tight to maintain a straight line.
The Cue: "Pull your chest to the bar, don't just reach your chin to it."
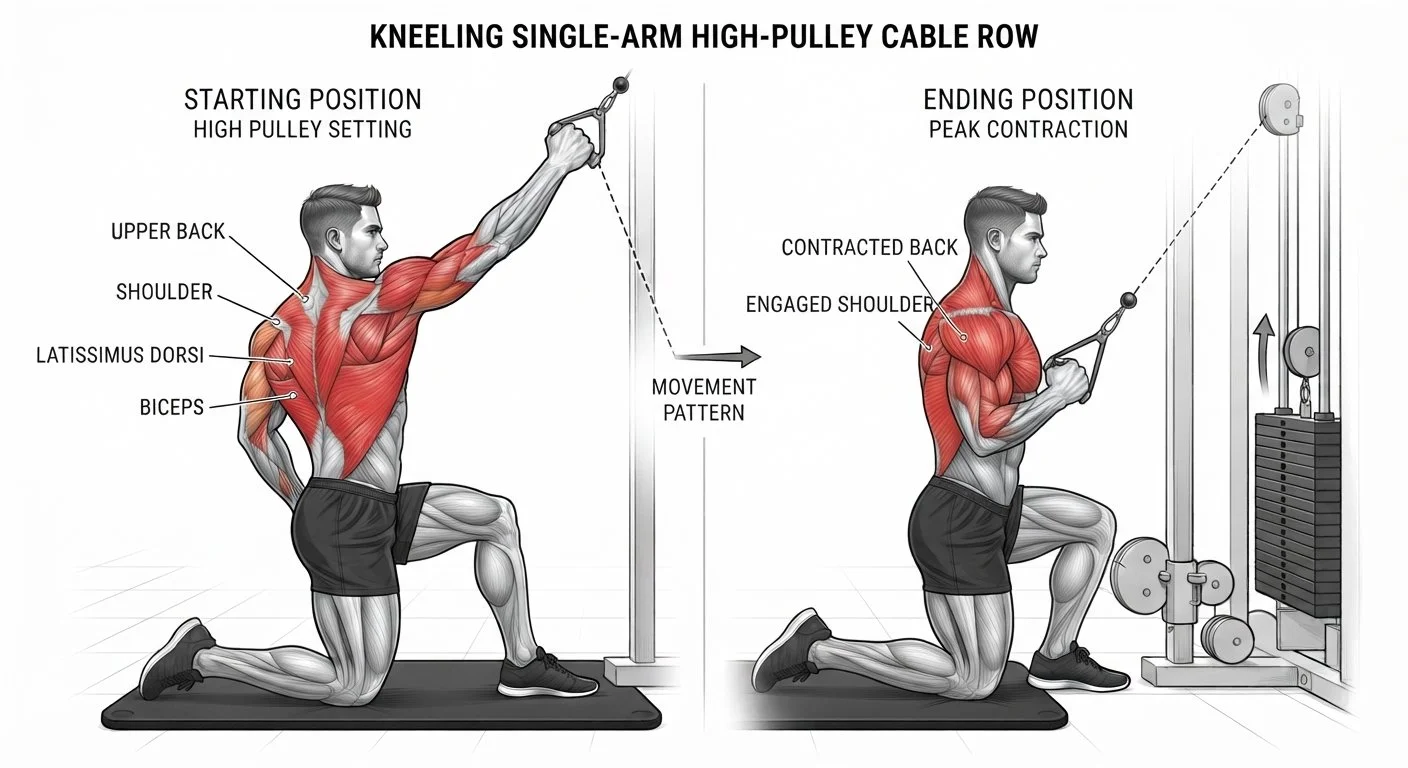
Single Arm Kneeling High Cable Row
Primary Muscles: Latissimus Dorsi, Teres Major, Rhomboids
Difficulty: Intermediate
Step-by-Step Execution
Setup: Kneel on one knee facing the high pulley. Reach up to grasp the handle with one hand.
The Movement: Pull the handle down and back toward your hip, focusing on retracting the shoulder blade on that side.
The Finish: Fully contract the lat at the bottom, then slowly return to the starting position, allowing the lat to stretch fully at the top.
Pro-Tips & Common Mistakes
Common Fault: Rotating the torso significantly. Try to keep your shoulders square to the machine.
The Cue: "Pull from the shoulder, not the wrist."
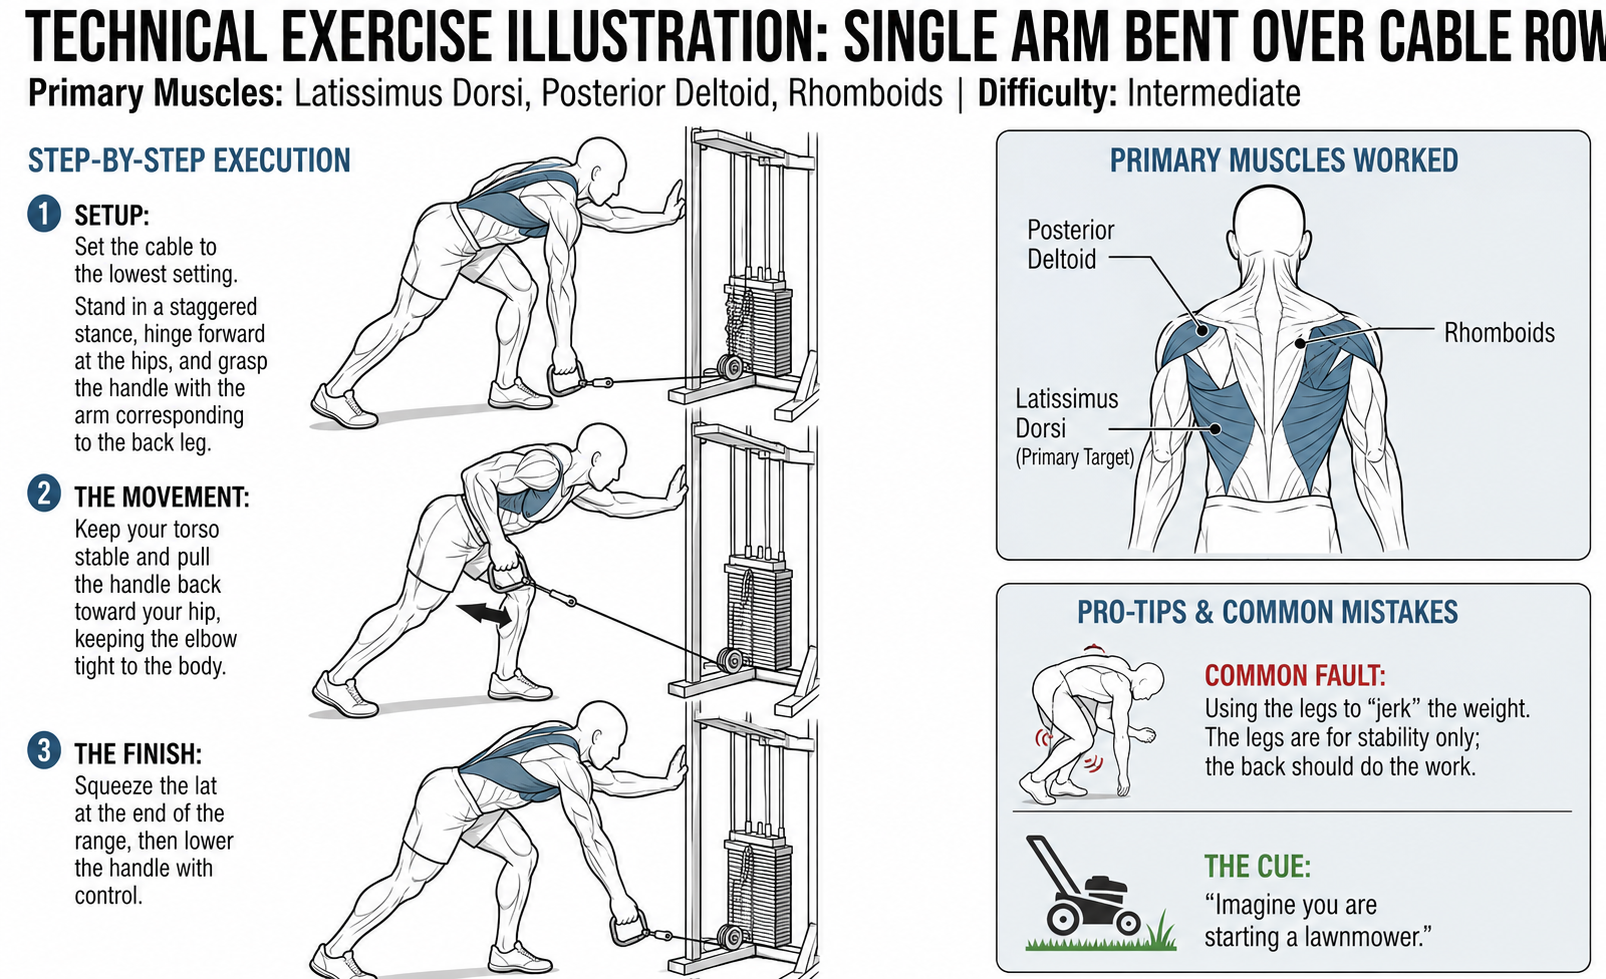
Single Arm Bent Over Cable Row
Primary Muscles: Latissimus Dorsi, Posterior Deltoid, Rhomboids
Difficulty: Intermediate
Step-by-Step Execution
Setup: Set the cable to the lowest setting. Stand in a staggered stance, hinge forward at the hips, and grasp the handle with the arm corresponding to the back leg.
The Movement: Keep your torso stable and pull the handle back toward your hip, keeping the elbow tight to the body.
The Finish: Squeeze the lat at the end of the range, then lower the handle with control.
Pro-Tips & Common Mistakes
Common Fault: Using the legs to "jerk" the weight. The legs are for stability only; the back should do the work.
The Cue: "Imagine you are starting a lawnmower."
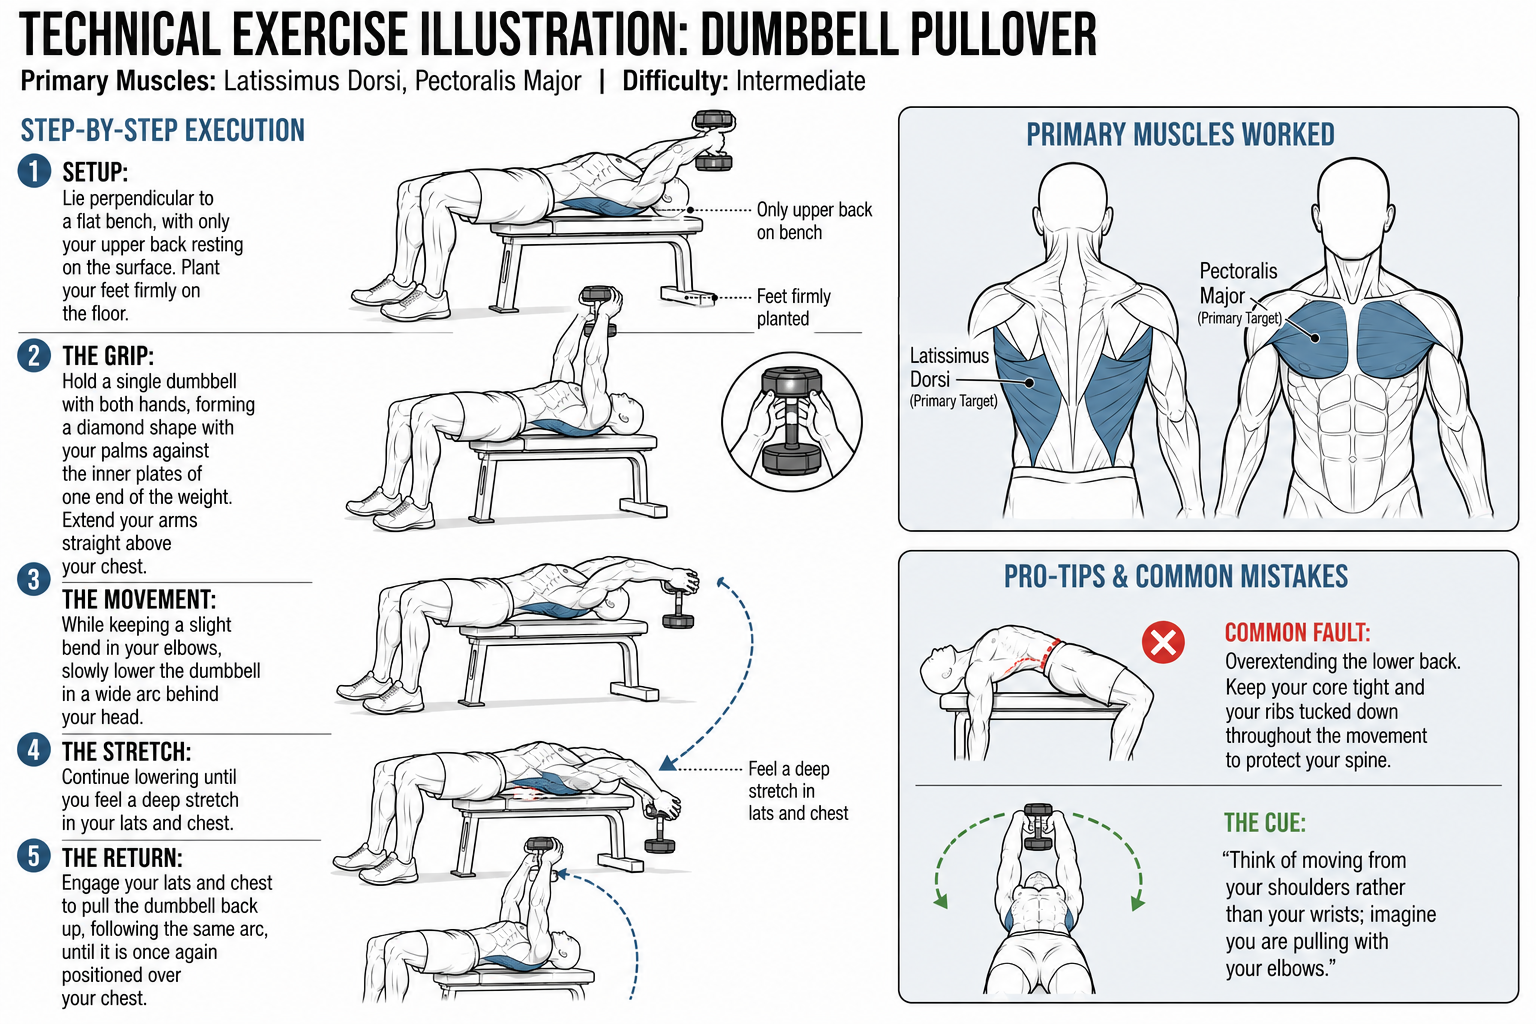
Dumbbell Pullover
This compound exercise primarily targets the latissimus dorsi and the pectoralis major, making it an excellent movement for developing upper body strength and mobility.
Step-by-Step Execution
Setup: Lie perpendicular to a flat bench, with only your upper back resting on the surface. Plant your feet firmly on the floor.
The Grip: Hold a single dumbbell with both hands, forming a diamond shape with your palms against the inner plates of one end of the weight. Extend your arms straight above your chest.
The Movement: While keeping a slight bend in your elbows, slowly lower the dumbbell in a wide arc behind your head.
The Stretch: Continue lowering until you feel a deep stretch in your lats and chest.
The Return: Engage your lats and chest to pull the dumbbell back up, following the same arc, until it is once again positioned over your chest.
Pro-Tips & Common Mistakes
Common Fault: Overextending the lower back. Keep your core tight and your ribs tucked down throughout the movement to protect your spine.
The Cue: "Think of moving from your shoulders rather than your wrists; imagine you are pulling with your elbows."
Would you like me to generate a technical illustration for the dumbbell pullover to go along with this description?
Mastering Your Physique: A Commitment to Technical Excellence
Building a powerful, balanced physique is a journey of precision, requiring not just hard work, but a deep understanding of the biomechanics behind every movement. By integrating these technical insights—from the heavy compound lifts that build foundational mass to the strategic isolation work that sculpts specific muscle heads—you are well on your way to maximizing your physical potential.
This back exercise guide is the perfect complement to your existing technical repertoire. Be sure to revisit the detailed protocols in your Leg Exercises Guide, Chest Exercise Guide, Shoulder Exercise Guide, Bicep Exercise Guide and Tricep Exercises Guide to ensure every training session is optimized for performance and growth. Consistent application of these techniques is the ultimate key to injury-free, sustainable progress.
Take the Next Step with Expert Coaching
Ready to turn this theory into tangible results? Whether you prefer hands-on training or a structured digital approach, I have the tools to help you succeed:
Book your two-session free trial in Port Melbourne: Experience personalized, one-on-one coaching with Nick Hall Body Transformations, where we tailor every set and rep to your unique physiology and goals.
Join my Online Training Program: Get elite-level guidance, customized programming, and technical support delivered directly to you, no matter where you are in the world.
Let’s refine your training, sharpen your technique, and build the strongest version of yourself.