The Complete Guide to Shoulder Development
Broad, well-developed shoulders are the centerpiece of an aesthetic physique and the powerhouse of your upper-body stability. Whether you are aiming to increase your overhead pressing strength, improve your posture, or maximize hypertrophy in the deltoids, this guide provides the technical blueprint for the most effective shoulder movements. By mastering the precise biomechanics of these exercises—from foundational compound presses to targeted lateral isolation—you can ensure maximum muscle recruitment while protecting your joints from common strain.

Ready to start with a Personal Trainer in Port Melbourne? Book in an introductory two-session free trial with Nick Hall Body Transformations today to start your personalized training program tailored to your goals.
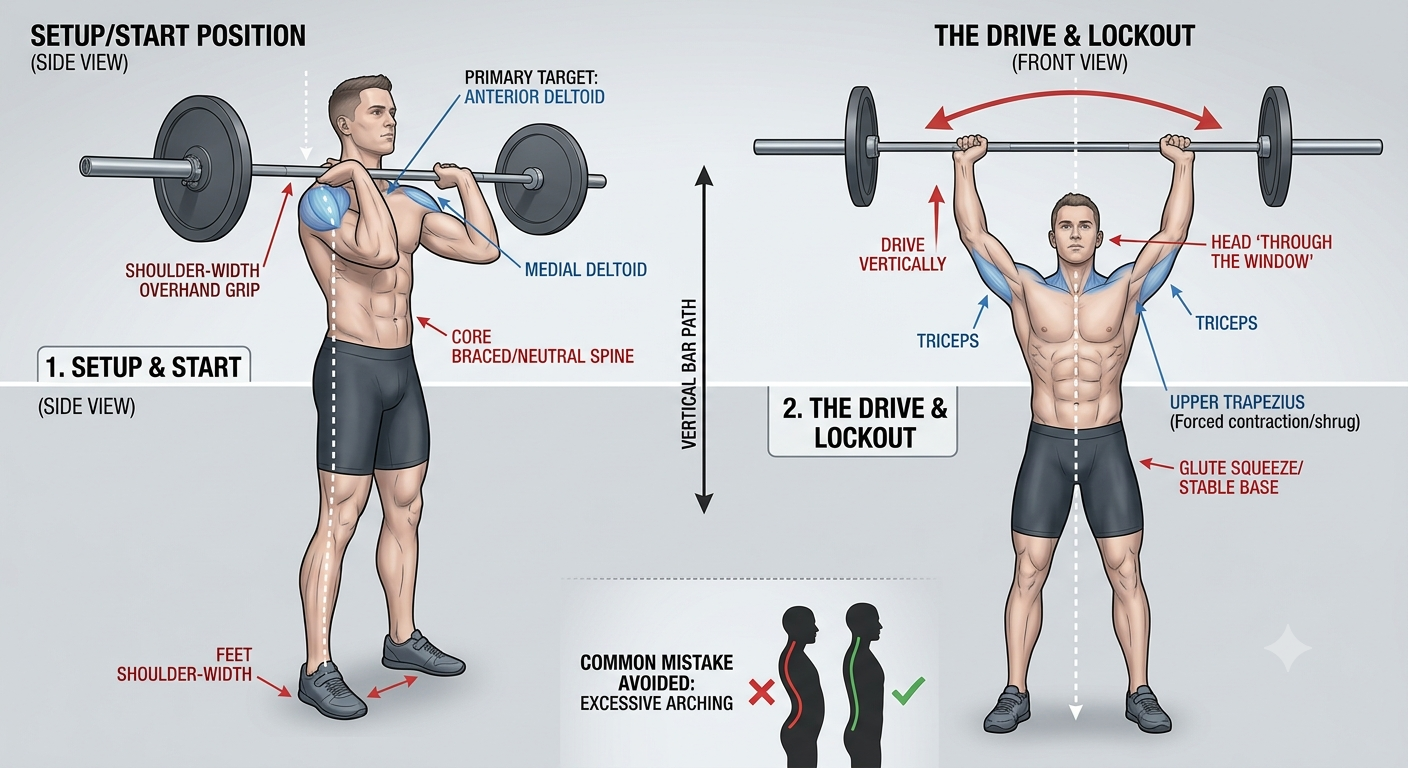
Barbell Overhead Press
The Barbell Overhead Press is the ultimate compound movement for building massive, powerful shoulders and total upper-body stability. By mastering this vertical push, you maximize anterior and medial deltoid activation while reinforcing core strength.
Targeted Anatomy
Primary: Anterior and Medial Deltoids.
Secondary: Triceps, Upper Traps, and Core.
Technical Execution
Setup: Stand with feet shoulder-width apart, core braced, and glutes tight. Rest the bar on your upper chest with a slightly wider than shoulder-width grip. Keep elbows slightly tucked in front of the bar.
The Drive: Press the bar in a straight vertical line. As the bar clears your forehead, shift your head slightly forward ("through the window") to keep the weight balanced over your joints.
The Lockout: Fully extend the elbows at the top, finishing with a slight shrug of the shoulders to engage the traps.
The Return: Lower the bar under control, retracing the same vertical path. Retract your chin as the bar clears your head to return to the starting position.
Pro-Tips for Success
Stay Vertical: Imagine the bar traveling inside a narrow, vertical tube. The closer the bar stays to your face, the safer and more efficient the lift.
Protect Your Back: Avoid excessive leaning backward. If you need to arch your lower back to move the weight, it is too heavy.
Brace Everything: Squeeze your glutes and core throughout the entire rep to create a rock-solid foundation.
Dumbbell Overhead Press
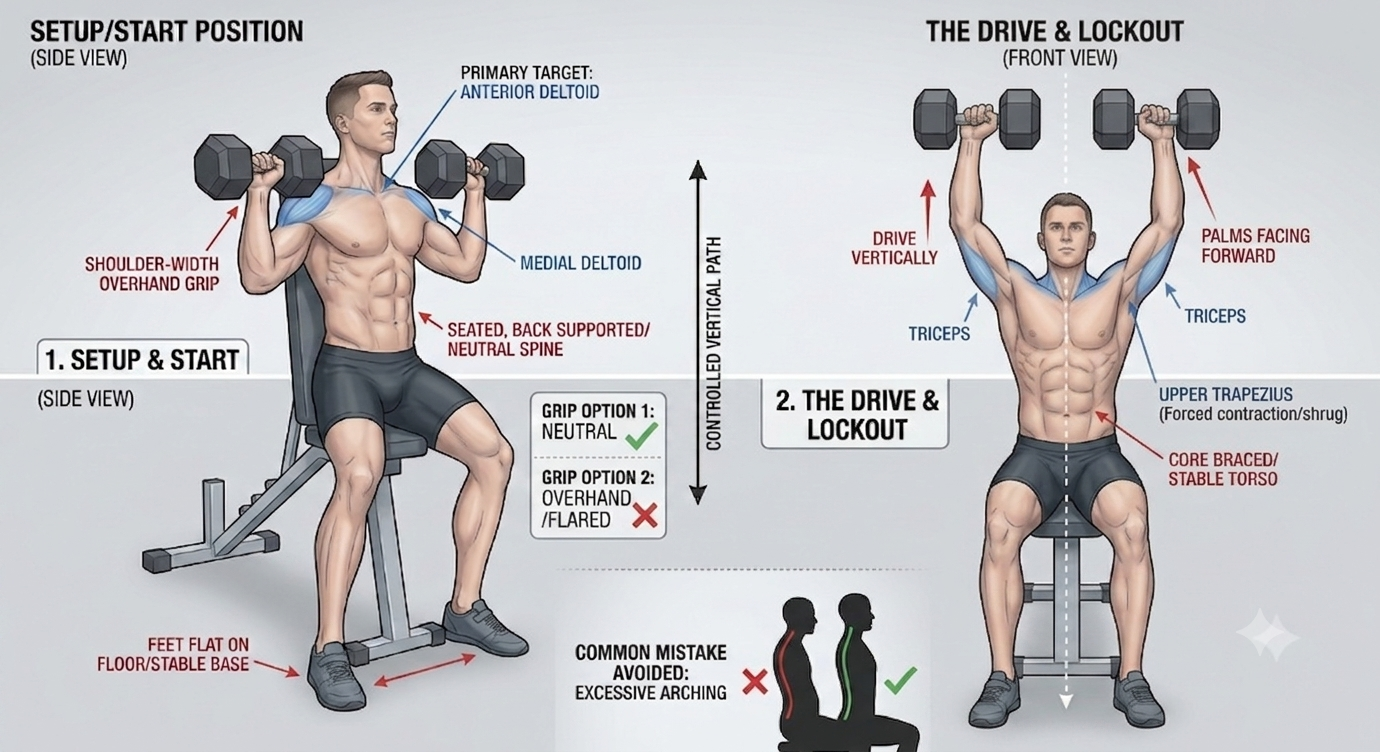
The Dumbbell Overhead Press offers a greater range of motion compared to the barbell variation, allowing for more individualized movement patterns and consistent tension on the deltoids. By utilizing a seated position, you can isolate the shoulders while maintaining a stable foundation.
Targeted Anatomy
Primary: Anterior and Medial Deltoids.
Secondary: Triceps, Upper Traps, and Core.
Technical Execution
Setup: Sit on a bench with a back support set to upright or a slight incline (80–85 degrees). Keep your feet flat on the floor, core braced, and back pressed firmly against the support.
The Drive: Starting with dumbbells at shoulder level, palms facing forward, press the weight vertically.
The Lockout: Extend your elbows fully at the top. Think about "reaching for the ceiling" to engage the upper traps at the peak of the movement.
The Return: Lower the dumbbells under control along the same path until they return to the starting position at shoulder height.
Pro-Tips for Success
Maintain Contact: Keep your glutes and upper back in contact with the bench throughout the entire set to ensure a stable base and prevent unwanted lumbar arching.
Control the Descent: The eccentric (lowering) phase is just as important for hypertrophy as the press itself; take 2 seconds to lower the weight for maximum muscle recruitment.
Arnold Press: Technical Guide
The Arnold Press is a premier rotational compound movement for the shoulders, famously popularized by Arnold Schwarzenegger. This variation uniquely maintains maximum tension on all three heads of the deltoid through an extended and rotational range of motion, rather than a straight vertical path.
Targeted Anatomy
Primary: Anterior and Medial Deltoids.
Secondary: Posterior Deltoid, Triceps, Upper Traps, and Rotator Cuff.
Technical Execution (Summarized)
Setup: Begin seated on an upright utility bench. Brace your core tightly and maximize contact between your back and the bench support, ensuring your spine remains neutral.
The Start: Hold two dumbbells at shoulder height, palms facing backward (pronated/internal rotation), with elbows tucked in close to your torso.
The Drive & Rotation: Initiate the press vertically. As the weights ascend, smoothly rotate your wrists, turning your palms forward (supinated/external rotation).
The Lockout: Fully extend the elbows at the top with palms facing forward, finishing with a small shrug to maximize upper back engagement.
The Return: Lower the dumbbells under strict control, reversing the entire rotational path to return to the backward-facing start position at shoulder height.
Pro-Tips for Success
Controlled Rotation: This is not a standard dumbbell press; the entire value lies in the controlled rotation. Avoid initiating the press with flared elbows or rotating too early.
Neutral Spine: Maintaining a rock-solid core and lumbar spine is crucial. Avoid excessive arching shifts the load away from the shoulders and creates dangerous stress on the lower back.
Focus on All Three Heads: Use the rotational path to feel tension shift from the anterior delt (start) to the medial/posterior delts during the transition, and back to the anterior delt at lockout. This provides total shoulder development in one movement.
Dumbbell Lateral Raise: Technical Guide
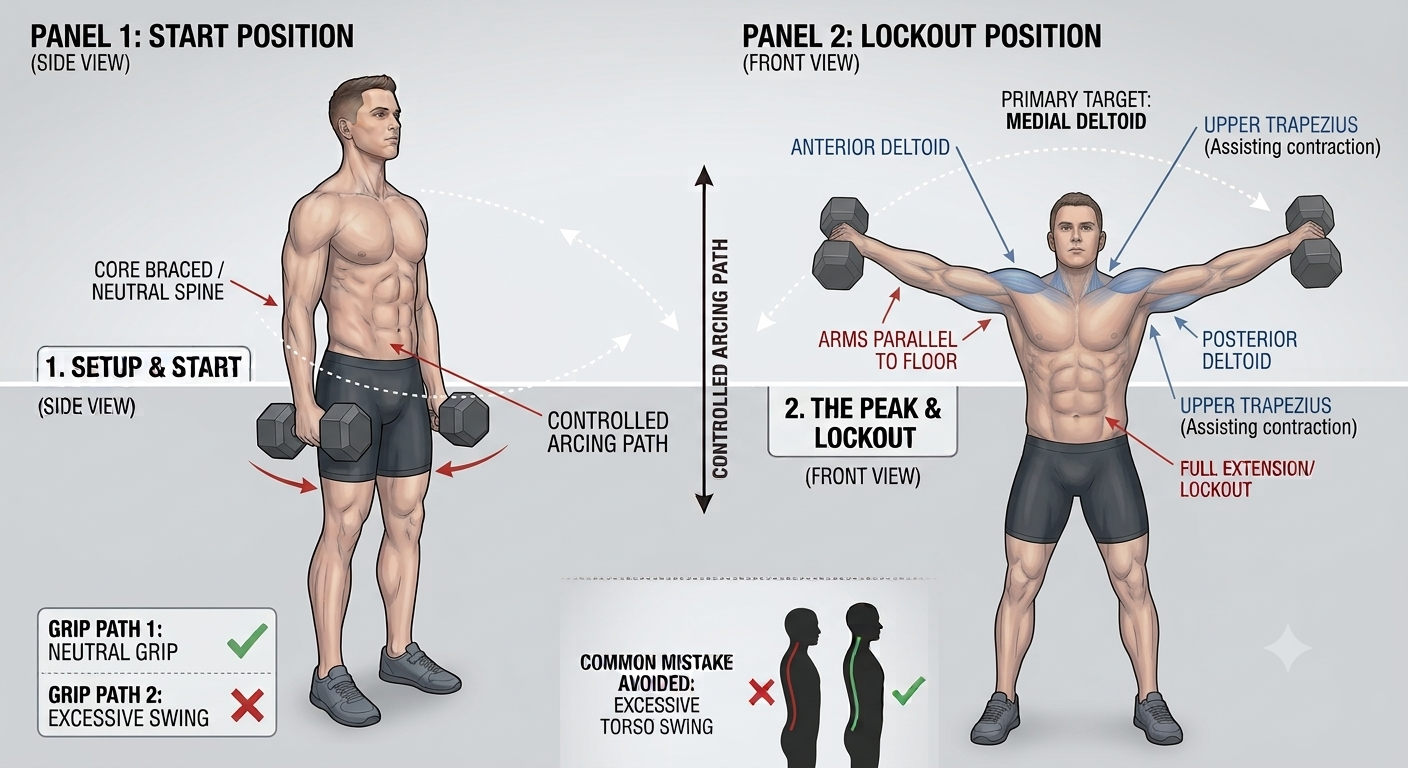
The Dumbbell Lateral Raise is the premier isolation movement for targeting the medial (side) deltoid. By effectively isolating this muscle head, you create the "capped" look that defines broad shoulders.
Targeted Anatomy
Primary: Medial Deltoid.
Secondary: Anterior Deltoid, Posterior Deltoid, Upper Trapezius.
Technical Execution
Setup: Stand with feet shoulder-width apart, holding a dumbbell in each hand with a neutral grip (palms facing your body). Maintain a slight bend in your elbows throughout the entire movement.
The Initiation: With your core braced, initiate the movement by leading with your elbows, lifting the dumbbells out to your sides until they reach approximately shoulder height.
The Peak: At the top of the movement, your arms should be parallel to the floor, forming a "T" shape with your torso. Pause briefly to maximize the squeeze in the medial deltoid.
The Descent: Lower the dumbbells under controlled tension, maintaining the same path and tempo to return to the starting position without letting the weights rest against your legs.
Pro-Tips for Success
Lead with the Elbows: To maximize lateral delt recruitment, imagine you are pouring water out of a pitcher as you lift. Keep your pinky finger slightly higher than your thumb to ensure the medial head bears the load.
Eliminate Momentum: Avoid swinging your torso to "cheat" the weight up. If you cannot lift the weight without using your legs or back, choose a lighter dumbbell.
Control the Tempo: The medial deltoid is best stimulated with higher volume and controlled tempo rather than heavy, explosive lifting.
Cable Side Raise: Technical Guide
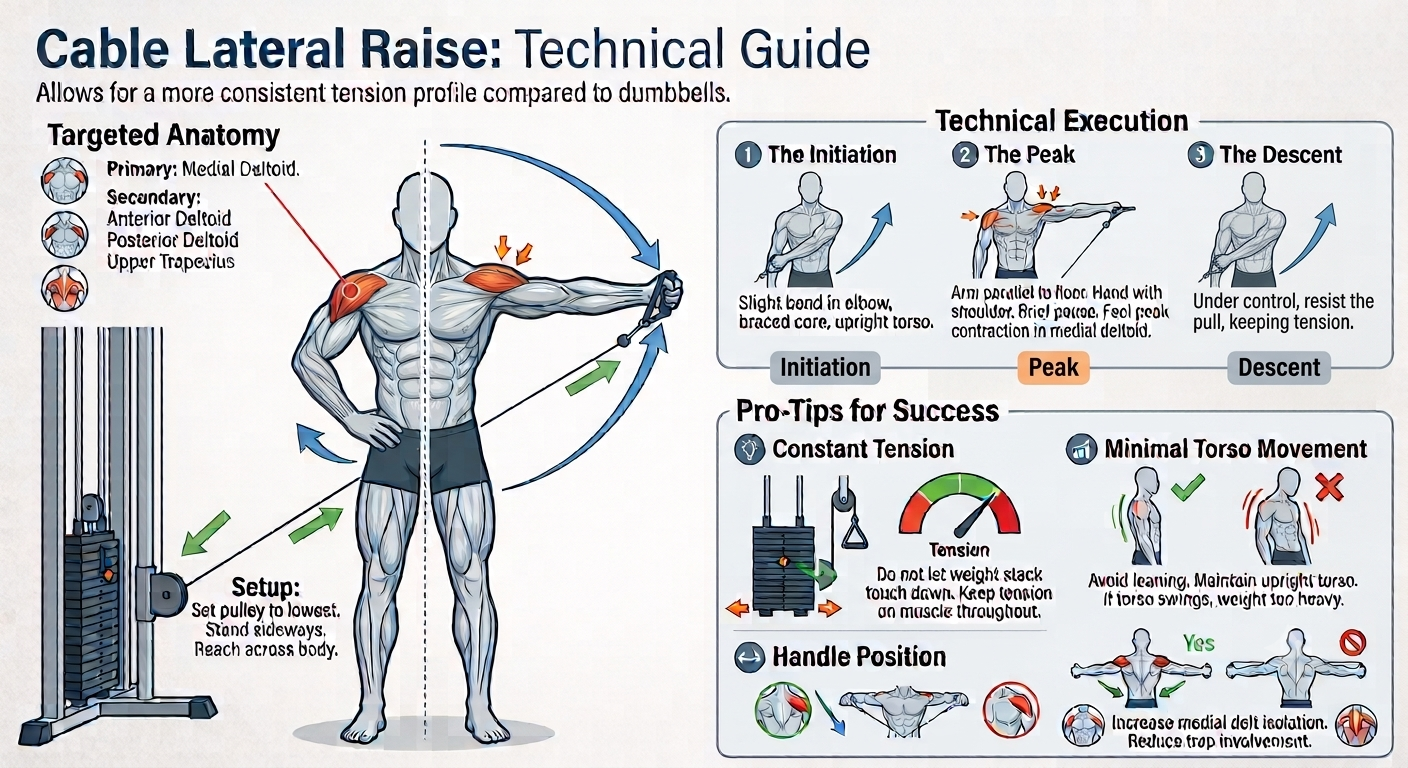
The cable variation allows for a more consistent tension profile compared to dumbbells because the resistance does not drop off at the bottom of the movement.
Targeted Anatomy
Primary: Medial Deltoid.
Secondary: Anterior Deltoid, Posterior Deltoid, Upper Trapezius.
Technical Execution
Setup: Set the cable pulley to the lowest position. Stand sideways to the cable stack, feet shoulder-width apart. Reach across your body with the hand furthest from the stack to grab the handle.
The Initiation: With a slight bend in your elbow, keep your core braced and your torso upright. Lift your arm out to the side in a smooth arc.
The Peak: Stop when your arm is parallel to the floor. Your hand should be in line with your shoulder. Pause briefly to feel the peak contraction in the medial deltoid.
The Descent: Lower the handle under complete control, resisting the cable's pull all the way back to the starting position across your body.
Pro-Tips for Success
Constant Tension: Do not let the weight stack touch down between reps; keep the tension on the muscle throughout the entire set.
Minimal Torso Movement: Avoid leaning toward or away from the cable stack to compensate for the weight. If you need to swing your torso, the weight is too heavy.
Handle Position: Holding the cable handle slightly behind your torso can sometimes increase medial delt isolation and reduce upper trap involvement.
Lean-Away Cable Lateral Raise: Technical Guide
The Lean-Away Cable Lateral Raise is a superior variation of the standard lateral raise. By leaning your body away from the pulley, you change the resistance profile, ensuring that the tension remains high throughout the entire range of motion—especially at the start, where a standard dumbbell lateral raise offers little resistance.
Targeted Anatomy
Primary: Medial Deltoid.
Secondary: Anterior Deltoid, Posterior Deltoid, Trapezius (as a stabilizer).
Technical Execution
Setup: Set the cable pulley to the lowest possible setting. Stand directly next to the pulley station. Grasp the handle with the hand furthest from the cable stack (you can also grasp the pole of the cable machine with your other hand for stability).
The Stance: Lean your torso away from the pulley, keeping your feet close to the base of the machine. Your body should form a straight line from your anchored feet to your shoulders.
The Initiation: With a slight bend in your elbow, initiate the movement by raising your arm out to your side in a wide arc.
The Peak: Lift your arm until it is parallel to the floor. Focus on "pushing" the weight out toward the side wall rather than just pulling it up.
The Descent: Lower the weight in a slow, controlled manner back to your side, ensuring constant tension is maintained by the cable.
Pro-Tips for Success
Minimize Traps: Keep your shoulder depressed (down and away from your ear) throughout the lift to ensure the medial deltoid does the heavy lifting rather than the upper trapezius.
Maintain the Lean: The "lean-away" is critical to the exercise's effectiveness; do not stand upright, as this will revert the resistance profile back to a standard cable lateral raise.
Controlled Eccentric: Because the cable provides constant tension, the lowering phase is highly effective for hypertrophy. Take 2–3 seconds to return to the starting position.
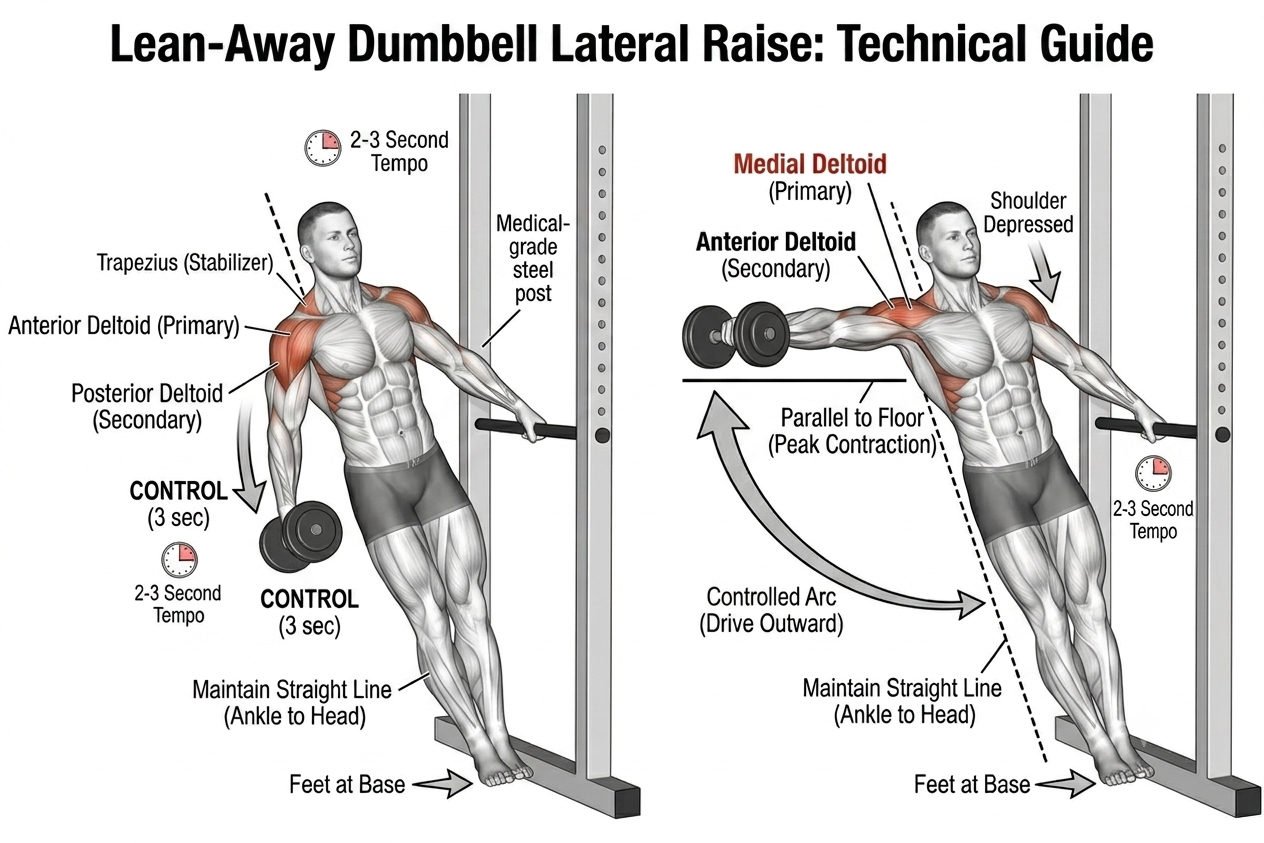
Lean-Away Dumbbell Lateral Raise: Technical Guide
The Lean-Away Dumbbell Lateral Raise is a variation of the traditional lateral raise that uses a fixed object (such as a squat rack pole) to achieve the same resistance profile benefits as the cable version, ensuring high tension at the start of the movement.
Targeted Anatomy
Primary: Medial Deltoid.
Secondary: Anterior Deltoid, Posterior Deltoid, Trapezius (as a stabilizer).
Technical Execution
Setup: Stand next to a sturdy vertical pole or rack. Grasp the pole with one hand at approximately waist or chest height.
The Stance: Place your feet close to the base of the pole. Lean your entire body away from the pole until your arm holding the pole is fully extended. Your body should form a straight line from your ankles to your head.
The Initiation: Hold a dumbbell in your free hand with a neutral grip. With a slight bend in your elbow, initiate the movement by raising the dumbbell out to your side in a wide, controlled arc.
The Peak: Raise the dumbbell until your arm is parallel to the floor. Focus on driving the weight outward rather than simply lifting it up.
The Descent: Lower the dumbbell back to your side under slow, controlled resistance. Ensure you maintain your body's lean throughout the entire repetition.
Pro-Tips for Success
Maintain the Angle: The effectiveness of this exercise relies entirely on the degree of your lean. If you stand too upright, the resistance profile changes and becomes less effective at the bottom of the movement.
Control the Eccentric: Use a 2–3 second tempo on the way down. Because you are at an angle, the gravity-induced tension is higher; controlling this phase is excellent for hypertrophy.
Shoulder Positioning: Keep your shoulder depressed (down and away from your ear) at the top of the movement. If you find your trap shrugging up, focus on pulling your shoulder blade down as you raise the arm.
Face Pull: Technical Guide
The Face Pull is a premier exercise for strengthening the posterior chain of the upper body, specifically focusing on the rear deltoids and the external rotators of the rotator cuff.
Targeted Anatomy
Primary: Posterior Deltoid, Infraspinatus, Teres Minor (external rotators).
Secondary: Rhomboids, Trapezius (middle and lower).
Technical Execution
Setup: Attach a rope handle to a cable pulley positioned at or slightly above eye level. Grip the ends of the rope with a neutral or overhand grip.
The Initiation: Take a step back to create tension in the cable. Keep your core braced and your spine neutral.
The Pull: Initiate the movement by pulling the center of the rope toward your forehead (or the bridge of your nose), keeping your elbows high and flared out to the sides.
The Peak: Focus on pulling your hands apart as they approach your face, squeezing your shoulder blades together and externally rotating your shoulders at the point of peak contraction.
The Return: Extend your arms back to the starting position under full control, resisting the weight stack to ensure the posterior deltoids remain under tension throughout the movement.
Pro-Tips for Success
External Rotation: The hallmark of a high-quality Face Pull is the external rotation at the end of the pull; imagine trying to pull the rope apart while bringing it toward your forehead.
Maintain Elbow Height: Keep your elbows raised to shoulder level throughout the pull to ensure the rear deltoids and upper back are the primary movers, rather than the lats.
Avoid Compensatory Movement: Do not use your body weight to pull the rope; maintain a static, stable torso throughout the repetition.
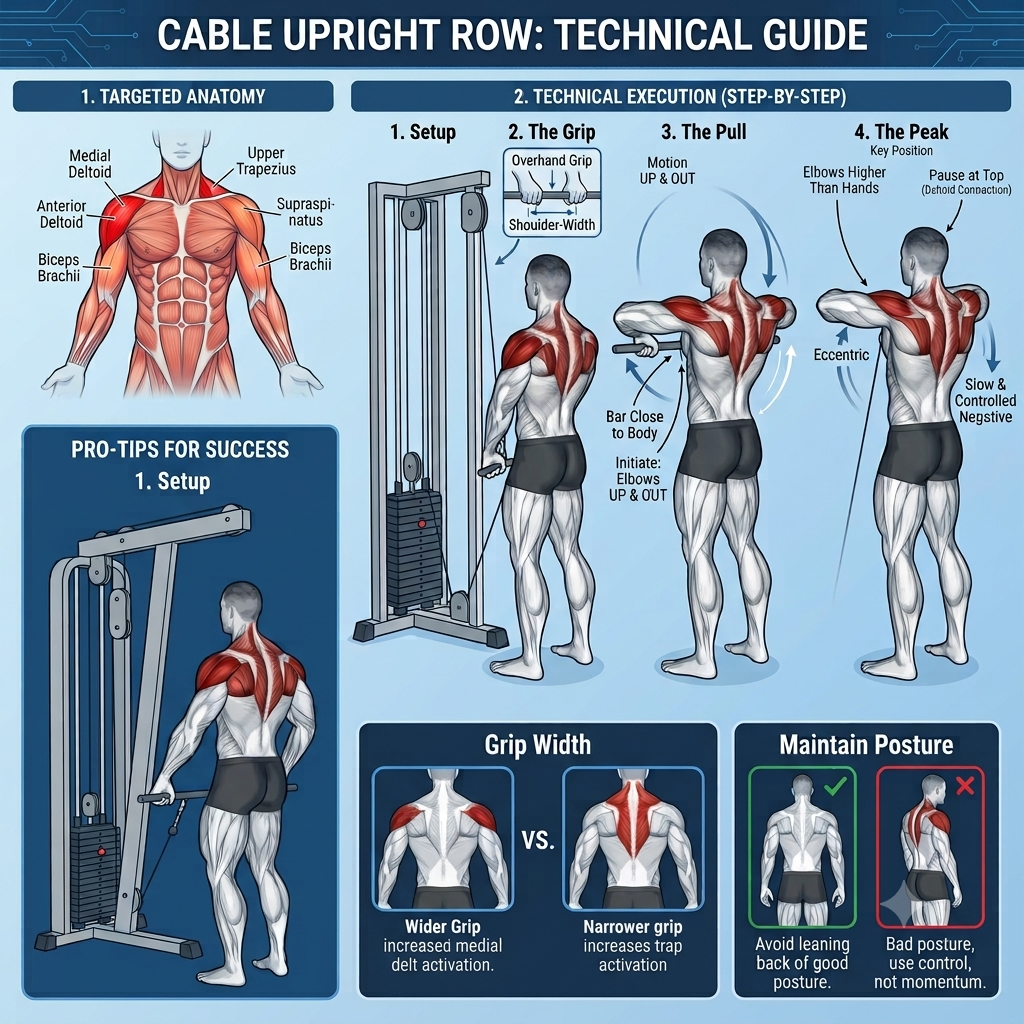
Cable Upright Row: Technical Guide
Targeted Anatomy
Primary: Medial Deltoid, Upper Trapezius.
Secondary: Anterior Deltoid, Biceps Brachii, Supraspinatus.
Technical Execution
Setup: Attach a straight bar or EZ-curl bar to a low pulley cable station. Stand close to the stack with your feet shoulder-width apart.
The Grip: Grasp the bar with an overhand, shoulder-width grip. Keep your arms fully extended and your chest proud.
The Pull: Initiate the movement by driving your elbows upward and outward. Keep the bar as close to your body as possible as you pull it toward your upper chest or chin.
The Peak: At the top of the movement, your elbows should be higher than your hands. Pause for a brief second to focus on the contraction in your lateral deltoids and traps.
The Descent: Lower the bar slowly under complete control, fighting the resistance all the way down until your arms are fully extended.
Pro-Tips for Success
Elbow Lead: The key to this exercise is leading with your elbows. If you focus on pulling with your hands, you will likely shift the emphasis toward your biceps rather than your shoulders.
Width Matters: Using a slightly wider grip can increase the demand on the medial deltoids, whereas a narrower grip tends to involve more of the upper trapezius.
Maintain Posture: Avoid leaning back or using momentum to "cheat" the weight up. If you find yourself swinging, drop the weight to maintain strict, isolated form.
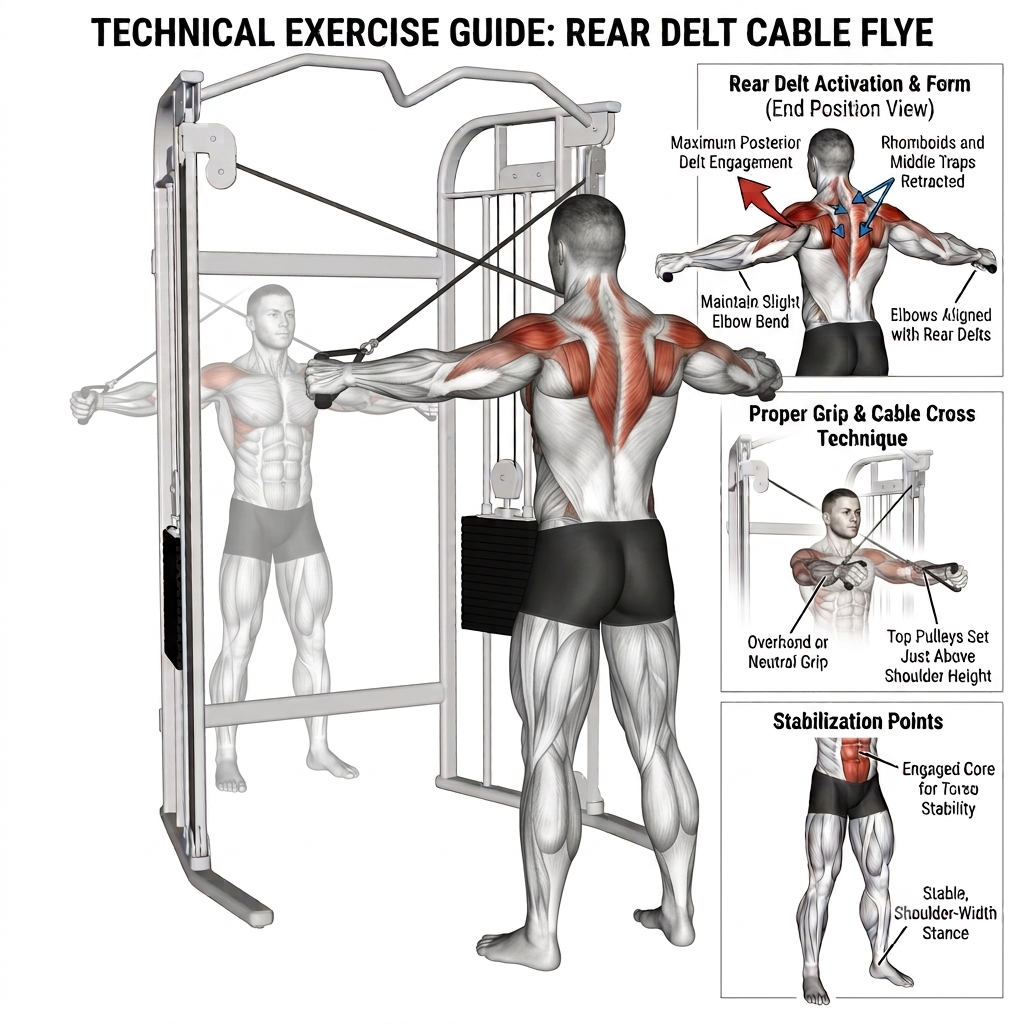
Cable Rear Delt Flyes: Technical Guide
Targeted Anatomy
Primary: Posterior Deltoid.
Secondary: Rhomboids, Middle Trapezius, Infraspinatus, Teres Minor.
Technical Execution
Setup: Set the cable pulleys to shoulder height. Stand in the center of the cable station. Grasp the left pulley with your right hand and the right pulley with your left hand, crossing the cables in front of your body.
Stance: Take a step back to create tension in the cables. Maintain a slight hinge at the hips and a neutral, braced spine.
The Initiation: With a slight bend in your elbows, initiate the movement by pulling your hands apart and backward in a wide, horizontal arc.
The Peak: At the end of the arc, focus on pulling your shoulder blades together and squeezing your posterior deltoids. Your arms should be in line with your shoulders.
The Descent: Allow the cables to return to the starting position under slow, controlled resistance. Do not let the weight stack touch down between repetitions.
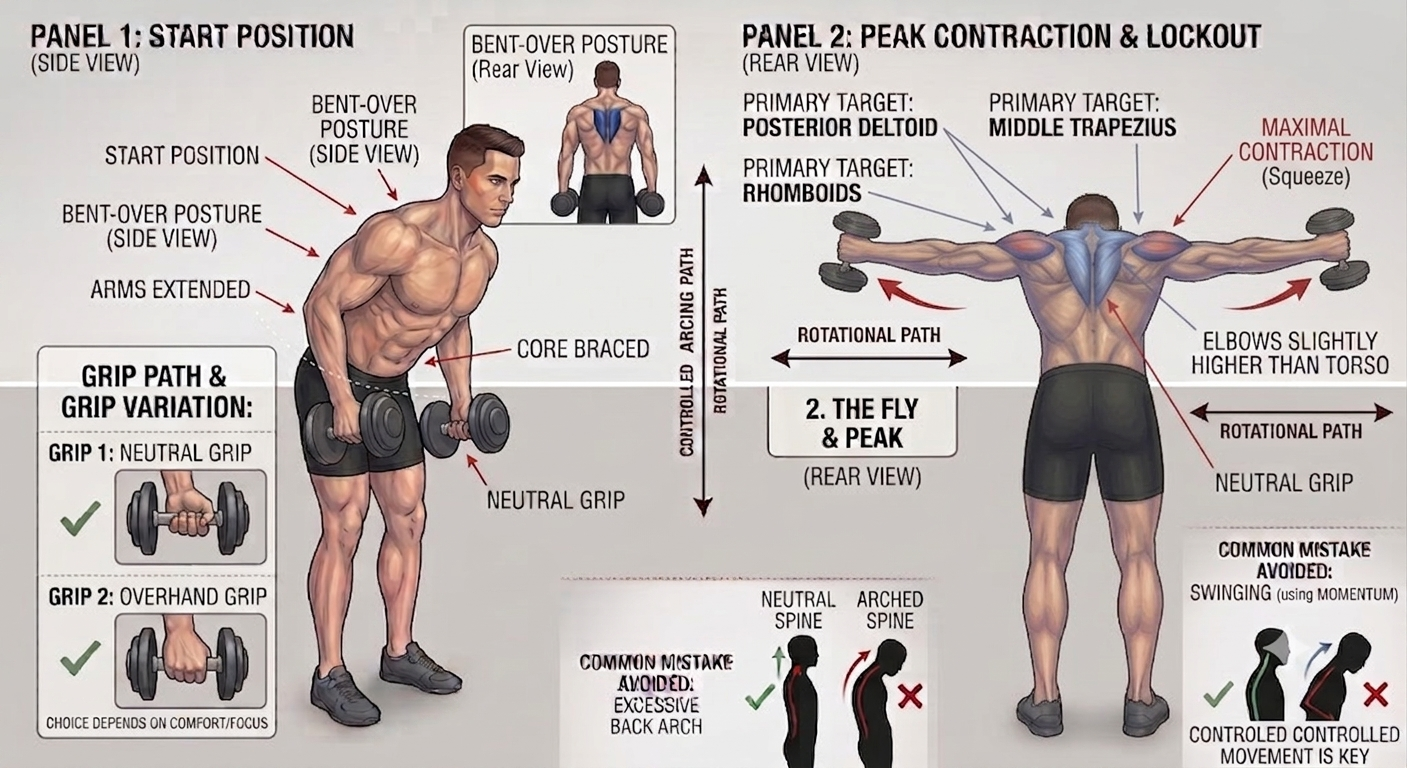
Bent-Over Rear Delt Flyes: Technical Guide
Targeted Anatomy
Primary: Posterior Deltoid.
Secondary: Rhomboids, Middle Trapezius, Infraspinatus, Teres Minor.
Technical Execution
Setup: Stand with feet hip-width apart, holding a dumbbell in each hand. Hinge at your hips, keeping your knees slightly bent and your spine in a neutral, flat position, until your torso is nearly parallel to the floor.
The Grip: You can utilize either a neutral grip (palms facing each other) or an overhand grip (palms facing backward) based on your comfort and focus.
The Initiation: Brace your core firmly. With a slight bend in your elbows, initiate the movement by driving your elbows out to the sides in a wide arc.
The Peak: At the top of the arc, ensure your elbows are slightly higher than your torso and hold for a brief moment to maximize the contraction in your rear delts and upper back.
The Descent: Lower the dumbbells back to the starting position under control, fighting the resistance throughout the entire motion.
Pro-Tips for Success
Avoid Momentum: A common mistake is using a swinging motion to move the weights. Keep the movement controlled throughout to ensure the deltoids are doing the work, not gravity or momentum.
Maintain Spinal Alignment: Keep a neutral spine throughout the set to protect your lower back.
Mind-Muscle Connection: Focus on pulling with your elbows rather than your hands to minimize bicep recruitment and maximize rear delt activation.
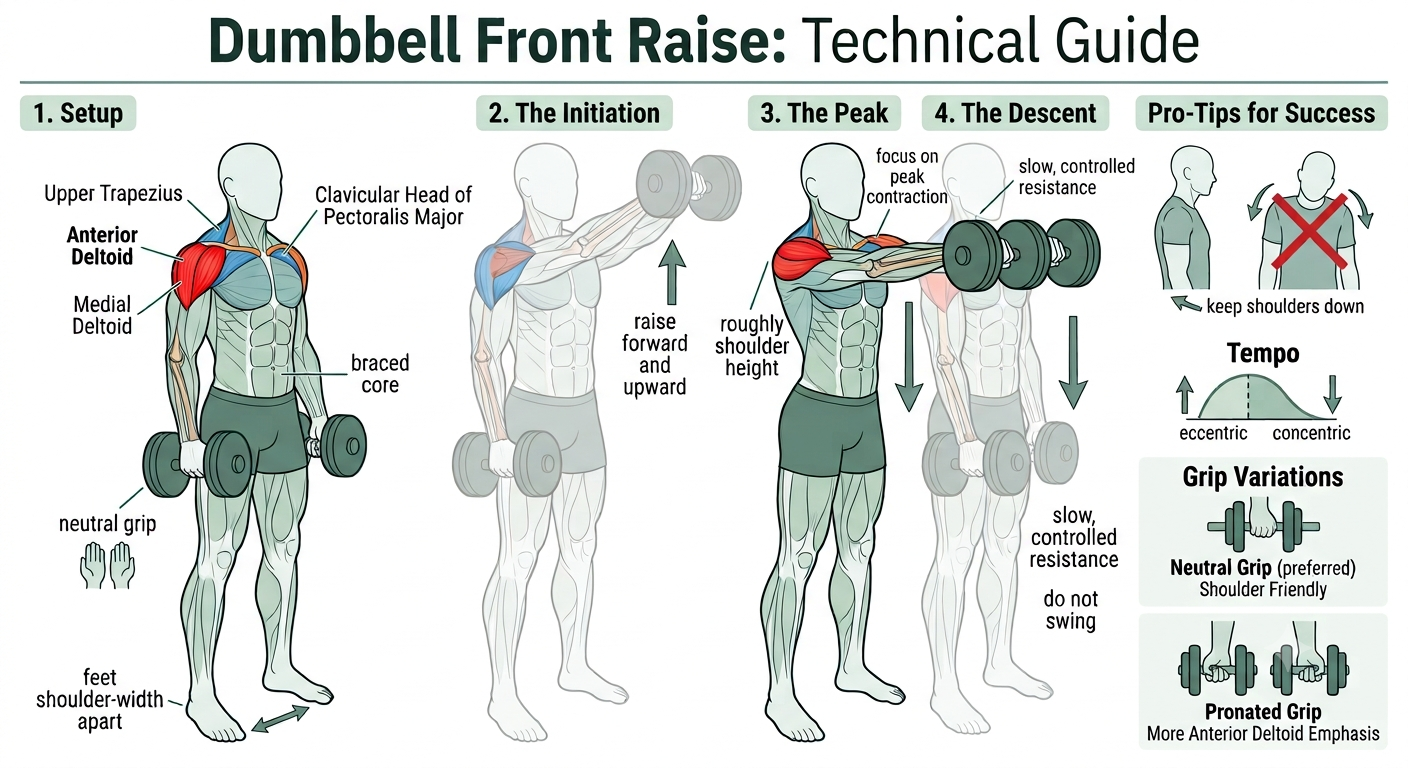
Dumbbell Front Raise: Technical Guide
Targeted Anatomy
Primary: Anterior Deltoid.
Secondary: Medial Deltoid, Upper Trapezius, Pectoralis Major (clavicular head).
Technical Execution
Setup: Stand with feet shoulder-width apart, holding a dumbbell in each hand with a neutral grip (palms facing your thighs). Keep your chest proud and your core braced.
The Initiation: With your arms extended (but not locked), initiate the movement by raising one or both dumbbells forward and upward.
The Peak: Lift the dumbbells until they are roughly at shoulder height. Pause for a brief second to focus on the peak contraction in the anterior deltoid.
The Descent: Lower the weights back to the starting position under slow, controlled resistance. Do not let the weights swing or use your body to generate momentum.
Pro-Tips for Success
Avoid Shrugging: Keep your shoulders depressed (down and away from your ears) throughout the movement to ensure the deltoids, not the traps, handle the load.
Control the Tempo: Focus on a slow lowering phase, as this is where much of the muscle-building stimulus occurs.
Neutral vs. Pronated Grip: A neutral grip (palms facing each other) is often more shoulder-friendly, while a pronated grip (palms facing the floor) may place more direct emphasis on the anterior deltoid. Choose the variation that feels best for your joints.
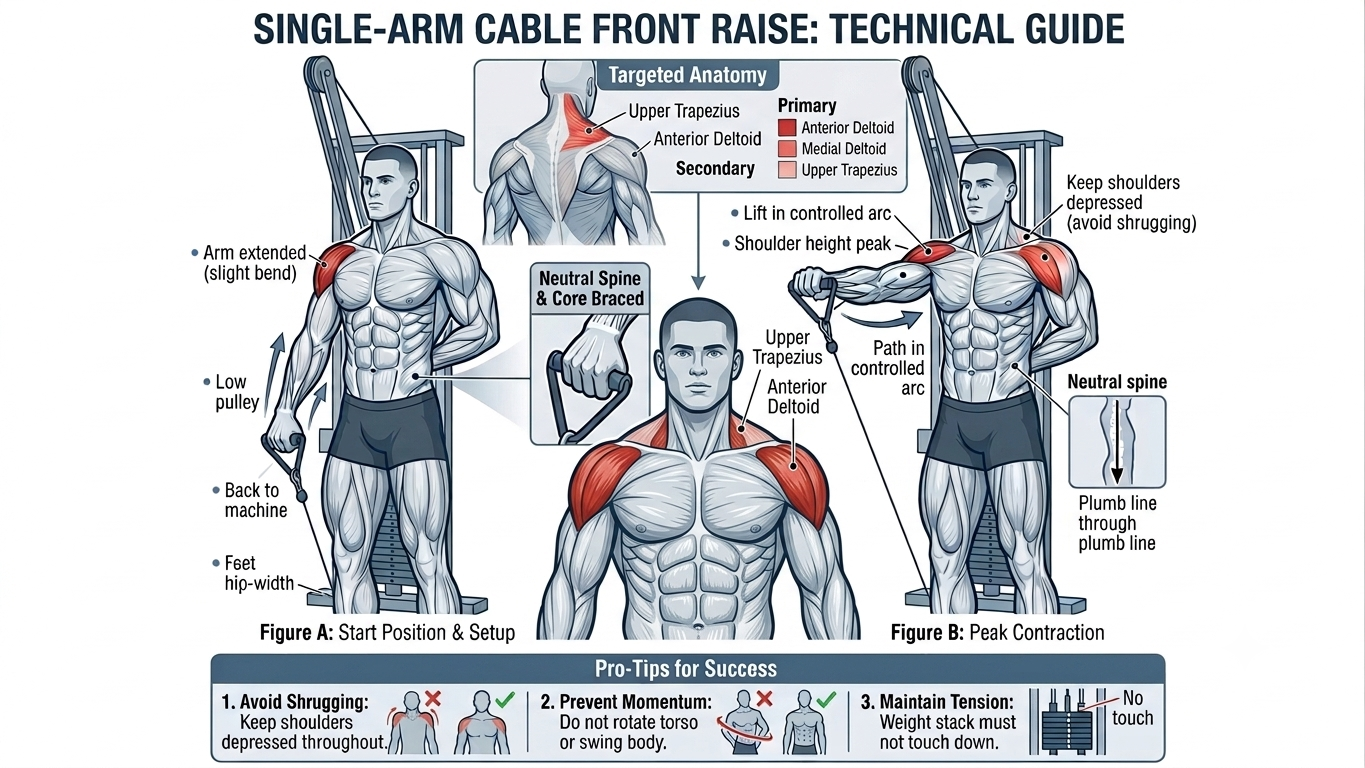
Single-Arm Cable Front Raise: Technical Guide
Targeted Anatomy
Primary: Anterior Deltoid.
Secondary: Medial Deltoid, Upper Trapezius.
Technical Execution
Setup: Attach a single-hand handle to a low pulley cable station. Stand with your back to the cable stack, feet hip-width apart.
The Grip: Reach down and grasp the handle with your working arm, letting your arm start by your side with the cable running just behind you.
The Initiation: Brace your core firmly and maintain a neutral spine. Keep your arm extended with only a slight bend in your elbow.
The Lift: Initiate the movement by lifting your arm forward and upward in a controlled arc.
The Peak: Raise the handle until it reaches shoulder height. Pause for a brief second to focus on the peak contraction in the anterior deltoid.
The Descent: Lower the handle back down to the starting position at your side in a slow, controlled manner, fighting the resistance throughout the entire motion.
Pro-Tips for Success
Avoid Shrugging: Keep your shoulders depressed throughout the movement to prevent the upper trapezius from taking over the exercise.
Prevent Momentum: If you find yourself rotating your torso or swinging your body to get the weight moving, the weight is too heavy; reduce it to maintain strict, isolated form.
Maintain Tension: Because this is a cable exercise, ensure the weight stack does not touch down between repetitions to keep constant tension on the muscle.
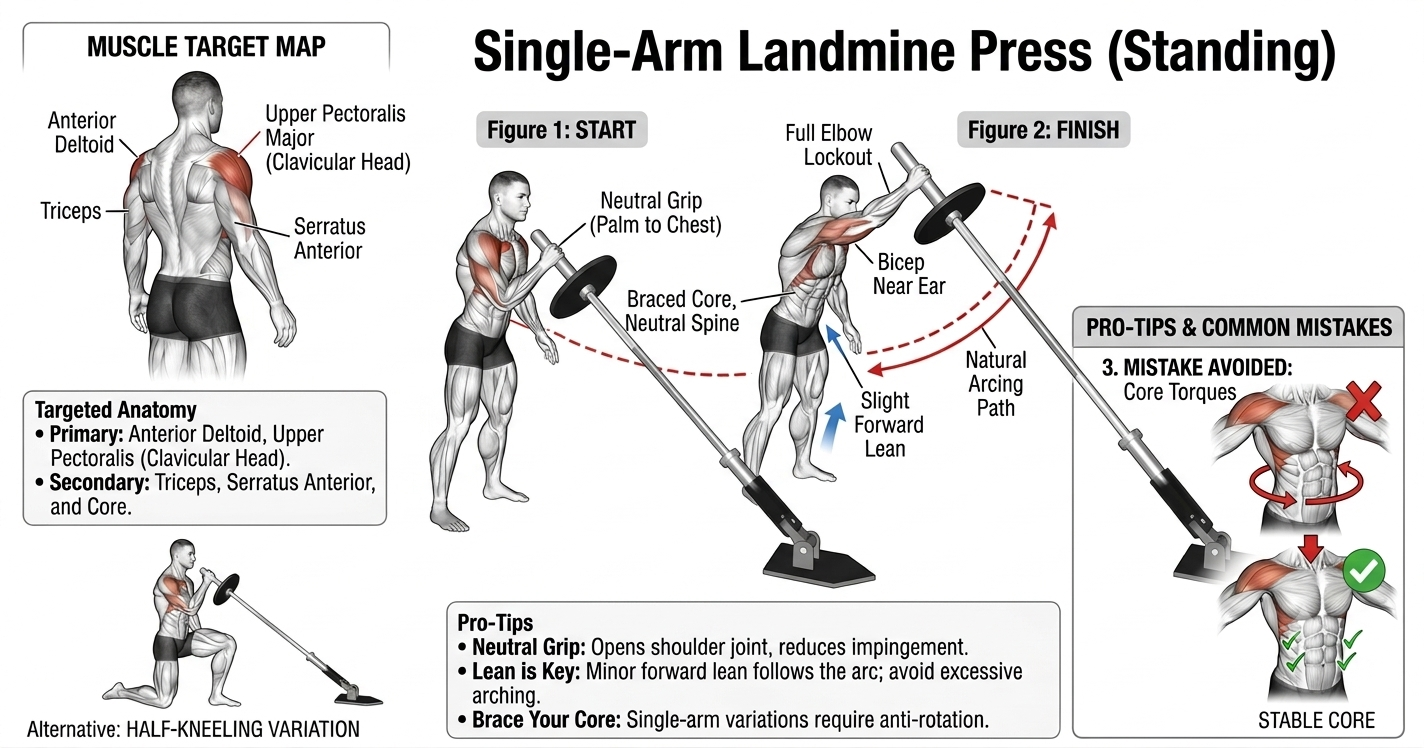
Landmine Press: Technical Guide
Targeted Anatomy
Primary: Anterior Deltoid.
Secondary: Medial Deltoid, Triceps Brachii, Upper Pectoralis Major, Serratus Anterior.
Technical Execution
Setup: Secure one end of a barbell in a landmine attachment or a corner. Load the opposite end with the desired weight. Carefully lift the loaded end and hold it with one hand at shoulder height, standing in a staggered stance (opposite foot forward to the working arm).
The Initiation: Brace your core firmly to maintain a neutral, upright spine. Keep your elbow tucked slightly inward toward your torso.
The Press: Drive the barbell upward and forward in a controlled arc. Focus on extending your arm fully without locking out abruptly.
The Peak: At the top of the movement, slightly protract your shoulder blade (reach forward) to engage the serratus anterior and fully activate the deltoid.
The Descent: Lower the barbell slowly back to the starting position at your shoulder, maintaining tension throughout the descent.
Pro-Tips for Success
Staggered Stance: Utilizing a staggered stance provides a stable base and helps prevent excessive lower back arching, which is a common compensation pattern.
Avoid Over-Rotating: While the landmine press allows for natural movement, avoid twisting your torso to "help" the weight up. Keep your shoulders square to the front.
Controlled Eccentric: Do not let the weight drop quickly. A controlled 2-3 second descent will significantly increase the time under tension for the anterior deltoids.
Dumbbell Shrug: Technical Guide
The Dumbbell Shrug is a highly effective isolation movement for building the size and strength of the upper traps.
Targeted Anatomy
Primary: Upper Trapezius.
Secondary: Levator Scapulae, Middle Trapezius.
Technical Execution
Setup: Stand with your feet shoulder-width apart, holding a heavy dumbbell in each hand with a neutral grip (palms facing your body). Keep your arms fully extended and your chest slightly puffed out.
The Initiation: Brace your core and maintain a neutral spine. Without using your arms to pull, initiate the movement by elevating your shoulders directly toward your ears.
The Peak: At the top of the movement, pause for a second to emphasize the contraction in the upper traps. Ensure you are not rolling your shoulders forward or backward.
The Descent: Lower the dumbbells under control to the starting position, allowing the weight to fully stretch the traps before starting the next repetition.
Pro-Tips for Success
Avoid Rolling: Do not roll your shoulders in a circular motion, as this can increase the risk of shoulder joint irritation and does not improve trap recruitment.
Keep Your Head Neutral: Look straight ahead rather than up or down to keep your neck in a safe, neutral position.
Focus on the Squeeze: The traps respond well to a hard, intentional squeeze at the top of the movement.
Mastering Your Physique: A Commitment to Technical Excellence
Building a powerful, balanced physique is a journey of precision, requiring not just hard work, but a deep understanding of the biomechanics behind every movement. By integrating these technical insights—from the heavy compound lifts that build foundational mass to the strategic isolation work that sculpts specific muscle heads—you are well on your way to maximizing your physical potential.
This tricep guide is the perfect complement to your existing technical repertoire. Be sure to revisit the detailed protocols in your Back Exercises Guide, Leg Exercises Guide, Chest Exercises Guide, Bicep Exercise Guide and Tricep Exercises Guide to ensure every training session is optimized for performance and growth. Consistent application of these techniques is the ultimate key to injury-free, sustainable progress.
Take the Next Step with Expert Coaching
Ready to turn this theory into tangible results? Whether you prefer hands-on training or a structured digital approach, I have the tools to help you succeed:
Book your two-session free trial in Port Melbourne: Experience personalized, one-on-one coaching with Nick Hall Body Transformations, where we tailor every set and rep to your unique physiology and goals.
Join my Online Training Program: Get elite-level guidance, customized programming, and technical support delivered directly to you, no matter where you are in the world.
Let’s refine your training, sharpen your technique, and build the strongest version of yourself.