
Master Your Bicep Development: The Complete Guide to Upper-Arm Strength
Building aesthetic, functional, and powerful arms is a core component of any complete physique, serving as the essential finishing touch for upper-body performance and balanced muscle development. This comprehensive guide breaks down the technical execution of the most effective bicep movements, ranging from heavy supinated curls that build overall thickness to precision isolation exercises that target the peak and the brachialis. By mastering the precise biomechanics of each curl, you can maximize fiber recruitment, enhance your mind-muscle connection, and ensure consistent, injury-free growth.
Ready to start with a Personal Trainer in Port Melbourne? Book an introductory two-session free trial with Nick Hall Body Transformations today to start your personalized training program tailored to your goals.
Barbell Curls: The Foundation of Bicep Development
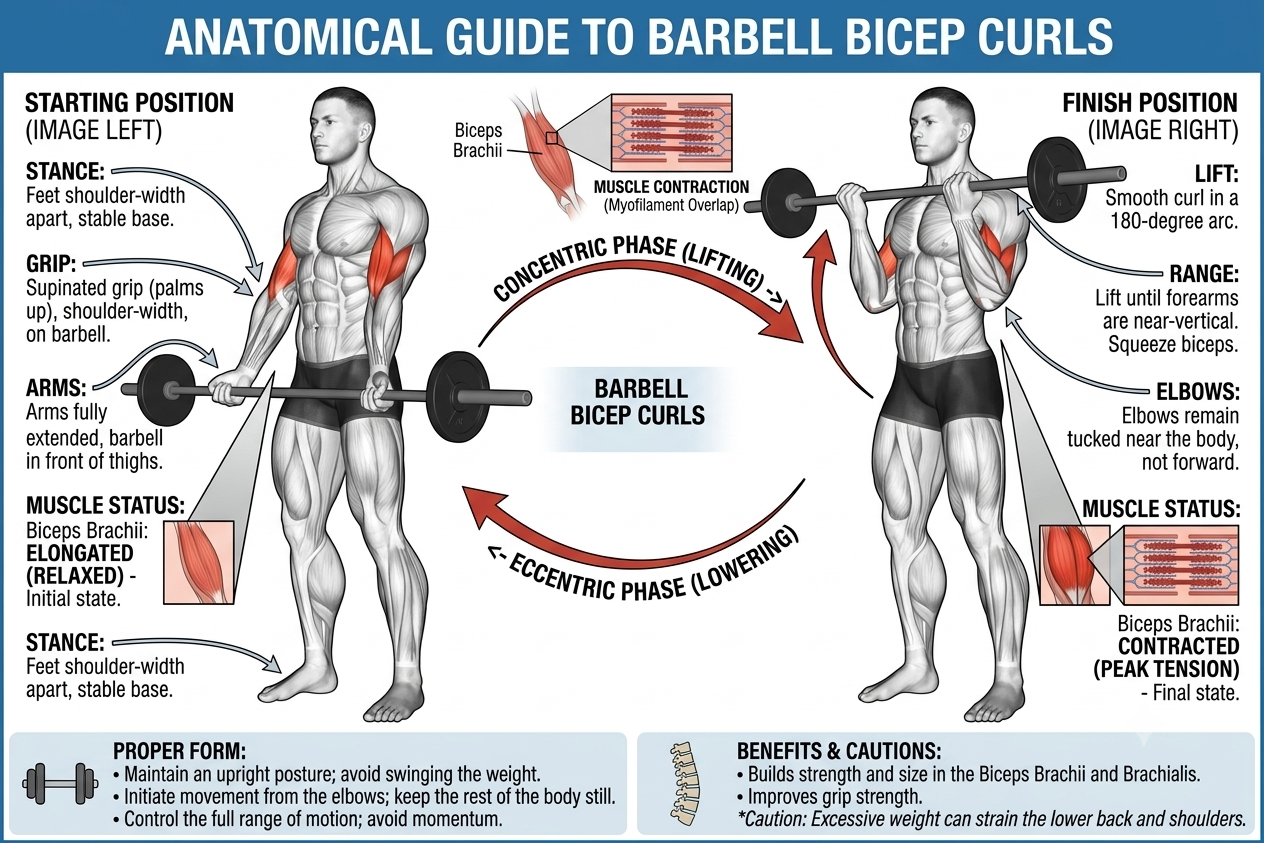
The Barbell Curl is the premier movement for overloading the bicep brachii. Because it allows for the use of both arms simultaneously with a fixed bar, it provides the highest stability, enabling you to move significant loads safely.
Technical Execution
Stance: Stand with your feet shoulder-width apart, knees slightly bent to provide a stable base. Keep your core tight and your spine neutral.
The Grip: Grasp the barbell with an underhand (supinated) grip, hands spaced just outside your hips.
The Setup: With arms fully extended, retract your scapulae (pull your shoulder blades back and down). Keep your elbows pinned against your torso; they should act as a hinge throughout the movement.
The Ascent: Initiate the movement by flexing your elbows, curling the bar toward your shoulders. Focus on moving only your forearms. Crucial: Do not allow your elbows to drift forward as you lift; keeping them locked at your sides forces the biceps to do the work rather than the front deltoids.
The Peak: At the top of the movement, squeeze the biceps hard for a split second. Avoid letting the bar rest on your chest, as this removes tension from the muscle.
The Descent: Lower the bar in a controlled, rhythmic motion until your arms are fully extended. Avoid "dropping" the weight, as the eccentric (lowering) phase is critical for hypertrophy.
Pro Tip: If you find yourself swinging your back to get the weight up, you are likely using too much weight. Reduce the load to ensure you can perform the full range of motion without momentum.
Key Biomechanical Focus
Shoulder Stability: By keeping the humerus (upper arm) vertical and stationary, you isolate the bicep. If your elbows move forward or backward during the lift, you shift the mechanical advantage away from the target muscle.
Full Range of Motion: Ensure you reach full elbow extension at the bottom to maximize the stretch-mediated hypertrophy of the bicep.
EZ-Bar Curls: Comfort and Peak Activation
The EZ-Bar Curl is a staple for many lifters because the angled "cambered" bar allows for a more natural wrist position compared to a straight bar. By reducing wrist pronation, the EZ-bar places less strain on the joints while still allowing you to handle heavy loads, making it an ideal tool for sustained bicep growth.
Technical Execution
Stance: Adopt a stable, shoulder-width stance with your feet firmly planted. Engage your core to ensure your torso remains upright throughout the entire set.
The Grip: Grasp the EZ-bar at the angled "semi-supinated" sections. This angle naturally shifts your wrists into a more comfortable position than a standard straight barbell, reducing stress on the forearms and elbows.
The Setup: With arms fully extended, pull your shoulders back and down. Keep your elbows tucked firmly into your sides; they should serve as a stationary pivot point for the movement.
The Ascent: Curl the bar upward in a smooth arc. Focus on bringing your hands toward your shoulders while maintaining the tension on your biceps. Your upper arms should remain perpendicular to the floor.
The Peak: At the top of the contraction, squeeze your biceps. Avoid bringing the bar so high that your elbows drift forward or the bar rests against your chest—keeping the elbows back ensures the tension stays entirely on the biceps.
The Descent: Lower the bar under control. The eccentric phase should take roughly 2 seconds, maintaining constant tension until your arms reach full extension.
Pro Tip: Because of the angled grip, the EZ-bar can sometimes be held with a slightly wider or narrower grip than a straight bar. Use the grip width that feels most comfortable for your wrists and allows you to feel the most significant contraction in the belly of the muscle.
Why Choose the EZ-Bar?
Joint Longevity: If you have experienced wrist or forearm discomfort with straight barbell curls, the EZ-bar’s geometry effectively mitigates these issues.
Biomechanical Advantage: The slight reduction in full supination (palm-up position) compared to a straight bar may slightly shift the focus, but it remains one of the most effective ways to overload the bicep brachii for pure hypertrophy.

Cable Bicep Curls (Straight or EZ-Bar): Constant Tension Mastery
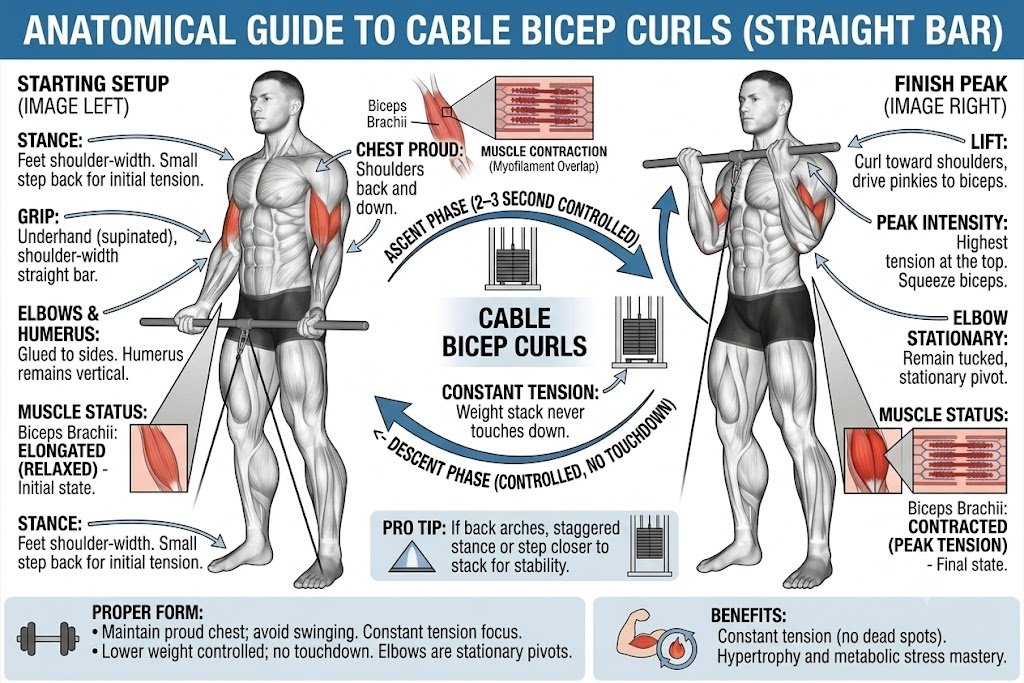
While free weights like barbells and dumbbells provide excellent mechanical tension, the Cable Bicep Curl offers a unique advantage: constant tension. Because the cable exerts force throughout the entire range of motion, there is no "dead spot" at the top or bottom of the movement, making it an ideal tool for metabolic stress and hypertrophy.
Technical Execution
Setup: Attach either a straight bar or an EZ-bar to the low pulley of a cable station.
Note: The straight bar emphasizes a traditional supinated grip, while the EZ-bar attachment offers the same wrist-friendly benefits as the free-weight version, allowing you to maintain a semi-supinated position that reduces joint stress.
Stance: Stand facing the machine with your feet shoulder-width apart. Take a small step back from the pulley to ensure the cable remains taut even when your arms are fully extended.
The Grip: Grasp your chosen attachment with an underhand (supinated) grip, hands shoulder-width apart.
The Setup: Roll your shoulders back and down. Keep your elbows glued to your sides. A common mistake is allowing the shoulders to roll forward as you fatigue—fight this by keeping your chest proud.
The Ascent: Flex your elbows to bring the bar toward your shoulders. Think about driving your pinky fingers toward your biceps rather than just pulling the bar up. Keep your humerus (upper arm) perfectly vertical.
The Peak: At the top, squeeze the biceps intensely. Because of the cable's nature, the tension is actually highest here, so ensure you do not use momentum to "throw" the bar up.
The Descent: Lower the bar slowly, taking 2–3 seconds. Control the resistance all the way down until your arms are fully extended. Do not let the weight stack touch down between repetitions, as this will break the tension.
Pro Tip: If you feel your lower back arching, take a half-step closer to the cable stack or try a staggered stance (one foot forward, one foot back) to increase your base of stability.
Why Use the Cable for Curls?
Time Under Tension (TUT): By eliminating the points of rest common in free-weight exercises, you force the bicep to work harder for the duration of the set.
Variable Resistance: The cable allows you to maintain peak contraction at the top of the movement, where the muscle is fully shortened, leading to a much stronger "pump."
Attachment Versatility: Using the EZ-bar attachment allows for a more ergonomic grip if you find standard straight bars cause wrist or forearm discomfort, while still retaining the benefits of the cable machine's constant load.
Dumbbell Curls: The Ultimate Tool for Symmetry and Rotation
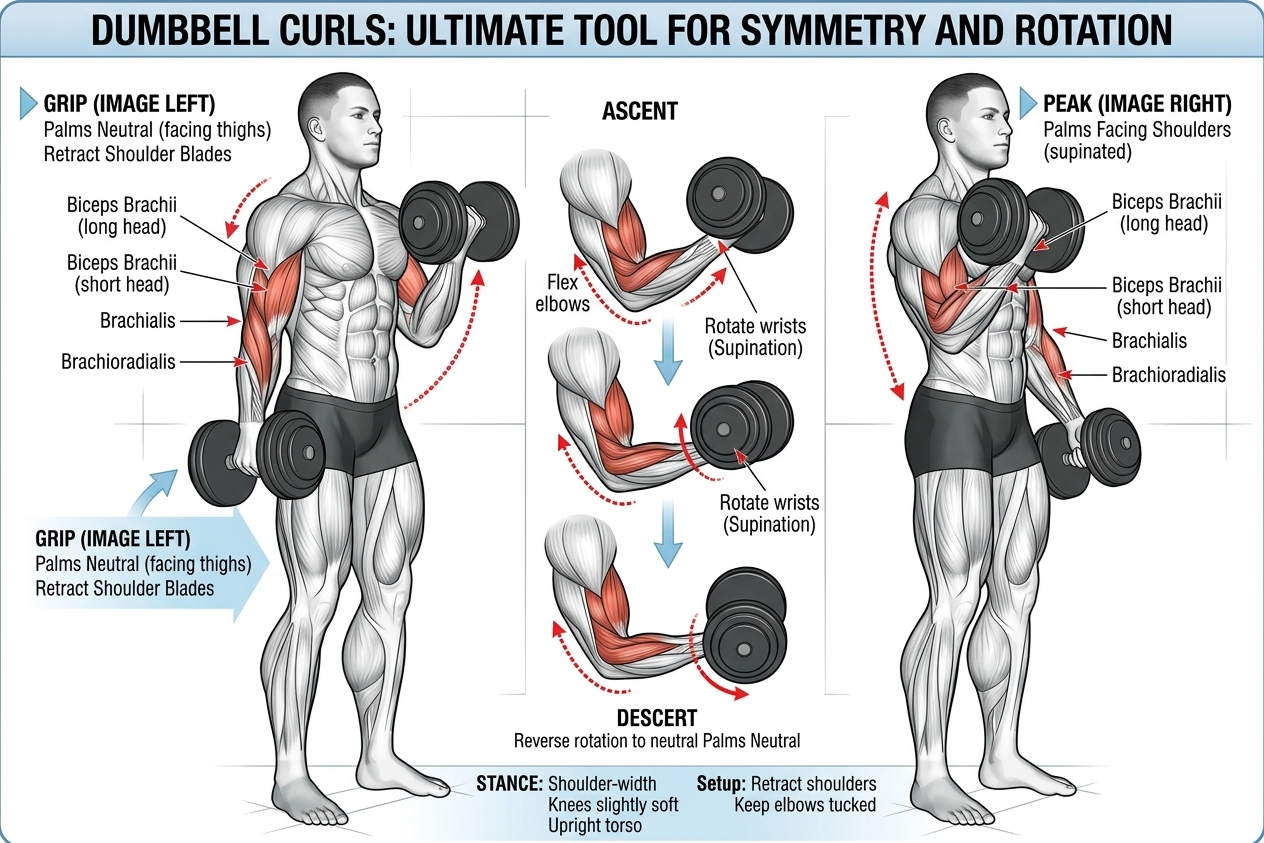
The Dumbbell Curl is a fundamental movement that offers a distinct advantage over fixed-bar exercises: the ability to move each arm independently and, more importantly, to incorporate forearm supination throughout the movement. This rotation allows you to follow the natural biomechanical path of the bicep, leading to potentially greater activation of the muscle fibers.
Technical Execution
Stance: Stand with feet shoulder-width apart, knees slightly soft. Keep your torso upright—avoid leaning back to "cheat" the weight up.
The Grip: Hold a dumbbell in each hand with your arms hanging by your sides, palms facing your thighs (neutral position).
The Setup: Retract your shoulder blades to create a stable foundation. Keep your elbows tucked near your ribs.
The Ascent: Initiate the curl by flexing your elbows. Crucial: Begin with your palms facing your thighs, and as you curl the weight upward, actively rotate your wrists so that your palms face upward (supination) by the time the dumbbells reach chest height.
The Peak: At the top of the movement, your palms should be facing your shoulders. Squeeze the biceps hard. Ensure your elbows have not migrated forward; they should remain locked in place at your sides.
The Descent: Lower the dumbbells with control, reversing the rotation so your palms return to the neutral position (facing your thighs) at the bottom.
Pro Tip: Focus on the "pinky-up" cue at the top of the movement. By consciously rotating your pinky finger toward your shoulder, you ensure maximum supination, which is the primary function of the bicep brachii.
Why Choose Dumbbells?
Correcting Imbalances: Because each arm works independently, your dominant side cannot compensate for the weaker side.
Enhanced Range of Motion: The rotation allows for a more natural path of motion, which often results in less wrist and elbow strain compared to a fixed straight bar.
Supination Focus: The deliberate rotation of the wrist is what truly maximizes the contraction of the bicep brachii, as the bicep's job is not only to flex the elbow but also to supinate the forearm.
Dumbbell Hammer Curls: Brachialis and Forearm Thickness
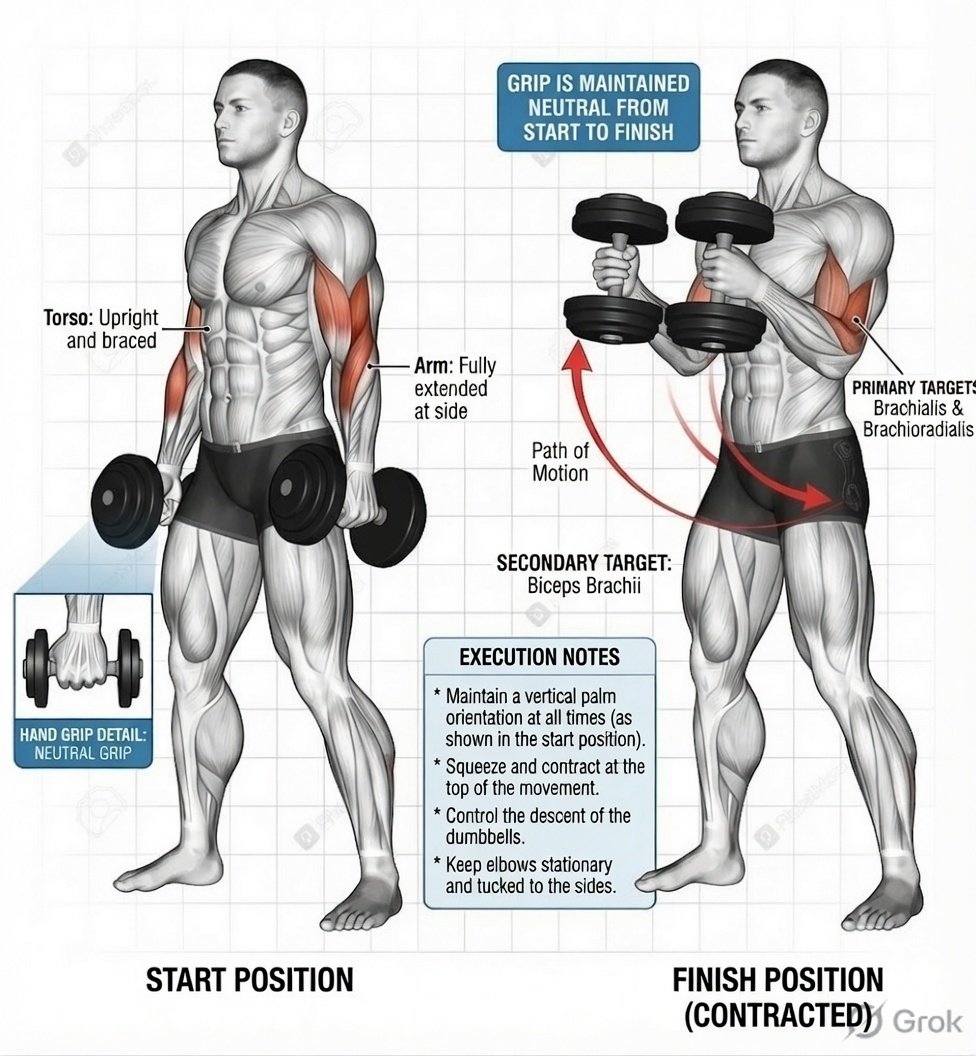
The Dumbbell Hammer Curl is the essential movement for developing the "thickness" of the upper arm. By maintaining a neutral grip (palms facing each other) throughout the entire range of motion, you shift the primary mechanical load away from the bicep brachii and onto the brachialis and brachioradialis. Developing these muscles is what creates the appearance of a wider arm when viewed from the front.
Technical Execution
Stance: Stand with your feet hip-width apart and your core braced. Maintaining a tall, neutral spine is vital to prevent lower-back strain.
The Grip: Hold a pair of dumbbells with your palms facing your body (neutral grip). Maintain this "thumbs-up" or "hammer" position for the duration of the entire set—do not rotate the wrists.
The Setup: Keep your shoulders pulled back and your elbows tucked tight to your torso. Think of your arms as two pistons moving in a fixed vertical plane.
The Ascent: Flex your elbows to lift the dumbbells toward your shoulders. Keep your elbows stationary; they should act as the hinge point. Ensure your palms remain facing each other throughout the lift.
The Peak: At the top of the movement, the dumbbells should be near your shoulders. Squeeze the forearm and upper arm muscles at the top of the contraction for a brief pause.
The Descent: Lower the weights under control, keeping the same tempo as the ascent. Do not allow your shoulders to roll forward as the weight descends.
Pro Tip: Imagine you are holding a hammer in each hand. The focus should be on driving the weight upward toward the front of your shoulder without letting your palm rotate toward the ceiling. If you find your wrists turning, the weight is likely too heavy, and you are subconsciously trying to recruit the bicep brachii to help.
Why Incorporate Hammer Curls?
Brachialis Isolation: The brachialis lies deep underneath the bicep. As it grows, it effectively "pushes" the bicep up, increasing the overall peak and mass of the arm.
Forearm Development: Because the brachioradialis (a large muscle in the forearm) is heavily involved in neutral-grip movements, this exercise is one of the most effective ways to improve grip strength and forearm size.
Joint Friendly: This position is generally very comfortable for the wrists and elbows, making it an excellent alternative if supinated curls cause any joint discomfort.
Seated Incline Dumbbell Curls: Targeting the Long Head
The Seated Incline Dumbbell Curl is a powerful isolation movement that places the bicep in a position of extreme stretch. By setting the bench to an incline, you position your arms behind your torso (shoulder extension), which places the long head of the bicep under significant mechanical tension. This is one of the most effective ways to promote hypertrophy through a deep stretch.
Technical Execution
The Setup: Set an adjustable bench to an incline of approximately 45 to 60 degrees. Sit back so your head, shoulders, and hips are firmly supported by the backrest.
The Starting Position: With a dumbbell in each hand, let your arms hang straight down toward the floor. Your arms should be fully extended behind your torso. This "pre-stretch" is the primary goal of this exercise.
The Grip: You can perform these with a neutral grip and rotate to supination (palms up) as you curl, or keep your palms facing forward throughout the movement. Keeping them supinated throughout emphasizes the long head even further.
The Ascent: Without moving your elbows from their position behind your torso, flex your elbows to curl the dumbbells toward your shoulders. Ensure your elbows remain pinned against the bench—they should not swing forward to assist the movement.
The Peak: Curl until your forearms are close to your biceps. Focus on a tight, purposeful squeeze at the top.
The Descent: Lower the dumbbells slowly, resisting the urge to let them drop. Focus on the stretch at the bottom of the movement; this eccentric phase is where the most growth stimulus occurs for the long head.
Pro Tip: Because your arms are in a vulnerable stretched position, it is safer to use lighter weights with perfect form than to go heavy. If you feel any sharp pain in the front of your shoulder, increase the incline slightly to reduce the angle of stretch until you are comfortable.

Incline Dumbbell Curls (Face Down / "Spider" Curls): Ultimate Isolation
Often referred to as Spider Curls, this exercise is one of the most effective ways to eliminate cheating. By lying face down on an incline bench, you lock your torso in place and prevent any use of lower-back momentum, effectively placing the humerus in front of your body. This positioning shifts the primary focus to the short head of the bicep and forces strict isolation.
Technical Execution
The Setup: Set an adjustable bench to an incline of approximately 45 to 60 degrees. Lean forward and rest your chest and torso firmly against the bench. Ensure your chin is clearing the top of the bench so you can breathe comfortably.
The Starting Position: Let your arms hang straight down toward the floor, perpendicular to the ground. Your shoulders should be stable, and your arms should be fully extended.
The Grip: Hold a dumbbell in each hand with a supinated (palms forward) grip.
The Ascent: Without moving your upper arms (keep your elbows fixed in space), curl the dumbbells toward your shoulders. Because you are leaning forward, your biceps will be under maximum tension right from the beginning of the movement.
The Peak: Squeeze your biceps at the top of the contraction. Because there is no way to swing your body to assist, the stimulus on the bicep is extremely intense.
The Descent: Lower the dumbbells slowly, maintaining control throughout the entire range of motion. Do not let the weights "dead hang" or swing at the bottom; maintain tension as you return to the full extension position.
Pro Tip: Keep your gaze forward or slightly down toward the floor to keep your neck neutral. Since the bench supports your chest, you have no reason to pull with your back; if the weight feels too heavy, your biceps are likely failing, not your stability.
Why Choose Face-Down Incline Curls?
Total Isolation: By pinning your chest to the bench, you remove the legs, hips, and lower back from the movement entirely. This makes it impossible to "cheat," ensuring that the tension is placed strictly on the bicep muscle.
Short-Head Focus: Having the arm positioned in front of the body (shoulder flexion) naturally favors the short head of the bicep, helping to build that sought-after "thickness" and "peak."
Constant Tension: Unlike standing curls where tension drops off at the bottom, the vertical angle of your arms in this position ensures the bicep is working hard from the very first inch of the lift.
Concentration Curls: The Precision Sculptor
The Concentration Curl is widely considered the premier exercise for isolating the bicep. By bracing your arm against your inner thigh, you remove almost all room for movement in the shoulder or torso. This exercise is not about moving the heaviest weight; it is entirely about the peak contraction and the mind-muscle connection.
Technical Execution
The Setup: Sit on the edge of a flat bench with your feet wider than shoulder-width apart, knees bent at 90 degrees.
The Starting Position: Lean forward slightly. Place the back of your upper arm (tricep area) against the inner part of your thigh. Your arm should be fully extended, with the dumbbell hanging freely.
The Grip: Hold the dumbbell with a supinated (palm-up) grip.
The Ascent: Without lifting your elbow from your thigh, curl the weight toward your shoulder. As you lift, consciously rotate your pinky finger upward to achieve maximum supination.
The Peak: At the top of the movement, hold and squeeze the bicep as hard as possible for a full second. This is the "money" portion of the lift.
The Descent: Lower the weight slowly (3 seconds) back to the starting position. Do not allow your arm to simply drop; control the weight all the way down until your arm is straight.
Pro Tip: Keep your non-working hand on your opposite knee for stability, but avoid using that hand to push your torso up. If you find your elbow slipping off your thigh, you are likely curling too much weight. Focus on a clean, controlled rep rather than a heavy one.
Why Choose Concentration Curls?
Maximum Isolation: Because your humerus is fixed against your leg, it is biomechanically impossible to use your back or shoulders to assist. The bicep is forced to perform 100% of the work.
Peak Contraction: This movement allows you to reach a shortened position that is difficult to replicate with other exercises, which is excellent for building the "height" of the bicep peak.
Mind-Muscle Connection: Because you have to focus on keeping the elbow still and rotating the wrist correctly, this is the perfect exercise to develop the ability to "feel" your biceps working during more complex movements.
Preacher Curls: The Short Head Specialist
The Preacher Curl is a legendary exercise for bicep isolation. By resting your upper arms on a slanted pad, you eliminate the possibility of using your shoulders or back to assist in the lift. This setup forces the bicep to initiate the movement from a position of mechanical disadvantage at the bottom, which is excellent for strengthening the muscle's ability to generate force.
Technical Execution
The Setup: Adjust the seat height so that your armpits are nestled comfortably against the top of the preacher bench. Your arms should be fully extended along the pad.
The Grip: Grasp an EZ-bar or a pair of dumbbells. Using an EZ-bar is standard here, as it places the wrists in a more neutral, comfortable angle than a straight bar.
The Starting Position: Ensure your arms are fully extended. Do not allow your chest to lift off the bench; keep your torso stable throughout.
The Ascent: Flex your elbows to curl the weight toward your shoulders. Think about pulling your elbows into the pad rather than lifting the weight up.
The Peak: Curl until your forearms are near your biceps. Squeeze hard at the top. Note that the tension will decrease slightly at the very top of the movement; focus on maintaining a slow, deliberate tempo to counteract this.
The Descent: Lower the weight slowly. Critical: Do not fully "lock out" your elbows at the bottom if you feel any strain on your tendons. Stopping just a fraction of an inch before full extension keeps the tension strictly on the bicep fibers.
Pro Tip: Many people make the mistake of bringing the bar too far toward their face at the top, which takes the tension off the biceps. Stop the movement when your forearms are perpendicular to the floor—this is where the bicep is under the most direct load.
Why Choose Preacher Curls?
True Isolation: The bench acts as a structural stop, making it nearly impossible to use momentum.
Short Head Emphasis: The forward-leaning position of the humerus targets the short head of the bicep, which is crucial for overall arm thickness.
Stability: Because your arms are supported, you can safely focus on "squeezing" the muscle, which is often easier to feel here than in standing variations.
Cable Bicep Curls (Facing Away): The "Drag" Stretch
Performing cable curls while facing away from the machine—often called "behind-the-back" cable curls—is a highly effective way to place the long head of the bicep in a position of extreme stretch. Because the cable pulls your arms slightly behind your torso, it creates a unique mechanical advantage that targets the muscle's lengthened state, similar to an incline curl but with the constant tension benefit of a cable stack.
Technical Execution
The Setup: Set a pulley to the lowest position. Attach a straight bar or a rope (a rope is often preferred here for a more natural wrist path).
The Starting Position: Stand a few feet in front of the cable stack, facing away from it. Reach back and grab the attachment. Your arms should be pulled slightly behind your torso by the weight, creating a deep stretch in the biceps.
The Stance: Use a staggered stance (one foot forward, one foot back) to provide a stable base, as the cable will naturally try to pull your torso backward. Lean your torso slightly forward to maintain balance.
The Ascent: Keep your elbows pinned in their position—slightly behind your body. Curl your hands toward your shoulders by flexing your elbows.
The Peak: At the top of the movement, squeeze your biceps. Because the cable is pulling from behind you, you will feel a different line of tension compared to traditional standing curls.
The Descent: Lower the weight under complete control. Allow the cable to gently pull your arms back into that stretched position, but do not let your shoulders roll forward.
Pro Tip: Do not let the weight stack touch down at the bottom of the movement. By stopping just before the stack hits, you keep the bicep under continuous tension, which creates a powerful "stretch-mediated" pump.
Why Choose This Variation?
Unique Line of Pull: Standard curls pull from the front; this variation pulls from behind, which shifts the recruitment pattern and provides a fresh stimulus for muscle growth.
Constant Tension: Like all cable exercises, you get no "rest" at the bottom of the rep, which is excellent for metabolic stress.
Hypertrophy: The combination of a deep stretch (lengthened position) and constant tension is a highly potent combination for triggering muscle protein synthesis.
Single-Arm Cable Curls: Precision Isolation
The Single-Arm Cable Curl is an exceptional tool for refining your physique. Because you are working one side at a time, you can focus entirely on the mind-muscle connection, ensure equal work distribution, and adjust your body angle to perfectly align with your specific biomechanics.
Technical Execution
The Setup: Set a pulley to the lowest position and attach a single-grip handle (D-handle).
The Starting Position: Stand to the side of the cable stack. Grasp the handle with your arm fully extended. Take a small step away to ensure there is constant tension on the cable at the bottom of the movement.
The Stance: Use a stable, shoulder-width stance. You can place your non-working hand on your hip or the cable machine for extra stability. Keep your shoulders square to the front.
The Ascent: Flex your elbow to curl the handle toward your shoulder. Focus on driving your palm toward your bicep. As you curl, ensure your elbow stays pinned to your side—do not let it drift forward or rotate outward.
The Peak: At the top of the contraction, rotate your wrist slightly so your pinky is pointed inward toward your shoulder. Squeeze the bicep hard.
The Descent: Lower the handle slowly and with control, taking 2–3 seconds to return to the starting position. Maintain tension throughout the entire descent; do not let the weight stack touch down.
Pro Tip: If you want to increase the peak contraction even further, try stepping slightly away from the machine and curling across your body toward the opposite shoulder. This slight change in the angle of pull can target the bicep from a different, challenging direction.
Why Choose Single-Arm Cable Curls?
Correction of Imbalances: It is common for one bicep to be slightly stronger or more developed than the other. Single-arm work forces your weaker side to work just as hard as your dominant side, preventing muscle size and strength discrepancies.
Increased Range of Motion: Without a bar connecting your two hands, you are free to follow your own natural arc of motion, which can lead to a deeper contraction at the top.
Focus & Intensity: With only one limb to monitor, you can direct 100% of your mental energy into the bicep you are training, which is ideal for the final, high-intensity sets of a workout.
Cable Hammer Curls (Rope): Brachialis Finishing Move
The Cable Hammer Curl (Rope) is the definitive exercise for combining the muscle-building benefits of the cable machine with the brachialis-targeting properties of a neutral grip. By using a rope attachment, you can maintain a "thumbs-up" position throughout the movement, which is not only more comfortable for most wrists but also places the load directly on the deep muscles of the upper arm and forearm.
Technical Execution
The Setup: Attach a double-rope handle to the low pulley of a cable station.
The Starting Position: Stand facing the cable stack, feet hip-width apart. Grasp the ends of the rope with a neutral grip (palms facing each other). Take a small step back so the weight stack is lifted slightly, ensuring the cable is tight from the start.
The Stance: Keep your core braced and your spine neutral. Keep your elbows tucked firmly into your sides.
The Ascent: Flex your elbows to pull the rope ends toward your shoulders. Unlike a standard supinated curl, you are not rotating your wrists; keep your palms facing each other the entire time. Think about driving your thumbs toward your shoulders.
The Peak: At the top, pull the rope ends slightly apart as you squeeze. This "fanning" motion at the peak can increase the intensity of the contraction in the brachioradialis and brachialis.
The Descent: Lower the rope slowly, resisting the cable's pull. Stop just before the weight stack touches down to maintain constant tension.
Pro Tip: Keep your elbows completely stationary. A common mistake is to pull the rope ends toward your chest by moving your elbows backward; instead, imagine your elbows are bolted to your ribcage. If you feel the need to move your elbows, you are likely compensating with your lats or shoulders.
Why Use the Cable Rope?
Constant Tension: Unlike dumbbell hammer curls, where tension drops at the bottom, the cable keeps the brachialis working through the entire range of motion.
Ergonomics: The rope allows for a degree of movement that a fixed bar does not, allowing you to find the exact wrist angle that puts the least stress on your joints while maximizing forearm engagement.
Hypertrophy focus: This movement is excellent for high-rep sets (12–20 reps) at the end of a workout to maximize the "pump" in the brachialis, which, when fully developed, physically pushes the bicep brachii upward.